background image

e X a c t   A u t o - S c a n   S y s t e m  

4


Overview and Setup 

The eXact Auto-Scan system provides fast, press-side color control. The instrument can also be detached 

from the scanning trolley to allow you to take spot check measurements. 


About this manual 

This manual covers the installation, basic operation and maintenance of the system. Specific instructions 

for using the instrument with your software application can be found in the software online help. 

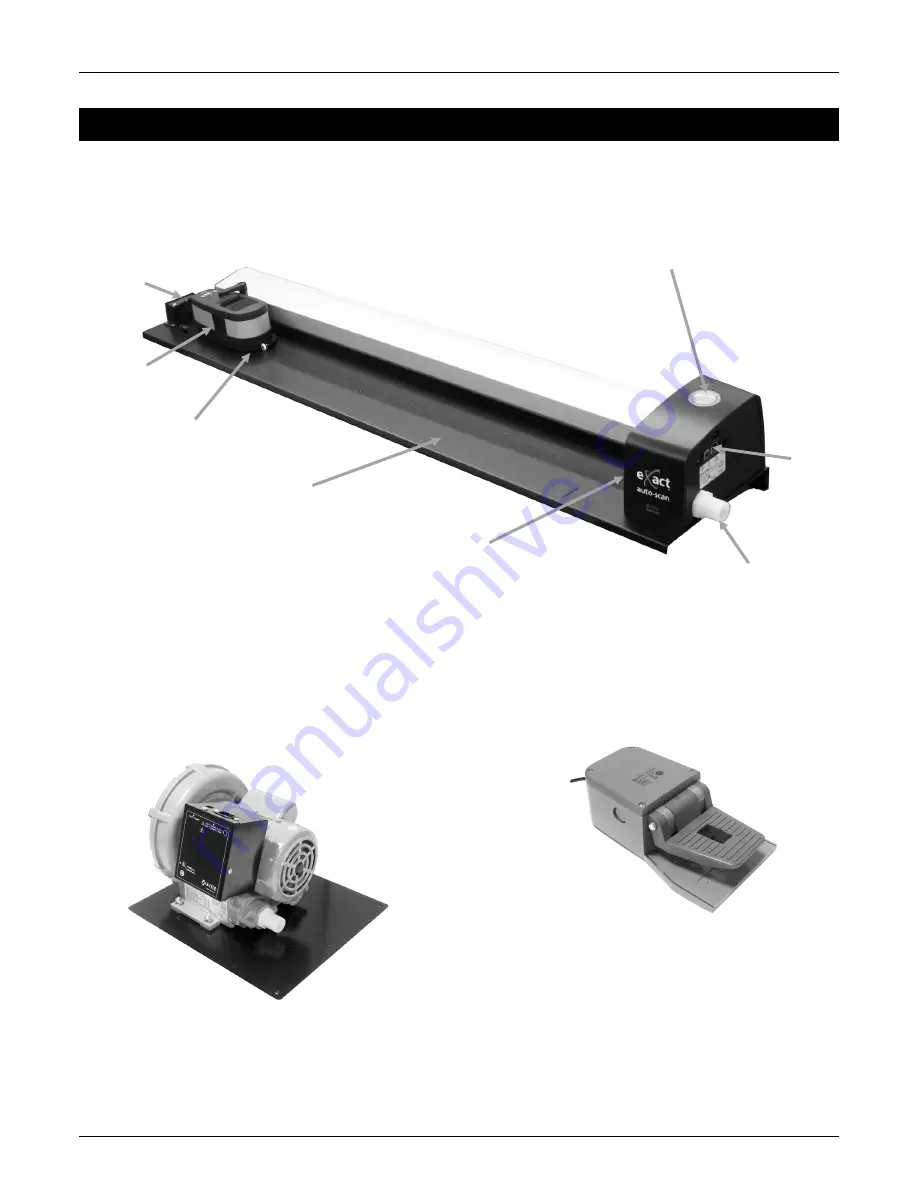
Operation button and Instrument Indicator 

(surrounds operation button) 

eXact instrument 

(not included) 

USB, vacuum 

pump and AC 

adapter 

connection 

locations 

Scanning track with 

vacuum holes 

Vacuum connector 

Laser location 

eXact charging 

station  

Vacuum Pump (optional) 

A series of small holes located in the surface of the 

track hold down the press sheet when the optional 

vacuum pump is connected. 

Scanning trolley 

Foot Switch (optional) 

The optional foot switch provides “hands-free” 

measurement activation. 

Summary of Contents for PANTONE exact Auto-Scan

Page 1: ...Auto Scan Setup and Operation ...

Page 2: ......

Page 3: ...ser will be required to correct the interference at his own expense Industry Canada Compliance Statement CAN ICES 3 A NMB 3 A Equipment Information Use of this equipment in a manner other than that specified by X Rite Incorporated may compromise design integrity and become unsafe WARNING This instrument is not for use in explosive environments ADVERTENCIA NO use este aparato en los ambientes explo...

Page 4: ...es in X Rite s accompanying documentation or published specifications iii repair or service by anyone other than X Rite or its authorized representatives iv the failure of the warranted goods caused by use of any parts or consumables not manufactured distributed or approved by X Rite v any attachments or modifications to the warranted goods that are not manufactured distributed or approved by X Ri...

Page 5: ...ns 5 Connecting the Vacuum Pump Only optional 6 Connecting the Foot Switch and Vacuum Pump optional 7 Installing the eXact InkKeyControl 2 Software Optional 8 System Requirements 8 Installing the Software 8 eXact Auto Scan Indicator 8 Setting Up the eXact Instrument 9 Operating the System 12 Sheet Loading and Alignment 12 Measuring a Color Bar 13 Performing a Spot Color Measurement 14 Calibration ...

Page 6: ...rument with your software application can be found in the software online help Operation button and Instrument Indicator surrounds operation button eXact instrument not included USB vacuum pump and AC adapter connection locations Scanning track with vacuum holes Vacuum connector Laser location eXact charging station Vacuum Pump optional A series of small holes located in the surface of the track h...

Page 7: ...stem Connections Note Please allow the system to stabilize at room temperature before plugging the power supply into an AC wall receptacle Operational hazard exists if a power supply other than X Rite SE30 277 is used 1 Plug one end of the USB cable into the port on your computer 2 Plug the other end of the cable into the USB port 1 on the right side of the system 3 Plug the input connector from t...

Page 8: ...tion switch 4 on the top of the control box 3 is set to the proper line voltage for your region 4 Connect the detachable line cord 5 to the control box 3 and then plug the line cord into an easily accessible grounded AC wall receptacle Note Only use appropriately approved AC Line Cord that X Rite provides Any other AC Line cord can compromise the integrity of regulatory agencies approvals for this...

Page 9: ... Auto Scan and control box 4 Make sure the voltage selection switch 6 on the top of the control box 4 is set to the proper line voltage for your region 5 Connect the detachable line cord 7 to the control box 5 and then plug the line cord into an easily accessible grounded AC wall receptacle Note Only use appropriately approved AC Line Cord that X Rite provides Any other AC Line cord can compromise...

Page 10: ...e 1 Insert the eXact InkKeyControl 2 software flash drive into the USB port If eXact InkKeyControl 2 setup screen does not open automatically open Windows Explorer and browse to the USB drive letter Double click the Setup exe file 2 The setup program guides you though the rest of the installation process Follow the instructions on each setup screen to complete the installation 3 Refer to the eXact...

Page 11: ...l outward NOTE If the Bluetooth function is not used route the USB for the eXact instrument in the channel at the top of charging adapter This will help prevent the cable from interfering with the charging station and track during operation This USB cable is separate from the eXact Auto Scan system USB cable that was previously installed Plug the square end of the USB cable into the back of the in...

Page 12: ...rument over the scanning trolley 4 and lower into place 7 Secure the eXact to the scanning trolley by rotating the locking arm 6 counterclockwise until it stops This holds the instrument in place during scanning 8 Slide the instrument and scanning trolley against the charging station 5 Scanning trolley 4 Locking arm 6 Charging station 5 ...

Page 13: ...e X a c t A u t o S c a n S y s t e m 11 Charging station 5 ...

Page 14: ... trolley If the laser is not centered you will need to align the laser before scanning Refer to the Laser Alignment Procedure in the Appendix 2 Place the edge of the press sheet at the white line 1 in front of the scanning trolley 3 Manually align the color bar so that the laser line 2 runs down the center of the color bar to be measured NOTE After 30 seconds the laser line will turn off if a meas...

Page 15: ...is properly aligned as previously explained 2 Open a job from the software application 3 Select the Measure option in the software or press the Operation button on the eXact Auto Scan system to start the measurement You can also press the optional Foot switch to start a measurement IMPORTANT The first press of the Operation button or Foot switch will turn on the laser If the laser is already on th...

Page 16: ...be the procedures required to perform a spot measurement with the eXact instrument 1 Remove the eXact instrument from the scanning trolley 2 Flip the target window 180 on the bottom of the eXact target base back to the spot measurement position 3 Position the target window over the sample to measure The opening should be completely filled with the sample color 4 Press the instrument firmly to the ...

Page 17: ...affected by smudge marks and dust and must be kept clean It is recommended that the instrument is cleaned regularly Refer to the cleaning procedure in the Appendix 1 When prompted for a calibration remove the eXact instrument from the scanning trolley if required 2 Open the instrument not locked and tap the START button on the eXact screen The instrument will display a countdown screen and then pe...

Page 18: ...1 or by email at gisupport xrite com Additional X Rite office numbers are located on the back cover of this manual You can also visit X Rite s Support page at www xrite com here you can find answers to common help desk questions Scanning instrument indicator not illuminating Ensure that the power supply is plugged in Reset the instrument see eXact Auto Scan Reset Scanning instrument and software n...

Page 19: ...irectly on the end covers or scanning track DO NOT use any solvents or harsh cleaners of any kind The track should be wiped clean with a lint free cloth dampened in glass cleaner weekly or more often if needed When cleaning the track make sure to clean the entire track This includes the portion of the track that resides under the eXact instrument trolley when it is in its docked position You can s...

Page 20: ...his should remove any accumulated debris from the optics 4 Carefully return the calibration holder to its normal position IMPORTANT If can air is used for cleaning do not invert or tilt the can during use This could cause damage to the optics Cleaning the eXact Calibration Plaque The calibration plaque should be cleaned periodically Do not use solvents or cleaners of any kind The calibration tile ...

Page 21: ...to activate the laser line 2 View the location of the laser line at the front of the scanning trolley Laser line not properly aligned Incorrect back alignment Incorrect front alignment 3 If the laser line is to the back of the white dash mark rotate the alignment wheel adjustment upward to center the laser line on the white dash mark If the laser line is to the front of the white dash mark rotate ...

Page 22: ...seconds Short term repeatability Density 0 01 D for CMYK measurements Data Interface Bluetooth Scan System Track Lengths 29 74 cm 40 102 cm Min Patch Size Strip Height 3 0 mm with 1 5 mm aperture 4 0 mm with 2 mm aperture Scan Speed 1 5 mm aperture on 4 mm patches 160 mm 7 sec Data Port USB Ethernet eXact InkKeyControl Software Colors Up to 16 colors Print Standard Support G7 PSO Japan Color ISO 1...

Page 23: ...tput External Control Line provides up to 120mA current sink during measurement sequence 2 Input External Trigger Line turns on laser when pulled to ground if laser is already on a measurement will begin 3 12v Provides 12 VDC up to 500mA not fused 4 GND DC Ground INPUT OUTPUT The CPC1030 has a maximum current of 120mA ...

Page 24: ...eadquarters X Rite Europe GmbH Althardstrasse 70 8105 Regensdorf Switzerland Phone 41 44 842 24 00 Fax 41 44 842 22 22 Asia Pacific Headquarters X Rite Asia Pacific Limited Suite 2801 28th Floor AXA Tower Landmark East 100 How Ming Street Kwun Tong Kowloon Hong Kong Phone 852 2568 6283 Fax 852 2885 8610 Please visit www xrite com for a local office near you P N EASEN 500 Rev B ...

Reviews: