background image

U S E R   I N T E R F A C E  

2-5


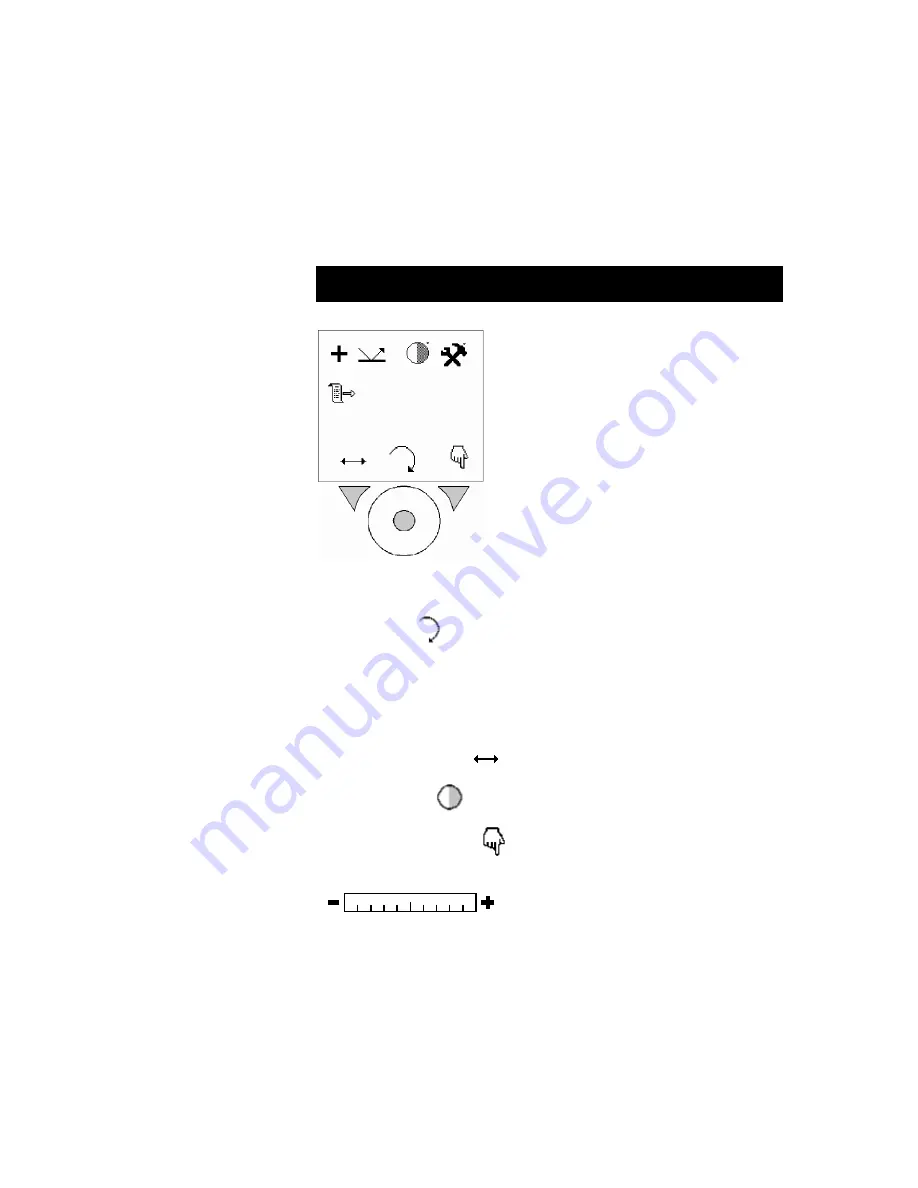
Setting Measurement Options 

All measurement options are located in the Primary screen.


To set options: 

1.


Press the 

Center 

key to turn on the instrument.  

NOTE:

 Hold the Center key down for 2 seconds if a charging 

message is displayed. 

2.


Press the 

Left 

key to advance to the primary screen. 


3.


See the following procedures to edit options. 

4.


After setting options in the primary screen, press the 

Center

 key 

 to return to the measurement screen. 

Adjusting the Screen Contrast 

The contrast of the instrument screen can be adjusted to 
accommodate varying lighting conditions. 

1.


Using the 

Left 

key 

, move the flashing highlight to the 

Contrast

 icon 

2.


Press the 

Right 

key 

 to access the contrast adjustment 

screen. 


3.


Press the 

Left 

key 

 to decrease contrast and the 

Right 

key 

 to increase contrast. The contrast can be adjusted in 10% 

increments. 

Setting the Measurement Type 

The instrument can be set to measure on positive or negative 
(negative film) material. 

Summary of Contents for FlexoDot

Page 1: ...FlexoDot Operator s Manual ...

Page 2: ...ich case the user will be required to correct the interference at his own expense NOTE Shielded interface cables must be used in order to maintain compliance with the desired FCC and European emission requirements Industry Canada Compliance Statement This Class A digital apparatus meets all requirements of the Canadian Interference Causing Equipment Regulations Cet appareil numérique de la classe ...

Page 3: ...l Utiliser seulement le bloc de batteries SE15 34 de X Rite il y a danger d explosion et de blessures avec les autres types AVVERTENZA Non usare un altro caricabatterie che non è del pezzo X Rite SE30 102 100 240V per il rischio di malfunzionamento dell apparecchio Usare solamente gli accumulatori SE15 34 di X Rite è possibile che altri tipi possano scoppiare e causare danno personale WARNING This...

Page 4: ... are the properties of their respective holders Warranty Information X Rite Incorporated warrants each instrument manufactured to be free of defects in material and workmanship excluding battery pack for a period of twelve months If the fault has been caused by misuse or abnormal conditions of operation repairs will be billed at a nominal cost In this case an estimate will be submitted before work...

Page 5: ...ey 2 1 Center key 2 1 Instrument Screens 2 1 Key Icons 2 2 Primary Screen Icons 2 2 Secondary Screen Icons 2 3 Typical Measurement Screen 2 4 Measurement Options 2 4 Setting Measurement Options 2 5 Adjusting the Screen Contrast 2 5 Setting the Measurement Type 2 5 Setting Substrate Type 2 6 Section 3 Editing Instrument Utilities 3 1 Fast Charge Mode 3 2 Screen Ruling Units 3 2 Screen Saver Timeout...

Page 6: ...4 10 Download Stored Dot Samples 4 12 Erasing Stored Dot Measurements 4 12 Section 5 Service and General Maintenance 5 1 Repair Information 5 1 Cleaning the Instrument 5 1 General Cleaning 5 1 Cleaning the Target Glass 5 1 Replacing the Battery Pack 5 2 Troubleshooting 5 3 Accessory Items 5 4 Instrument Upgrades 5 5 Instrument Specifications 5 6 ...

Page 7: ...X R I T E D O T vi ...

Page 8: ...tact the transportation company Do not proceed with operation until the carrier s agent has inspected the damage Your instrument was packaged in a specially designed rigid case and carton to assure against damage If shipment is necessary the instrument should be packaged in the original case and carton If the original packaging materials are not available contact X Rite to have replacements shippe...

Page 9: ... fully discharge and then fully charge the battery every two to three months Failure to do so may significantly shorten the battery s life To discharge simply operate your instrument under the battery s power until it shuts down or until you get a low battery warning Then recharge the battery for up to 14 hours A charged battery will eventually lose its charge if unused It may therefore be necessa...

Page 10: ... your area If not contact X Rite or an authorized representative NOTE Older X RiteDot models labeled ccDot4 and earlier use a different AC adapter than the newer ccDot5 and X RiteDot models Never use your X RiteDot power supply with an older ccDot4 model or you will permanently damage the ccDot 4 instrument 2 Insert the mini DIN plug from the interface cable into the back of the instrument 3 Inser...

Page 11: ...port For a Mac attach the optional Mac serial adapter P N SE108 DB9PA to the DB9 plug Then plug the other end into a modem port NOTE An optional USB to Serial converter is available from X Rite The converter is plugged into the DB9 connector and then into the computer s USB port Order P N SE108 USBSERADB9 PC Connection Diagram MAC legacy Connection Diagram Optional USB to serial converter P N SE10...

Page 12: ...cess a screen where additional options exist Press this key to increase numeric values when editing Center key Use to turn the instrument on and take measurements Press this key to return the instrument to the main screen when at the primary or secondary screens Instrument Screens When the instrument is powered up the main screen appears The startup screen contains the status bar and firmware vers...

Page 13: ... Return icon Returns the instrument screen to the previous screen when the key center below this icon is pressed Select Toggle icon Toggles an option s status or accesses a screen where additional options exist when the key right below this icon is pressed Primary Screen Icons The upper portion of the screen displays the available options of the instrument Depending on the instrument model all opt...

Page 14: ...he secondary screen is similar to the primary screen The remaining options are displayed on this screen The icons along the bottom are also used to navigate return and select toggle Depending on the instrument you have all options may not appear Two times Four times or Eight times Indicates the level of zoom set to display sample dots when the zoom tool is activated Zoom tool icon Activates the zo...

Page 15: ...d along with screen angle and ruling Screen angle and ruling LPI and dot size is automatically calculated each time a dot measurement is taken in the range of approx 20 40 and 85 95 For chain dots the range is 15 30 These ranges are used as they generally represent dot structures where the elements can be evaluated as non touching individual points The calculation is performed after the measuremen...

Page 16: ...ons in the primary screen press the Center key to return to the measurement screen Adjusting the Screen Contrast The contrast of the instrument screen can be adjusted to accommodate varying lighting conditions 1 Using the Left key move the flashing highlight to the Contrast icon 2 Press the Right key to access the contrast adjustment screen 3 Press the Left key to decrease contrast and the Right k...

Page 17: ...n or 2 Press the Right key to toggle between the two options Setting Substrate Type The instrument can be set to measure on flexo plate reflectance or film transmission 1 Using the Left key move the flashing highlight to the Substrate Type icon or 2 Press the Right key to page through the two options ...

Page 18: ...n the instrument NOTE Hold the Center key down for 2 seconds if a charging message is displayed 2 Press the Left key to advance to the primary screen 3 Using the Left key move the flashing highlight to the Utilities icon 4 Press the Right key to access the utilities screen 5 See the following procedures to edit the utilities 6 After setting options in the utilities screen press the Center key to r...

Page 19: ...arge mode press and hold the Center key for 2 seconds to enter the main measurement screen Screen Ruling Units The screen ruling displayed during a dot measurement can be set as inches or centimeters 1 Using the Left key move the flashing highlight to the Screen Ruling icon or 2 Press the Right key to toggle between the two options Screen Saver Timeout You can adjust the time that it takes the ins...

Page 20: ... your instrument 1 Using the Left key move the flashing highlight to the Frequency icon or 2 Press the Right key to toggle between the two options Feature Upgrade Your instrument can be upgraded with new features by entering a new key code obtained from X Rite 1 Using the Left key move the flashing highlight to the Key icon 2 Press the Right key to access the key code entry screen Make a note of t...

Page 21: ...d on the screen If KEY REJECTED appears try reentering the key code again If a problem still exists contact X Rite or an X Rite representative Time Date You can adjust the internal time and date of the instrument 1 Using the Left key move the flashing highlight to the Calendar icon 2 Press the Right key to access the time date adjustment 3 Press the Left key to move the cursor flashing number to t...

Page 22: ...omatically calibrates for every measurement it is not necessary to have a calibrated light source or use the same spot for every measurement NOTE For accurate dot measurements ensure you have set the appropriate electrical supply frequency Refer to Section 3 To take a film dot measurement 1 Press the Center key to turn on the instrument NOTE Hold the Center key down for 2 seconds if a charging mes...

Page 23: ...enu screen hold the instrument steady and press the Center key to take the measurement Measurement results are displayed on the instrument screen 7 Press the Right key to see a magnified view of the measurement area Pressing the Right key again returns the display to the main measurement screen Viewer Window ...

Page 24: ...d position the flexographic plate image side up on the black mat Apply one drop of PosiDot to the area to be measured An amount of approximately 3mm 1 8 in diameter is desirable 4 Active the instrument so that the blue illumination lights are on without flashing This will help to find the area to be measured NOTE Do not exert any downward pressure on the instrument before or during a measurement P...

Page 25: ...strument screen 7 Press the Right key to see a magnified view of the measurement area Pressing the Right key again returns the display to the main measurement screen 8 After the measurement clean both the instrument and the flexo plate with the cloths provided Additional cloths and PosiDot liquid can be ordered from X Rite Refer to Accessories in Section 5 Viewer Window ...

Page 26: ...n The instrument supports two times x2 four times x4 and eight times x8 zoom modes To zoom on a dot measurement 1 Press the Center key to turn on the instrument NOTE Hold the Center key down for 2 seconds if a charging message is displayed 2 Take a dot measurement 3 Press the Left key to advance to the secondary screen 4 Make sure the flashing highlight is on the zoom factor icon x2 x4 or x8 and p...

Page 27: ...ey to access the zoomed image 7 Press the Left key to scroll the image from left to right Press the Right key to scroll the image from top to bottom 8 Press the Center key to exit out of the zoom mode and return to the secondary screen Scroll Bar ...

Page 28: ...rolls 8 images per roll The instrument can be upgraded to 32 film rolls for a total of 256 images stored IMPORTANT A new film roll must be selected after 8 images are stored If not all 8 previously stored images will be erased when a new measurement is taken To store images in a film roll 1 Press the Center key to turn on the instrument NOTE Hold the Center key down for 2 seconds if a charging mes...

Page 29: ...urement data 9 To view the storage location press the Right key to access the magnified view The storage location and images stored are displayed at the top of the screen 10 Press the Right key again to return the display to the main measurement screen Transferring Images The instrument can transfer images instantaneously after a measurement To instantly transfer images the frame store option must...

Page 30: ... see section 1 for connections and the software connection is activated 2 Press the Center key to turn on the instrument 3 Enable Frame Store option as previously explained in Storing Images The status bar should show the connection icon as active active connection inactive connection If active image does not appear refer to the ImageLink on line guide for troubleshooting tips 4 Take a measurement...

Page 31: ...umber of measurements need to be taken and a direct interface to a computer is not readily available Storing Dot Samples To store dot measurement 1 Press the Center key to turn on the instrument NOTE Hold the Center key down for 2 seconds if a charging message is displayed 2 Press the Right key to advance to the secondary screen 3 Using the Left key move the flashing highlight to the dot store ico...

Page 32: ...urement will be overridden 5 To store the current measurement to the location displayed and move on to the next measurement press the Right key The percentage storage location increments to the next location 6 Position the instrument on next location and press the Center key to take the measurement Press the Right key to store the measurement 7 Continue with additional measurements 8 After storing...

Page 33: ... dot storage and download feature as previously explained in Storing Dot Samples 4 Using the Left key move the flashing highlight to the dot download icon 5 Press the Right key Sending is momentarily displayed and the samples are sent to the computer Erasing Stored Dot Measurements To erase stored samples from the instrument 1 Press the Center key to turn on the instrument 2 Access the dot storage...

Page 34: ...nty The customer shall pay shipping cost to the factory or authorized service center and repair cost The instrument shall be submitted in the original case and carton as a complete unaltered unit Cleaning the Instrument Your instrument requires very little maintenance to achieve years of reliable operation However to protect your investment and maintain measurement accuracy a few simple cleaning p...

Page 35: ... Remove the screw securing the battery cover in place and remove the cover 4 Remove the old pack battery and unplug the connector 5 Plug in the connector from the new battery pack and install the battery into the compartment 6 Replace the battery cover and secure with screw 7 Charge the new battery for 14 hours for full charge Battery Cover Battery Pack Connector ...

Page 36: ...asurements appear inaccurate or erratic The FlexoDot is sensitive to bright light reflected into its viewer Make sure there is no light including sunlight shining directly into the viewer window If measurements still appear inaccurate shield the FlexoDot viewer window with your hand Be careful not to apply any downward pressure on the instrument when doing this If you are measuring a flexographic ...

Page 37: ...allow serial communication with a legacy Macintosh computer P N SD67 CTP50 01 Large plastic travel case for FlexoDot P N CTP50 200 PosiDot Fluid Refill Kit includes wipes P N CTP10 500 CD CD containing ImageLink video and KeyMagic data software X RiteDot operator manuals and software manuals P N SE30 103 Power supply 7 5vdc for CCDot4 P N SE30 102 Power supply 9 0vdc for X RiteDot and CCDot5 P N S...

Page 38: ...N C E 5 5 Instrument Upgrades P N CTP UP P Upgrade to add Data to PC Mac option P N CTP UP V Upgrade to add Video to PC Mac option P N CTP UP P V Upgrade to add Video to PC Mac option to a FlexoDot model that already contains the Data to PC Mac option ...

Page 39: ...e 2 seconds Warm up Time None Accuracy 1 dot Display Numeric display Graphical display with image view and zoom Data Connection Serial connection Mini DIN Mac serial adapter optional USB adapter optional Power Source Rechargeable battery pack Switching power supply 100 240 Charge Time Up to 14 hours for full charge Physical Dimensions Height 5 4cm 2 125in Width 9 5cm 3 75in Length 26cm 10 25in Wei...

Page 40: ...S E R V I C E A N D G E N E R A L M A I N T E N A N C E 5 7 ...

Page 41: ...horova 705 CZ 682 11 Vyskov Czech Republic Tel 420 507 328197 Fax 420 507 328138 X Rite Asia Pacific Ltd Room 808 10 Kornhill Metro Tower 1 Kornhill Road Quarry Bay Hong Kong Tel 852 2 568 6283 Fax 852 2 885 8610 X Rite Ltd The Acumen Centre First Avenue Poynton Cheshire England Tel 44 0 1625 871100 Fax 44 0 1625 871444 X Rite Méditerranée Parc du moulin de Massy 35 rue du Saule Trapu 91300 Massy ...

Reviews: