PH: 866.476.9217
11
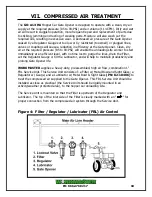
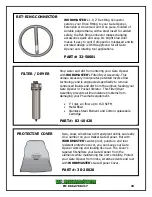
FILTER: Designed to operate at 250 PSI max pressure and in a temperature range of
40°F to 200°F. Filtering out of dirt and foreign particles, and the separation of moisture
is automatic with air flow. There are no moving parts and no adjustments are
necessary.
Maintenance: Accumulated moisture and sludge must be periodically drained.
Sediment must not be permitted to fill above the Filter's Lower Baffle. The Filter should
be drained weekly by turning the petcock on the bottom of the Filter Bowl
clockwise ½
to 1 turn. This can be done while the Filter is under pressure to take advantage of
blowdown. Periodically, eg, every 3 to 4 months, the Service Unit must be
depressurized so that the Filter can be cleaned to maintain filtering efficiency:
1.
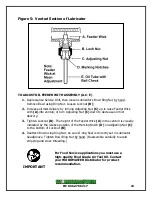
Unscrew the Metal Bowl and then unscrew the Filter Element from the Head;
2.
Wash the Element in kerosene;
3.
Clean the Filter Bowl with soapy water;
4.
Inspect the O-ring, replace if damaged or destroyed;
5.
Dry the Filter Element thoroughly;
6.
Reassemble carefully to avoid stripping and cross threading;
7.
After Metal Bowl is tightened, it may be rotated up to 180° for proper viewing of
the Sight Glass.
REGULATOR: Designed to operate at 250 PSI max pressure with an air flow up to 700
CFM and in a temperature range of 40°F to 160°F. The Regulator is always installed
downstream of the Filter but upstream of the Lubricator. Before turning the air supply
to the Service Unit "ON", back-off the Regulator's Pressure Adjusting Knob. When air
supply is turned "ON", regulate the Adjusting Knob until the pressure gauge shows the
desired 85 to 90-PSI. To lock the Adjusting Knob, push down until Knob snaps into
locking groove. To make the Regulator tamper-resistant, remove Adjusting Knob from
the Regulator. The Regulator may be readjusted later by simply replacing the Knob.
Maintenance: Upon detection of leaks, pressure fluctuation, or pressure "creep", the
Regulator must be inspected and cleaned:
1.
Depressurize the Service Unit;
2.
Remove Bottom Cap;
3.
Inspect Valve for damage or wear;
4.
Inspect Seat in Head Casting for foreign material or damage;
5.
Clean with kerosene and blow-out with air;
6.
Replace damaged or worn parts;
7.
Replace Bottom Cap.
NB: If leaks persist, it will be necessary to remove Regulator's Bonnet and
inspect Diaphragm and Diaphragm Seat for foreign matter or wear, and
replace if necessary.


