background image

Vertex-Pro Motor-Driven Compressor Control 

Manual 26489V1 


Woodward 

2.2.3—Redundant Power Supplies 


Two load sharing power supplies provide redundant power to the motherboard, 
CPU and I/O modules. The MicroNet Plus power supplies are 2-slot wide each and 
are located at each end of the chassis in the designated PS1 and PS2 slots. 


2.2.4—Simplex Inputs and Outputs 

 
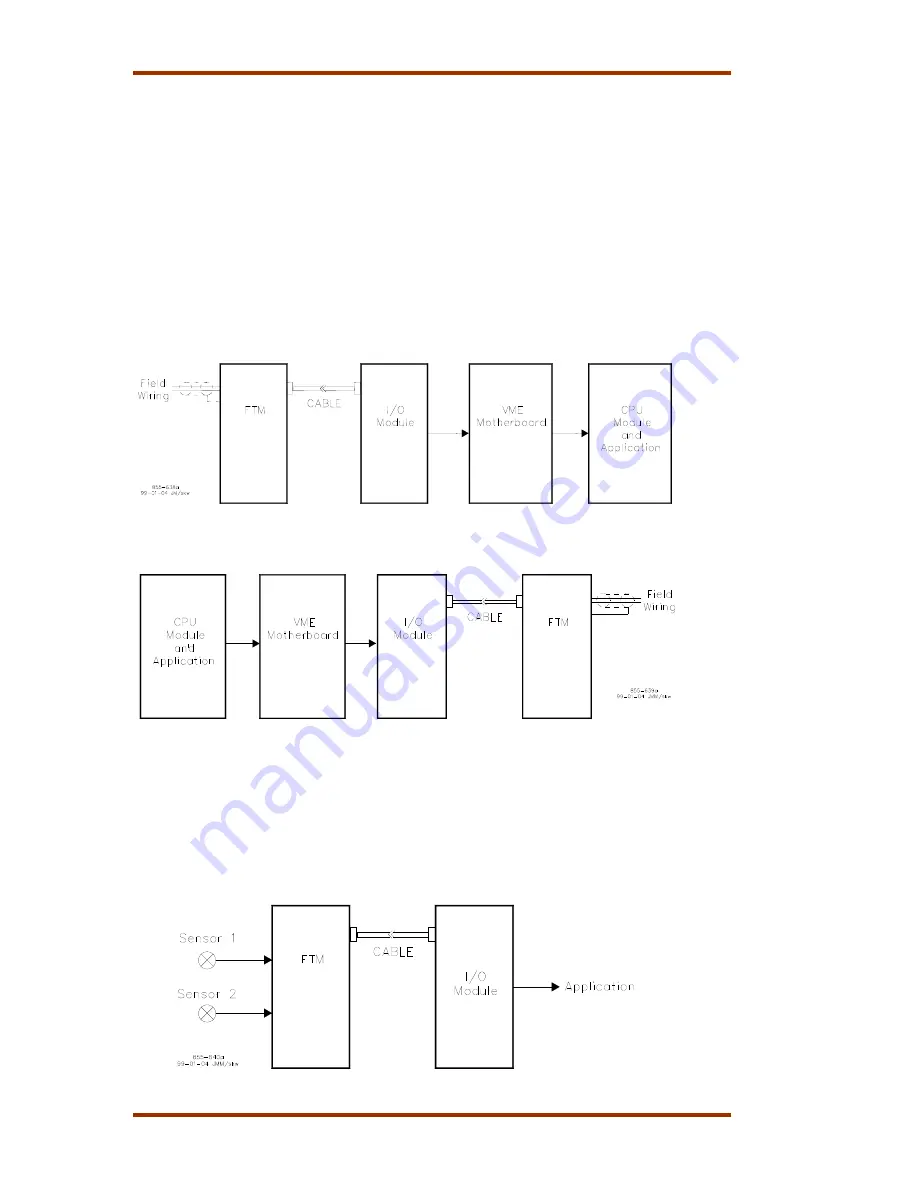
Each I/O module has connectors on the faceplate. For analog and discrete I/O, 
cables connect the module to a Field Terminal module (FTM). The FTM is used to 
connect to the field wiring. For communications on the CPU, FTMs are not used. 
Cables are connected directly to the faceplate of the communications on the CPU. 
The following diagram shows the flow of analog and discrete inputs from the field 
to the application. 


Figure 2-1—Input Flow 


Figure 2-2—Output Flow 


2.2.5—Redundant Inputs and Outputs 


One level of redundancy is available. This involves wiring two external input 
devices to two separate input channels. See Figure 2-3. In the event of a failed 
sensor or a failure in the connection from the sensor to the control, a valid input is 
still available 


Figure 2-3—Redundant Sensors 


Summary of Contents for Vertex-Pro

Page 1: ...Installation Hardware Manual Vertex Pro Motor Driven Compressor Control Volume 1 Installation Hardware Manual 26489 consists of 2 volumes 26489V1 26489V2 Manual 26489V1 ...

Page 2: ...ince this copy was produced To verify that you have the latest revision be sure to check the Woodward website www woodward com pubs current pdf The revision level is shown at the bottom of the front cover after the publication number The latest version of most publications is available at www woodward com publications If your publication is not there please contact your customer service representa...

Page 3: ...tion 16 4 3 Power Supply Troubleshooting 18 CHAPTER 5 CPUS 20 5 1 PowerPC CPU5200 Module Motorola 20 CHAPTER 6 DISCRETE I O MODULES 31 6 1 Introduction 31 6 2 48 24 Discrete Combo Module 31 CHAPTER 7 ANALOG I O MODULES 38 7 1 Introduction 38 7 2 Combination I O Modules 38 7 3 24 8 Analog Module 38 7 4 Analog Combo Module Option 46 CHAPTER 8 FIELD TERMINATION MODULES FTMS 60 8 1 Introduction 60 8 2...

Page 4: ...ination and Cable Connection Examples 26 Figure 5 7 Preferred Multipoint Wiring Using Shielded Twisted Pair Cable with a Separate Signal Ground Wire 27 Figure 5 8 Alternate Multipoint Wiring Using Shielded Twisted Pair Cable without a Separate Signal Ground Wire 27 Figure 5 9 CPU Service Port mini DIN6F 28 Figure 5 10 CAN Communication Ports M12 male 28 Figure 5 11 CAN Communication Connection Exa...

Page 5: ...ematic 64 Figure 8 5 24 12 Discrete Module Outline Dimensions 66 Figure 8 6 24 12 Discrete Module Schematic 67 Figure 9 1 MicroNet Power Supply 70 Figure 9 2 FTM Grounding and Outlines 72 Figure 9 3 Shield Termination Diagram Example 73 Figure 9 4 Discrete FTM Grounding Diagram Example 73 Figure 9 5 Bottom Cable Entry Area 78 Figure 9 6 Door Bonding 78 Figure 9 7a Cable Entry 1 79 Figure 9 7b Cabl...

Page 6: ... for application of the CE Marking Machinery Compliant as a component with 98 37 EC COUNCIL Directive DIRECTIVE of 23 July 1998 on the approximation of the laws of the Member States relating to machinery GOST R Certified for use in ordinary locations within the Russian Federation per GOST R certificates РОСС US US МЛ03 В00603 and POCC US US МЛ03 В00604 This equipment is considered indicator equipm...

Page 7: ...ipment and within easy reach of the operator and that is clearly marked as the disconnecting device for the equipment Field wiring must be suitable for at least 80 C for operating ambient temperatures expected to exceed 55 C For ATEX compliance this equipment must be installed in an area providing adequate protection against the entry of dust or water A minimum ingress protection rating of IP54 is...

Page 8: ...ircuit is energized unless area is known to be non hazardous RISQUE D EXPLOSION Ne pas raccorder ni débrancher tant que l installation est sous tension sauf en cas l ambiance est décidément non dangereuse La substitution de composants peut rendre ce matériel inacceptable pour les emplacements de Classe I applications Division 2 Ne pas enlever ni installer l alimentation électrique pendant que le c...

Page 9: ...tyrofoam materials such as plastic or Styrofoam cups cup holders cigarette packages cellophane wrappers vinyl books or folders plastic bottles and plastic ash trays away from the control the modules and the work area as much as possible 4 Do not remove the printed circuit board PCB from the control cabinet unless absolutely necessary If you must remove the PCB from the control cabinet follow these...

Page 10: ...Vertex Pro Motor Driven Compressor Control Manual 26489V1 viii Woodward ...

Page 11: ...r software configuration I O modules allow for hot replacement without removing control power The MicroNet Operating System together with Woodward s GAP Graphical Application Program produces a powerful control environment Woodward s unique rate group structure ensures that control functions will execute deterministically at rate groups defined by the application engineer Critical control loops ca...

Page 12: ...ac dc x 8262 3026 110 Vac dc 8263 0115 24 Vdc x 8262 3028 24 Vdc 8263 0117 220 Vac x 8262 3030 220 Vac Simplex 8263 0110 110 Vac dc x 8262 3027 110 Vac dc 8263 0116 24 Vdc x 8262 3029 24 Vdc 8263 0118 220 Vac x 8262 3031 220 Vac x with non EMI cabinet For critical applications requiring increased reliability and availability users can order dual redundant control models which have manual switch ov...

Page 13: ...ture limits are 40 to 85 C In a redundant system there are two CPU modules running the same application program receiving power from the same pins on the VME backplane and with access to the I O modules over the same VME bus The CPU modules communicate their health to each other over the VME bus and arbitrate for control of the bus The CPU which is in slot 1 and in good health first gains control ...

Page 14: ... Field Terminal module FTM The FTM is used to connect to the field wiring For communications on the CPU FTMs are not used Cables are connected directly to the faceplate of the communications on the CPU The following diagram shows the flow of analog and discrete inputs from the field to the application Figure 2 1 Input Flow Figure 2 2 Output Flow 2 2 5 Redundant Inputs and Outputs One level of redu...

Page 15: ...e running CPU If the applications are not the same and both CPUs are started together CPU1 located in slot A1 will be the SYSCON and the backup CPU will be failed Normal Operation Redundant Normally the CPUs will be powered up together and will start running the application within the 20 second window The first CPU to start running the application will remove the WATCHDOG as indicated by the red L...

Page 16: ...sync If the BACKUP syncs in correctly the backup fault indication in the GAP will go FALSE see Figure 2 7 2 4 Vertex Pro Simplex 2 4 1 System Diagram Vertex Pro Simplex MicroNet 8 VME Slot Chassis Single CPU for simplex operation Motorola PowerPC CPU5200 Simplex I O modules Simplex Power Redundant smart fans FAN_2 FAN_3 FAN_4 Blank FAN_1 Blank A3 Blank A4 Blank A5 48 24 Discrete I O A6 Blank A7 24...

Page 17: ...e flow of analog and discrete inputs from the field to the application Figure 2 4 Input Flow Figure 2 5 Output Flow 2 4 5 Redundant Inputs One level of redundancy is available This involves wiring two external input devices to two separate input channels See Figure 2 7 In the event of a failed sensor or a failure in the connection from the sensor to the control a valid input is still available Fig...

Page 18: ...stallation and replacement information Sections 4 2 contain additional details for power supply installation and replacement Note that power must be removed from the power supply input before a module is removed or inserted BEFORE REMOVAL RESET MODULE Live insertion and removal of the CPU5200 is allowed in a MicroNet Plus chassis These modules should be reset immediately before removing them from ...

Page 19: ...en Compressor Control Woodward 9 The Vertex Pro fault information available from the CHASSIS status block Figure 2 7 CHAS_STAT Block REQ_FOVER is used when making BACKUP CPU change SYSCON manually This is effective only within DEBUG mode ...

Page 20: ...nt CPU capability and more I O slots as well as improvements in airflow and overall system reliability Features A total of 8 CPU and I O slots are available for use A new 2 slot wide redundant load sharing power supply is used Redundant Smart fans are used for early notification of fan failure Chassis temperature switches are built into the motherboard and trip at 65 C Redundant hot swappable CPUs...

Page 21: ...I O module can be installed in any of the slots designated for I O modules However when the application software is designed each module will be assigned to a specific slot and thereafter the software will expect that specific I O module to always be in its designated slot FAN_3 FAN_4 FAN_2 FAN_1 I O A3 I O A4 I O A5 I O A6 I O A7 I O A2 2 Slot Power Supply PS1 2 Slot Power Supply PS2 A1 CPU1 A1 C...

Page 22: ...wo separate 5 A fuses If a direct short of this power output occurs the fuses will blow to protect the motherboard and the power supplies will shut down with a 24 Vdc power fault Replacement fuses can be ordered as Woodward P N 1641 1004 The system must be shut down to replace the fuses safely 24 Vdc Motherboard Power Redundant systems Not recommended for use Simplex systems This power may be used...

Page 23: ...ward 13 Figure 3 3 Outline Drawing of MicroNet Plus 8 Slot Chassis 3 3 Installation Figure 4 8 shows the mounting template and fasteners to bulkhead mount the chassis Rack mounting is not recommended Figure 3 4 Mounting Template of MicroNet Plus 8 Slot I O Chassis ...

Page 24: ...rcuitry balances the load to reduce heat and improve the reliability of the power supplies In the event that one supply needs to be replaced the recommended method for changing Power Modules is with the power off to the module being removed and the module being inserted The system will tolerate this cold swap method without failure Each main power supply has four LEDs to indicate power supply heal...

Page 25: ...C See Power Supply specifications For a particular system configuration use the MicroNet Power Program to calculate the output current requirements 24 V 5 V as a function of the Chassis CPUs and I O modules used in the system Main PS 24 Vdc Input Operating range 18 to 36 Vdc Nominal input voltage rating 24 Vdc Maximum input current 33 A Maximum input power 600 W Input power fuse breaker rating 50 ...

Page 26: ...40 Vac as on power supply label Maximum input current 6 7 A Maximum input power 1250 VA Input power fuse breaker rating 10 A time delay Maximum output current 24 Vdc 12 0 A 65 C System Ambient Temp Maximum output current 5 Vdc 22 0 A 65 C 28 A 60 C 32 A 55 C Holdup time 1 cycle 220 Vac 4 2 Installation 4 2 1 Input Power Wiring A ground conductor connected to the chassis is required for safety The ...

Page 27: ...us power supplies may have power supplies of the same model but in different chassis connected to the same source In this case each branch to a chassis must have its own overcurrent protection sized according to Table 4 1 and the power source must be sized for the sum of the branches Not all systems will require the full load capability of the MicroNet Plus power supply If not otherwise indicated ...

Page 28: ... power is not present and verification should be made 4 3 1 Power Supply LED Descriptions OK LED This green LED turns on to indicate that the power supply is operating and that no faults are present INPUT FAULT LED This red LED turns on to indicate that the input voltage is either above or below the specified input range If this LED is on check the input voltage and correct the problem Long term o...

Page 29: ...circuit is found reset the supply by removing input power for one minute If the power supply is still not functioning after input power has been restored verify that the supply is properly seated to the motherboard connector If the supply is properly seated but is not working then replace the supply 4 3 2 Power Supply Checks The following is a troubleshooting guide for checking areas which may pre...

Page 30: ...ion and replacement instructions see the instructions for installing and replacing the VME module in Chapter 9 Installation and Replacement Procedure BEFORE REMOVAL RESET MODULE Live insertion and removal of this module is allowed in a MicroNet Plus chassis This module should be reset immediately before removing it from the chassis This notifies the module that it will be removed and provides a gr...

Page 31: ...ALTH MONITOR MFT IOLOCK FAN MONITOR Control Status ARBITER BTO SYSCON 1 2V 1 5V 1 8V 2 5V 3 3V Isol 5V coms CAN 2 5V 2 5V 3 3V 3 3V LOCAL PWR MONITOR 5 0V_FAIL 3 3V_FAIL 2 5V_FAIL 1 8V_FAIL 1 5V_FAIL 1 2V_FAIL RESET VME_24 4 Isolated 5V Power Supplies Serial and CAN 1 8V VME_5V 1 2V LOCAL POWER SUPPLY 1 5V 2 5v 3 3V 3 3V HotSwap Ctrl 5V to 3 3V 3 3V 2 5V CDB 15 0 RTC with Battery CAB 15 0 ADDRESS ...

Page 32: ...ailable Network Type The Network Type setting is factory set OFF to automatically configure the RTN communication port IP addresses to the 172 20 x x series It is recommended to verify proper switch settings before installing the module in the system and when troubleshooting CPU or RTN related issues The Network Type setting on all CPU and Remote RTN modules in the system must match for proper sys...

Page 33: ...Remote RTN module is the VMEbus System Controller STANDBY Standby Ready YELLOW Active when the STANDBY mode of this CPU or Remote RTN module is ready to release or take over the System Controller functions in a failover event LVCC Low VCC Power Fault RED A CPU or VME power supply high or low tolerance fault has been detected Local CPU power faults could be 1 2V 1 5V 1 8V 2 5V or 3 3V VME power fau...

Page 34: ...STANDBY CPU who then becomes the new System Controller Reset detection on the STANDBY unit causes a HealthFault that removes it from STANDBY mode The front panel RUN RESET led will be RED while reset is held and will turn GREEN for a few seconds after releasing reset After turning OFF it will again turn GREEN when the operating system starts to boot BEFORE REMOVAL RESET MODULE This module should b...

Page 35: ...d rate is selectable from 300 baud to 57 6 Kbaud Shielded cable is required when connecting to the CPU module s serial port Using shielded cable will help ensure the robustness of the serial communications Pin 1 RS 422 Transmit Pin 2 RS 232 Receive Pin 3 RS 232 Transmit Pin 4 RS 422 Transmit Pin 5 Signal Ground Pin 6 Termination Resistor Pin 7 RS 485 422 Receive Pin 8 RS 485 422 Receive Pin 9 Term...

Page 36: ...ual to the characteristic impedance of the cable This is usually about 100 to 120 Ω The purpose is to maintain a voltage level between the two differential lines so that the receiver will be in a stable condition The differential voltage can range between 0 2 and 6 V the maximum voltage between either receiver input and circuit ground must be less than 10 V There is one termination resistor networ...

Page 37: ...y If the latter method is used and there are non isolated nodes on the party line connect the shield to ground at a non isolated node not an isolated node Figures 5 7 and 5 8 illustrate these cabling approaches Non isolated nodes may not have a signal ground available If a signal ground is not available use the alternate wiring scheme in Figure 7 24 with the signal ground connection removed on tho...

Page 38: ...Ports Two CAN ports M12 male connectors are available for communication with other Vertex Pro controllers A maximum of three Vertex Pro configured for operation using compressor load sharing may be used When using redundant CPU modules and a failover occurs each CAN port automatically performs a failover from the SYSCON to the STANDBY CPU module Note If CAN or GS6 operation is required in an expan...

Page 39: ...5 11 CAN Communication Connection Example 5 1 10 CAN Cable Specification Thick cable is preferred and recommended for all uses Most CAN DeviceNet trademark of ODVA Inc cable is not rated for temperatures above 80 C so be careful during installation to avoid hot routing areas Always use shielded cables for improved communications in industrial environments Impedance 120 Ω 10 at 1 MHz DC resistance ...

Page 40: ...y troubleshooting messages through the debug Service Port and AppManager Off line diagnostics run automatically on power up and when the Reset switch is asserted On line diagnostics run during normal Control System operation when the GAP application is active More information on diagnostics tests subsequent LED flash codes and serial port messages is contained in the VxWorks manual A table of the ...

Page 41: ... configurations for the 48 24 Discrete Combo Module Configuration 1 consists of one 48 24 Discrete FTM connected to the 48 24 Discrete Combo module via two High Density Analog Discrete cables The 48 24 Discrete FTM is then connected to either two 16Ch Relay Modules or one 32Ch Relay Module via a Low Density Discrete Cable s Configuration 2 consists of two 24 12 Discrete FTMs DIN rail mounted conne...

Page 42: ...lds Low voltage 8 Vdc at 1 5 mA OFF 16 Vdc at 3 mA ON High voltage 29 Vdc at 1 8 mA OFF 67 Vdc at 4 mA ON Input current 4 mA 24 Vdc 2 6 5 mA 125 Vdc External input voltage 18 32 Vdc UL and LVD or 100 150 Vdc UL w high Voltage FTM Isolation voltage 500 Vdc to earth ground 1000 Vdc to control common Time stamping 1 ms resolution Isolated 24 Vdc contact supply 400 mA maximum Discrete Outputs Number o...

Page 43: ...ons for the 48 12 Discrete Combo Module Configuration Configuration consist of two 24 12 Discrete FTMs DIN rail mounted connected to the 48 24 Discrete Combo module via two High Density Analog Discrete cables See Figure 8 7 for an example of configuration Power Supply 1 48 24 DIO High Density Cable High Density Cable 24 12 Discrete FTM 24 12 Discrete FTM J1 P2 J1 P2 J1 P1 J2 P1 CPU Figure 6 2 Conf...

Page 44: ...A B Figure 6 3 Discrete Input Interface Wiring to a 24 12 Discrete FTM Configuration Notes Refer to Chapter 8 for Discrete Input wiring All contact inputs accept dry contacts If the internal 24 Vdc is used a jumper must be added to tie the internal 24 Vdc to the bussed power terminal blocks see Figure 8 8 If an external 24 Vdc is used the common for the external 24 Vdc must be tied to the discrete...

Page 45: ...of relay contacts meets the power requirements of the circuit with which it is being used Interposing relays are required when the interfaced circuit demands relay contacts with a higher power rating If interposing relays or other inductive loads are required it is recommended that interposing relays with surge inductive kickback protection be used Improper connection could cause serious equipment...

Page 46: ... may be located in the wrong slot Number of LED Flashes Failure 2 Micro controller internal RAM test failure 3 External RAM high and low byte test failure 4 External RAM low byte failure 5 External RAM high byte failure 6 EEPROM failure 7 Software not running 8 System monitor fault 9 MFT pulses missing Table 6 1 LED Indications of Failure Fault Detection I O In addition to detecting 48 24 Discrete...

Page 47: ...le If not replace the 48 24 Discrete Combo module 6 If the readings are incorrect on several channels of the 48 24 Discrete Combo module corresponding to both cables replace the 48 24 Discrete Combo module 7 If replacing the module does not fix the problem replace the FTM See the instructions in Chapter 9 Installation for replacing the FTM Discrete Outputs If a discrete output is not functioning p...

Page 48: ... and require no calibration A module may be replaced with another module of the same part number without any adjustment The 24 8 Analog Modules come in four different configurations 1 24 channels of 4 20 mA inputs with 8 channels of 4 20 mA outputs 2 pole 10 ms filter on all input channels 2 24 channels of 4 20 mA inputs with 8 channels of 4 20 mA outputs 2 pole 10 ms filter on all input channels ...

Page 49: ...aximum voltage input range may vary between 4 975 and 5 025 Volts from module to module Isolation 0 Vrms 60 dB CMRR 200 Vdc common mode rejection voltage no galvanic isolation Input imp 4 20 mA 200 ohms Anti aliasing filter 2 poles at 10 ms Resolution 16 bits Accuracy Software calibrated to 0 1 over 0 25 mA full scale Temp drift 275 ppm C maximum Fuse 100 mA fuse per channel Time stamping 5 ms res...

Page 50: ...brated to 0 2 of 0 25 mA full scale Temperature drift 125 ppm C maximum Readback accuracy 0 5 of 0 25 mA full scale Readback temp drift 400 ppm C maximum 7 3 3 Installation The modules slide into card guides in the control s chassis and plug into the motherboard The modules are held in place by two screws one at the top and one at the bottom of the front panel Also at the top and bottom of the mod...

Page 51: ...0 mA transducer See Figure 9 3 for analog input connection This power is protected with a 100 mA fuse on each channel to prevent an inadvertent short from damaging the module The 24 Vdc outputs are capable of providing 24 Vdc with 10 regulation The maximum current is 0 8 A Power connections can be made through terminals located on the 24 8 Analog FTMs See Chapter 8 for complete field wiring inform...

Page 52: ... for analog output connection Each output monitors the output source current for fault detection All of the analog outputs may be individually disabled When a channel fault or a module fault is detected the application program may annunciate the fault disable the channel and stop using data in system calculations or control Care should be taken to prevent ground loops and other faults when interfa...

Page 53: ... in the wrong slot Number of LED Flashes Failure 1 Hardware watchdog CPU clock failure reset fail 2 Micro controller internal RAM test failure 3 External RAM test failure 4 Unexpected exception error 5 Dual Port RAM test failure 6 EEPROM failure 7 Communications watchdog time out 8 EEPROM error is corrected reset the module to continue 9 Missing an A D Converter interrupt Table 7 1 LED Indications...

Page 54: ...espond to 0 mA look for a loose connection on the terminal blocks disconnected or misconnected cables a missing jumper on the terminal block if the input is a current input or a blown fuse on the 24 Vdc on the FTM 5 If all of the inputs are reading high check that the 24 Vdc is not connected across the input directly 6 Check the software configuration to ensure that the input is configured properl...

Page 55: ...alog module are not working check the fuse on the 24 8 Analog module See instructions for module replacement in Chapter 9 Installation System Level Installation This fuse is visible and can be changed through the bottom of the module If the fuse is blown fix the wiring problem then replace the fuse with another fuse of the same type and rating 7 Check the software configuration to ensure that the ...

Page 56: ...here are two configurations of the Analog Combo Modules One has the analog inputs configured for 4 20 mA and the other is configured for 0 5 V See Appendix A for specific part numbers In a simplex system either Analog Combo module is connected through two analog cables to one Analog Combo FTM All of the I O are accessible on the FTM and the channels are labeled to correspond to their software loca...

Page 57: ...r chosen frequency range Accuracy Software calibrated to 0 03 full scale Fuse 24 Vdc 100 mA fuse channel 12 Vdc short circuit protected Time Stamping 5 millisecond resolution on low event and low latch Analog Input Ratings Number of channels 8 Update time 5 millisecond Input range 0 25 mA or 0 5 V Dependent on module part number The maximum input voltage range may vary between 4 975 and 5 025 Volt...

Page 58: ...rrent output 4 20 mA or 20 160 mA software selectable Current output range 0 24 mA or 0 196 mA depending on the selected range Isolation 0 Vrms Max act resistance 45 ohms on the 20 160 mA output 360 ohms on the 4 20 mA output Readback Actuator source and return currents Readback isolation 60 dB CMRR 200 Vdc common mode Dither current 25 Hz fixed duty cycle software variable amplitude Resolution 11...

Page 59: ...nputs The MPU and proximity probe inputs are read and the speed is provided to the application program A derivative output is provided via the application software if desired The speed sensor inputs are filtered by the Analog Combo module and the filter time constant is selectable through the application software program at 8 milliseconds or 16 milliseconds Eight milliseconds should be acceptable ...

Page 60: ...20 01uF FTM CABLE MicroNet Module TB1 J1 J1 Outer Shell Ground to DIN Rail MPU PROX_1 Ch 3 Prox NC MPU 1 NC MPU PROX_3 MPU PROX_4 PROX 2 24VDC 2 1K ohm 24 12V Reg 24 12V Reg 24 12V Reg 24 12V Reg NC PROX 3 Shld Ch 4 Not Used Ch 2 Prox Ch 1 MPU 35 35 13 13 J1 J2 J2 J1 J2 J2 20 20 11 15 11 15 15 15 J1 J2 J1 J2 11 11 Com 12VDC 24VDC Prox Input Jumper MPU Input MPU Input Jumper 24VDC Prox Input Prox I...

Page 61: ...ng speed sensing resolution and have coupling gear backlash resulting in less than optimum speed control For safety purposes it is also not recommended that the speed sensing device sense speed from a gear coupled to a mechanical drive side of a system s rotor coupling Analog Inputs The analog inputs may be current or voltage type dependent on the part number See Appendix A for specific part numbe...

Page 62: ...liasing Filter AI_01 AI_02 AI_03 AI_04 AI_05 AI_06 AI_07 AI_08 01uF 01uF 01uF 01uF 01uF 01uF 01uF 43 87 88 COM 24V SHLD Input Input Ch 4 COM 24V SHLD Input Input Ch 5 COM 24V SHLD Input Input Ch 6 COM 24V SHLD Input Input Ch 7 COM 24V SHLD Input Input Ch 8 COM NC Ch 2 Ch 1 F8 F7 F6 F5 F4 F3 F2 F1 2 2 J2 J2 13 13 13 13 J1 J1 11 11 J2 J2 J1 J1 J2 J2 24VDC 200 Ohm Anti aliasing Filter 200 Ohm Anti al...

Page 63: ... J1 J1 Outer Shell Ground to DIN Rail Self Powered Voltage Transducer NC SHLD Input Input Ch 3 NC Anti aliasing Filter AI_01 AI_02 AI_03 AI_04 AI_05 AI_06 AI_07 AI_08 01uF 01uF 01uF 01uF 01uF 01uF 01uF 43 87 88 NC NC SHLD Input Input Ch 4 NC NC SHLD Input Input Ch 5 NC NC SHLD Input Input Ch 6 NC NC SHLD Input Input Ch 7 NC NC SHLD Input Input Ch 8 NC NC Ch 2 Ch 1 F8 F7 F6 F5 F4 F3 F2 F1 2 2 J2 J2...

Page 64: ...tput return current All of the actuator outputs may be individually disabled When a channel fault or a module fault is detected the application program may annunciate the fault disable the channel or module and stop using the data in system calculations or control Dither may be provided in the application software for each output Dither is a low frequency 25 Hz signal consisting of a 5 millisecond...

Page 65: ...Fault Detection Module Hardware Each Analog Combo module has a red Fault LED that is turned on when the system is reset During initialization of a module which occurs after every CPU reset the CPU turns the Fault LED on The CPU then tests the module using diagnostic routines built into the software If the diagnostic test is not passed the LED remains on or blinks If the test is successful the LED ...

Page 66: ... is then replace that Analog Combo module See instructions for replacement in Chapter 9 Installation When a module fault is detected its outputs should be disabled or de energized Speed Sensor Inputs MPUs If a magnetic pickup input is not functioning properly verify the following 1 Check that the cable is shielded and the shield is properly grounded per the Shields and Grounding section in Chapter...

Page 67: ...nd replacing it should be the last option Analog Inputs If an analog input is not functioning properly verify the following 1 Check that the cable is shielded and the shield is properly grounded per the Shields and Grounding section in Chapter 9 Installation 2 Measure the input voltage on the terminal block It should be in the range of 0 5 V 3 Verify that there are no or minimal AC components to t...

Page 68: ...e the cable If not replace the Analog Combo module 9 If the readings are incorrect on several channels of the module corresponding to both cables replace the Analog Combo module 10 If replacing the module does not fix the problem replace the FTM See instructions for replacing the FTM in Chapter 9 Installation The FTM does not contain any active components on the MPU inputs so replacing it should b...

Page 69: ...Field Terminal Module FTM 1 Verify that the condition that caused the fuse to blow has been corrected If power has not been removed from the control system power will be active at the module and also at the FTM Shorting of protected circuitry could cause a control system shutdown 2 Remove FTM cover carefully to prevent contact with any FTM circuitry under the cover To remove the FTM cover pinch th...

Page 70: ...terposing terminal blocks to field wiring The cage clamp terminals on the FTMs and relay modules accept a maximum of one 12 AWG wire or two 18 AWG wires Field wiring hookup is performed by stripping the wire back 0 312 inches 8 mm inserting into the cage clamp and tightening the screw 8 2 Analog I O FTMs 8 2 1 24 8 Analog FTM The 24 8 Analog FTM is used with the 24 8 Analog Modules see Chapter 7 M...

Page 71: ...has been corrected If power has not been removed from the control system power will be active at the module and also at the FTM Shorting of protected circuitry could cause a control system shutdown 2 Remove the FTM cover carefully to prevent contact with any FTM circuitry under the cover To remove the FTM cover pinch the retaining barb and lift the cover 3 Locate and replace the fuse with another ...

Page 72: ...Vertex Pro Motor Driven Compressor Control Manual 26489V1 62 Woodward Figure 8 2 24 8 Analog FTM Schematic ...

Page 73: ...or driver outputs Two MicroNet Low Density Analog cable are used to connect the FTM with the Analog Combo module see Appendix A for part numbers There are eight 24 Vdc connections available for sourcing 4 20 mA inputs Each connection is protected with a 0 1 A fuse F1 F8 There are four 24 12 Vdc output connections available for powering four proximity sensors Each of these connections are protected...

Page 74: ...Vertex Pro Motor Driven Compressor Control Manual 26489V1 64 Woodward Figure 8 4 Analog Combo FTM Schematic ...

Page 75: ...to one 48 24 Discrete Combo Module Each FTM uses one MicroNet High Density Analog Discrete cable to connect it with the 48 24 Discrete Combo Module see Appendix A for part numbers This relay module incorporates an I O lockout relay that will de energize all of the relays if de activated by the I O lock signal from the DO module All field connections use removable connectors for ease in replacing m...

Page 76: ...Vertex Pro Motor Driven Compressor Control Manual 26489V1 66 Woodward Figure 8 5 24 12 Discrete Module Outline Dimensions ...

Page 77: ...Manual 26489V1 Vertex Pro Motor Driven Compressor Control Woodward 67 External 24VDC Connection Figure 8 6 24 12 Discrete Module Schematic ...

Page 78: ...nsider the following when selecting a cabinet location for mounting the MicroNet Make sure the MicroNet unit s are mounted in a dry location protected from water and condensation Make sure the ambient temperature of the system location is not lower than 0 C 32 F or higher than 55 C 131 F and that the relative humidity is not over 90 non condensing NOTE For NTCPU 0 50 C Provide adequate ventilation...

Page 79: ...nector on the module and the connector on the motherboard make contact 3 With even pressure exerted at the top and bottom of the module firmly push the module into place If resistance is encountered when installing a module do not force the module Remove the module and check the connectors for bent contacts or foreign objects Also check to ensure that the module screws are fully retracted Forcing ...

Page 80: ...l the connectors on the modules and the connectors on the motherboard make contact 3 With even pressure exerted at the top and bottom of the supply s front panel firmly push the unit into place Alternatively apply force to the extraction handle 4 Tighten the screws that secure the module in place If resistance is encountered when installing a module do not force the module Remove the module and ch...

Page 81: ... possible 4 Snap the FTMs onto the DIN rail 5 Snap ground terminals onto the DIN rail next to the FTMs See Figure 19 7 6 Connect a 4 mm 12 AWG wire between each ground terminal and the FTM earth ground terminal Torque to 0 37 to 0 5 to 0 8 Nm 0 59 ft lbs This wire should be kept short for optimum high frequency grounding It must be no longer than 150 mm 6 in in length After both the FTM and the mo...

Page 82: ...utputs All of the analog inputs and outputs should be wired using shielded twisted pair wiring The shields should be connected to earth ground at one point only as well as terminated at the FTM terminal block which will typically AC couple the shield to earth ground See application note 51204 for a more detailed discussion on shield terminations The length of exposed wire extending beyond the shie...

Page 83: ...to be a six sided metal enclosure If a glass door is needed the door must provide 20 dB of attenuation from 10 kHz to 1 GHz Floor and top must provide holes for cable entry Top and bottom cable entry areas must be restricted in size largest dimension of any aperture hole no greater than 152 mm 6 When RF transmitters hand held radios can be located below the plane of the floor floor entry areas sha...

Page 84: ...O equipment areas Shielded I O area Un shielded I O area Power area Light Industrial compliant equipment area Monitor kybd pointing device HMI if applicable Other equipment area Maintain a minimum or 6 of separation between areas 9 2 5 5 Input Power Routing and Filtering Input power must enter the cabinet and be routed separately from all other circuits Route power in middle at back of cabinet All...

Page 85: ...oint as possible Locate I O module away from shielded analog I O areas 6 I O Cable w I O Module in Cabinet Route I O cable against cabinet metal wall from entry point to I O module If I O cable is shielded ground the I O cable shield direct to cabinet at entry point o If overbraided ground overbraid shield to cabinet connect inner braids directly to earth ground at one point only o If single shiel...

Page 86: ...om MicroNet module to I O module with cable against cabinet metal wall Ground MicroNet module to I O module cable at entry point to cabinet and to I O module 9 2 6 Third Party Hardware CE Compliant to Light Industrial Levels Locate inside the cabinet away from all I O cables that enter or exit the cabinet by 12 Locate from all other cables 6 away Use only CE compliant devices CE Complaint to Indus...

Page 87: ...FTM Maximum length of ground wire shall not exceed 5 cm 2 9 2 11 Equipment Bonding DIN rail shall be electrically connected to structural frame 2 5 mΩ once every 30 cm 12 Use a minimum of 2 screws to bond a DIN rail to cabinet frame Equipment chassis shall be electrically connected to structural frame 2 5 mΩ 9 2 12 Safety Ground Wire Installation Safety wires shall be routed against the grounded c...

Page 88: ...rtex Pro Motor Driven Compressor Control Manual 26489V1 78 Woodward 9 2 14 Shielded I O Cable Copper tape is not reliable for shield termination Figure 9 5 Bottom Cable Entry Area Figure 9 6 Door Bonding ...

Page 89: ...Manual 26489V1 Vertex Pro Motor Driven Compressor Control Woodward 79 Figure 9 7a Cable Entry 1 Figure 9 7b Cable Entry 2 ...

Page 90: ...ent Area Figure 9 8 Zoning 9 3 Replacement Procedures 9 3 1 Safety Considerations Do not connect or disconnect while circuit is live unless area is known to be non hazardous Substitution of components may impair suitability for Class I Division applications Do not remove or install power supply while circuit is live unless area is known to be non hazardous Do not remove or install modules while ci...

Page 91: ...ressing the top module handle up and the bottom module handle down 3 Pull the module straight out along the card guide slots until it is approximately 25 mm 1 inch from the motherboard Disconnect the I O cables from the module and secure the ends to avoid damage or shorting of pins The I O cables use a slide latch to disengage slide the latch towards the top of the module 4 Remove the module by pu...

Page 92: ...hen it is connected to the FTM For this reason all power should be removed from the FTM terminal blocks before disconnecting any cables 1 Carefully to avoid shorting cable pins disconnect all I O cables from the FTM and secure cable ends to avoid damage or shorting of pins The I O cables use a slide latch to disengage slide the latch to the release position 2 Disconnect all field wiring Care shoul...

Page 93: ...ect all field wiring Care should be taken to avoid shorting the wires 3 Install the replacement relay box 4 Reconnect all field wiring 5 Connect all I O cables to the relay box being careful to avoid shorting cable pins Lock the connector in position by sliding the latch to the latched position 6 If power was removed reapply power 7 Put the CPU module back in run mode 8 Verify that the new relay b...

Page 94: ...odule from the motherboard by pulling the module straight out along the card guide slots until it is approximately 25 mm 1 inch from the motherboard 4 Disconnect the I O cable from the module and secure the ends to avoid damage or shorting of pins The I O cable uses a slide latch to disengage slide the latch towards the top of the module 5 Disconnect the I O cable from the FTM or Relay Discrete In...

Page 95: ...ect RED wire to the fan terminal and BLACK wire to fan terminal Do not contact quick connect terminals with any metallic surface during reinstallation MicroNet General Chassis Power Supply Only 1 Installation of MicroNet Power Supply Locate power supply a minimum of 8 cm 3 with a maximum distance of 11 4 cm 4 5 directly below the TMR chassis 2 Use the following procedure to remove faulty fan from ...

Page 96: ...r equipment system documentation for details Woodward Business Partner Support Woodward works with and supports a global network of independent business partners whose mission is to serve the users of Woodward controls as described here A Full Service Distributor has the primary responsibility for sales service system integration solutions technical desk support and aftermarket marketing of standa...

Page 97: ...age or in advance of a scheduled outage to request a replacement control unit If the unit is available at the time of the call it can usually be shipped out within 24 hours You replace your field control unit with the like new replacement and return the field unit to the Full Service Distributor Charges for the Replacement Exchange service are based on a flat rate plus shipping expenses You are in...

Page 98: ...ol Use the following materials when returning a complete control protective caps on any connectors antistatic protective bags on all electronic modules packing materials that will not damage the surface of the unit at least 100 mm 4 inches of tightly packed industry approved packing material a packing carton with double walls a strong tape around the outside of the carton for increased strength To...

Page 99: ...n much of the non Woodward equipment with which our products interface For information on these services please contact us via telephone email us or use our website www woodward com support 10 6 How to Contact Woodward For assistance call one of the following Woodward facilities to obtain the address and phone number of the facility nearest your location where you will be able to get information a...

Page 100: ... Fuel gas gaseous steam etc Rating Application Control Governor Information Please list all Woodward governors actuators and electronic controls in your system Woodward Part Number and Revision Letter Control Description or Governor Type Serial Number Woodward Part Number and Revision Letter Control Description or Governor Type Serial Number Woodward Part Number and Revision Letter Control Descrip...

Page 101: ...24 IN 12 OUT x x 5453 829 A CHASSIS MICRONET PLUS 8 SLOT REDUND WITH SMART FANS x x x x x 5466 253 A MODULE ANALOG COMBO TMR x n a x x x x 5466 257 A MODULE HIGH DENSITY ANALOG I O TMR x x x x 5466 258 A MODULE SIMPLEX DISCRETE I O x x n a x x x x 5466 332 A MODULE HIGH DENSITY ANALOG I O x x n a x x x x 5466 1000 A MODULE POWER SUPPLY 2 SLOT 24 VDC INPUT MICRONET PLUS x x x x x 5466 1001 A MODULE...

Page 102: ...urs EN 50178 96 hours 93 2 3 RH 40 C 104 F Humidity MicroNet Plus Lloyd s Register Test Specification No 1 2002 Humidity Test 1 2 cycles 20 55 C at 95 RH non condensing over 48 hours EN 50178 96 hours 93 2 3 RH 40 C 104 F Vibration MicroNet Lloyd s Register Test Specification No 1 1996 Vibration Test 1 5 13 2 Hz 1 mm 13 2 100 Hz 0 7 g EN 50178 vibration test 1 10 57 Hz 0 075 mm amplitude and 57 15...

Page 103: ...Manual 26489V1 Vertex Pro Motor Driven Compressor Control Woodward 93 Appendix C Declarations ...

Page 104: ...Vertex Pro Motor Driven Compressor Control Manual 26489V1 94 Woodward ...

Page 105: ...Manual 26489V1 Vertex Pro Motor Driven Compressor Control Woodward 95 ...

Page 106: ...Vertex Pro Motor Driven Compressor Control Manual 26489V1 96 Woodward ...

Page 107: ...Manual 26489V1 Vertex Pro Motor Driven Compressor Control Woodward 97 ...

Page 108: ...d Junction CMRR Common Mode Rejection Ratio COM Communication Combo Combination CPU Central Processor Unit CSR Control Status register dB Decibel dc Direct Current DCS Distributed Control System DFB Dual Feedback DLE Dry Low Emissions DI Discrete Input DIN Deutsche Institut für Normung DIO Discrete Input Output DIP Dual Inline Package DO Discrete Output DPDT Double Pole Double Throw DRAM Dynamic R...

Page 109: ...ht Emitting Diode LinkNet Woodward Local Area Network Product Line LM GE Gas Turbine Family LPT1 Line Printer Terminal 1 LQ Woodward Liquid Valve Family LV Low Voltage LVD Low Voltage Directive LVDT Linear Variable Differential Transformer mA Milliampere Max Maximum Mbps Million Bits per Second MFT Minor Frame Timer Min Minimum MPU Magnetic Pick up ms Millisecond mV Millivolt MUX Multiplex er NEC ...

Page 110: ...hielded Twisted Pair STP Shielded Twisted Pair SYSCON System Controller TC Thermocouple TCP IP Transmission Control Protocol Internet Protocol TM Woodward Actuator Family Torque Motor TM100 Woodward Actuator Model Torque Motor TMR Triple Modular Redundant Tx Transmit USB Universal Serial Bus UART Universal Asynchronous Receive Transmit UL Underwriters Laboratories Vac Volts ac Alternating Current ...

Page 111: ......

Page 112: ...East Drake Road Fort Collins CO 80525 USA Phone 1 970 482 5811 Fax 1 970 498 3058 Email and Website www woodward com Woodward has company owned plants subsidiaries and branches as well as authorized distributors and other authorized service and sales facilities throughout the world Complete address phone fax email information for all locations is available on our website 2009 9 Makuhari ...

Reviews: