10
Operation
MAN1255 (3/19/2018)
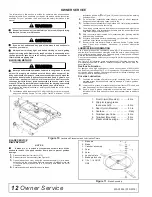
Figure 6
.
Determine Shield Length
5.
Cut the shield to the overall dimension.
Figure 7
.
Cut Shield
6.
Place the cutoff portion of the shield against the end of the shaft and use
as a guide. Mark and cut the shaft.
Figure 8
.
Cut Shaft to Length
7.
Repeat step 6 for the other half of the drive.
8.
File and clean cut ends of both drive halves.
Do not use tractor if proper driveline engagement cannot be obtained through
these methods.
Connect driveline to tractor PTO shaft, making sure the spring-activated lock
-
ing collar slides freely and locks driveline to PTO shaft.
NOTICE
■
If attaching with quick hitch, the distance between the tractor PTO
and gearbox input shaft will increase. Please follow the steps as you
would for a 3-point hitch to insure proper engagement.
DRIVELINE INTERFERENCE CHECK
1.
Check for clearance between driveline and cutter deck.
2.
Slowly lift cutter and observe driveline. If clearance between driveline and
cutter deck is less than 25.4 mm (1 inch), shorten top link or limit upper
travel of lower hitch arms. Refer to tractor operator's manual for
instructions.
CUTTING HEIGHT ADJUSTMENT
Before working underneath, disconnect driveline, raise cutter, lock in
transport position, and block cutter securely. Hydraulic system leak
down and failure of mechanical or hydraulic system can cause equip
-
ment to drop.
Keep all persons away from operator control area while performing
adjustments, service, or maintenance.
■
Avoid low cutting heights. Striking the ground with blades pro
-
duces one of the most damaging shock loads a cutter can encounter.
Allowing blades to contact ground repeatedly will cause damage to cutter
and drive.
1.
Level cutter from side to side. Check by measuring from cutter frame to
the ground at each deck rail.
2.
Adjust, using tractor 3-point arm leveling device.
NOTE:
Keep the front of cutter level with or slightly lower than rear for
best mowing.
3.
Control cutting height with tractor 3-point arms, rear tailwheel adjustment,
or optional check chains.
4.
To raise rear of cutter, move tailwheel down.
5.
To raise front of cutter, raise tractor 3-point arms or shorten optional
check chains.
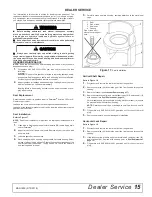
The cutting height is the distance between the blade and the ground. The
blades are approximately 292.1 mm (11.5") below the deck. To check cut
-
ting height, do the following:
a)
Place a straight edge along top edge of deck.
b)
Select a cutting height; as an example, for an approximate cutting height
of 76.2 mm (3"), set the center of the deck 368.3 mm (14.5") above the
ground:
c)
Adjust the front-to-rear attitude from 12.7 to 19.1 mm (1/2" to 3/4") higher
than the front.
CHECK CHAIN ADJUSTMENT
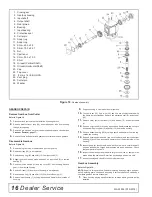
1.
Refer to Check Chain Installation (Optional), page 22 for check chain
installation.
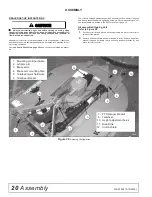
2.
After making cutting height adjustment, adjust both chains (3) in check
chain bracket (2) so you have the same number of links on each side.
This will keep your cutter level side-to-side.
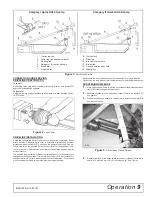
Figure 9
. Check Chain Adjustment
1-9/16"
A
DP3
DP4
DP5
WARNING
76.2 mm (3")
Desired cutting height
+ 292.1 mm
(11.5")
Distance blade cutting edge is below deck
= 368.3 mm
(14.5")
2. Check chain bracket
3. Check chain
Summary of Contents for BRUSHBULL BB600XE
Page 1: ...OPERATOR S MANUAL BRUSHBULL ROTARY CUTTER 3 19 2018 BB600XE BB720XE BB840XE MAN1255 TM...
Page 7: ...Declaration of Conformity 7 MAN1253 3 15 2018...
Page 24: ...24 Assembly MAN1255 3 19 2018 NOTES...
Page 28: ...28 Parts MAN1255 3 19 2018 GEARBOX ASSEMBLY...
Page 38: ...MANUEL D UTILISATION BRUSHBULL MAN1255 3 19 2018 BB600XE BB720XE BB840XE TM FAUCHEUSE ROTATIVE...
Page 44: ...7 D claration de Conformit MAN1255 3 19 2018 Declaration of Conformity...
Page 63: ...TRINCIATRICE ROTANTE BRUSHBULL 19 03 2018 MAN1255 TM BB600XE BB720XE BB840XE...
Page 69: ...Dichiarazione di conformit 7 MAN1253 15 03 2018...
Page 81: ...Assemblaggio 19 MAN1255 19 03 2018 NOTE...
Page 87: ...BRUSHBULL SICHELM HER 19 03 2018 BB600XE BB720XE BB840XE MAN1255 TM...
Page 93: ...Konformit tserkl rung 7 MAN1253 15 03 2018...
Page 105: ...Montage 19 MAN1255 19 03 2018 HINWEISE...
Page 111: ...BRUSHBULL DESBROZADORA GIRATORIA 19 3 2018 BB600XE BB720XE BB840XE MAN1255 TM...
Page 117: ...Declaraci n de conformidad 7 MAN1253 15 3 2018...
Page 129: ...Montaje 19 MAN1255 19 3 2018 NOTAS...


