WolfPack HDTVBYOD8200 User Manual Download Page 18

14

4. Choose the language you wish to use: English or Chinese.
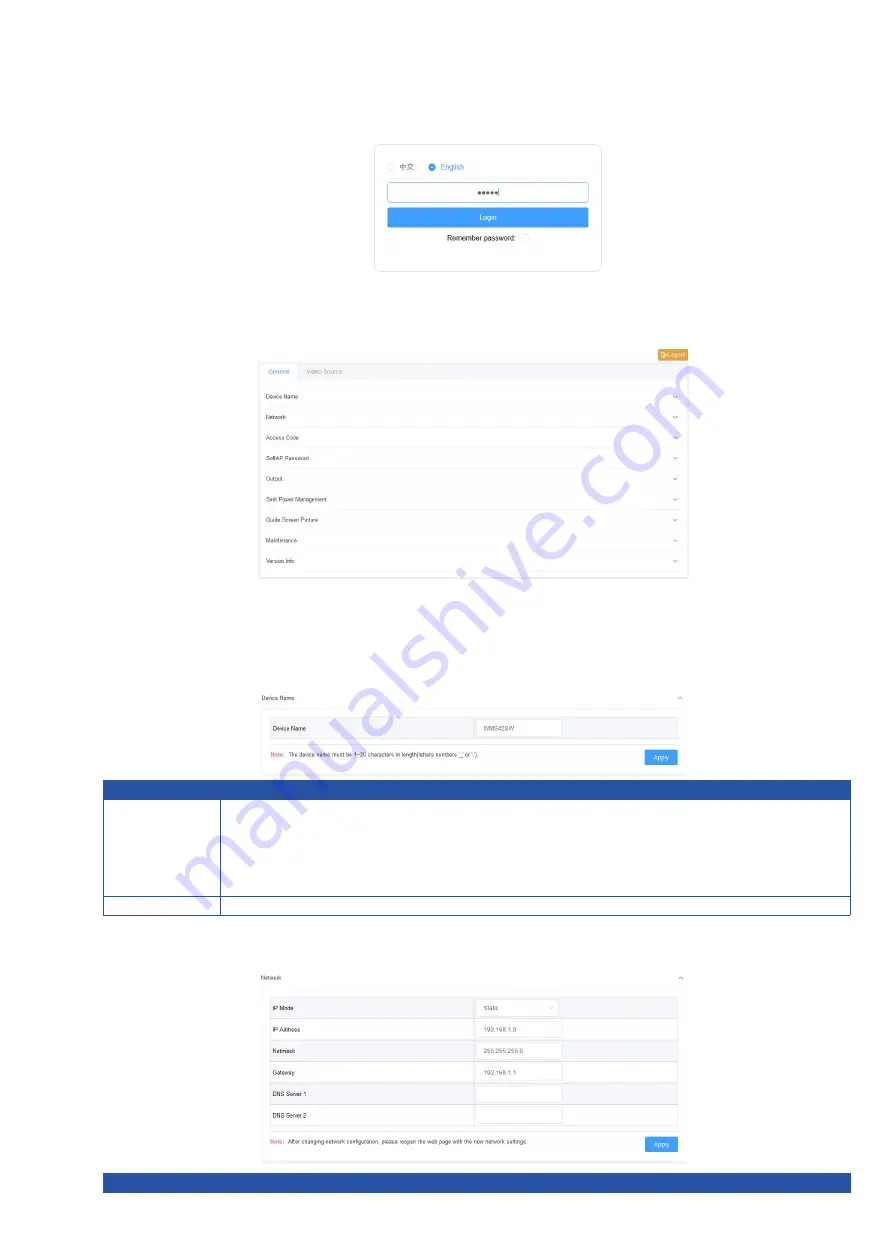
5. Input password (default password: admin) and click Login to enter the main page of Web UI.

The Web UI main page consists of General and Video Source Tabs.

General Tab

Device Name

UI Element Description

Device

Name

Redefine the device name to names easy to remember.

Note:

The name must be 1~20 characters in length, including letters,

numbers,

_

or

-

.

By default, it

s set as

WMS42SW

.

Apply

Click to perform current settings.

Network

UI Element Description

Summary of Contents for HDTVBYOD8200

Page 1: ...1 HDTVBYOD8200 4K BYOD Wireless 8x2 Presentation Switcher Version V2020 001 User Manual...

Page 2: ...not install or place this product near any heat sources such as radiators heat registers stoves or other apparatus including amplifiers that produce heat 8 Protect the power cord from being walked on...

Page 3: ...and Wiring 5 Installation 5 Wiring 5 7 Key Function 6 Screen Layout Switch 6 Automatic Signal Switching 7 Screen Mirroring 7 1 Screen Mirroring over Airplay 7 2 Screen Mirroring over Miracast 8 3 Scre...

Page 4: ...4 Sink Power Management 17 Password 18 Guide Screen Picture 18 Maintenance 18 Version Information 19 Video Source Tab 19 State Switch 19 Manage Alias 20 9 Video Source Tab 20...

Page 5: ...ss switching for both single view and Multiview Supports HDMI input resolutions up to 4K 30Hz 4 4 4 Supports HDMI output resolutions up to 4K 60Hz 4 4 4 Detailed and friendly OSD information Supports...

Page 6: ...U disk for firmware upgrade Connect to the USB Dongle for pairing up with each other 6 Reset Hold press this button for five or more seconds and then release it will automatically reboot and restore...

Page 7: ...1920x21605 1600x12008 1920x12008 2560x14405 2560x14408 1280x7206 720p50 1280x7208 720p60 1920x10806 1080i50 1920x10808 1080i60 1920x10802 1080p24 1920x10803 1080p25 1920x10805 1080p30 1920x10806 1080...

Page 8: ...4...

Page 9: ...ckwise 6 2 Repeat the above step for another antenna Attaching Installation Brackets 6 3 Attach the installation bracket to the enclosure using the screws provided in the package separately 6 4 The br...

Page 10: ...and consider to adjust the switch configuration if necessary Installation and Wiring 7 Key Function Screen Layout Switch The switcher support automatic manual switching on Multiview screen layout i e...

Page 11: ...increase or decrease the switcher will change to a new screen layout automatically so that all video sources can be displayed appropriately on the whole screen If all video sources are removed the sw...

Page 12: ...op outputting the screen of iPhone 2 Screen Mirroring over Miracast For Android mobile take Samsung Galaxy S9 for example 1 Enable the Wi Fi or WLAN feature of the mobile 2 Slide down from the top of...

Page 13: ...mobile from the switcher click the icon on the mobile screen and choose Disconnect in the Smart View window Note The icon instruction and entrance of the Miracast function may vary on different Androi...

Page 14: ...erent computers Some Windows 10 computers may fail to perform screen mirroring over Miracast due to compatibility issues Tip Both the Airplay mirroring and Miracast support access code If you see the...

Page 15: ...he switcher for pairing up Then the switcher will set its soft AP s SSID and password for USB dongle Once pairing is done Pairing succeeded will appear on the display screen 2 Connect USB Dongle to a...

Page 16: ...conds a countdown timer with the time period of 60 seconds will appear on the Guide Screen When the timer ticks to zero if the connected display is CEC supported or correctly set with RS232 control co...

Page 17: ...cess code is set as blank therefore the OSD doesn t display the access code If you want to set access code please refer to Access Code section for more information 8 Web UI The Web UI provides basic c...

Page 18: ...e Web UI main page consists of General and Video Source Tabs General Tab Device Name UI Element Description Device Name Redefine the device name to names easy to remember Note The name must be 1 20 ch...

Page 19: ...UI Element Description Access Code Enter a four digit access code to help prevent users from accidentally connecting to an unintended device and protect from an unauthorized access When an access cod...

Page 20: ...n from the dropdown menu to output this fixed resolution By default it s set as Auto Refresh Click to refresh to the latest status of the output timing Output HDCP Support Set the HDCP capability for...

Page 21: ...232 parameters for the controlled display For more information about the parameters see the user guide of your display devices Parameter Value Abbreviation Baud Rate 9600bps 9600 Data Bits 8bits 8 Par...

Page 22: ...For changing a picture for Guide Screen Apply Click to upload the picture file to the switcher Note The picture must be in jp e g format that has 1920 x 1080 pixels Maintenance UI Element Description...

Page 23: ...m white to blue to display the video source s on the screen connected to HDMI Out 1 Secondary Click the button turns from white to blue to display the video source s on the screen connected to HDMI Ou...

Page 24: ...on it will start to upgrade and the LED indicators on front panel VGA HDMI 1 2 USB C LEDs will start blinking When the upgrade process is completed the four LEDs will stop blinking and return to norma...

Reviews: