background image

- 12 -

On the handle bars

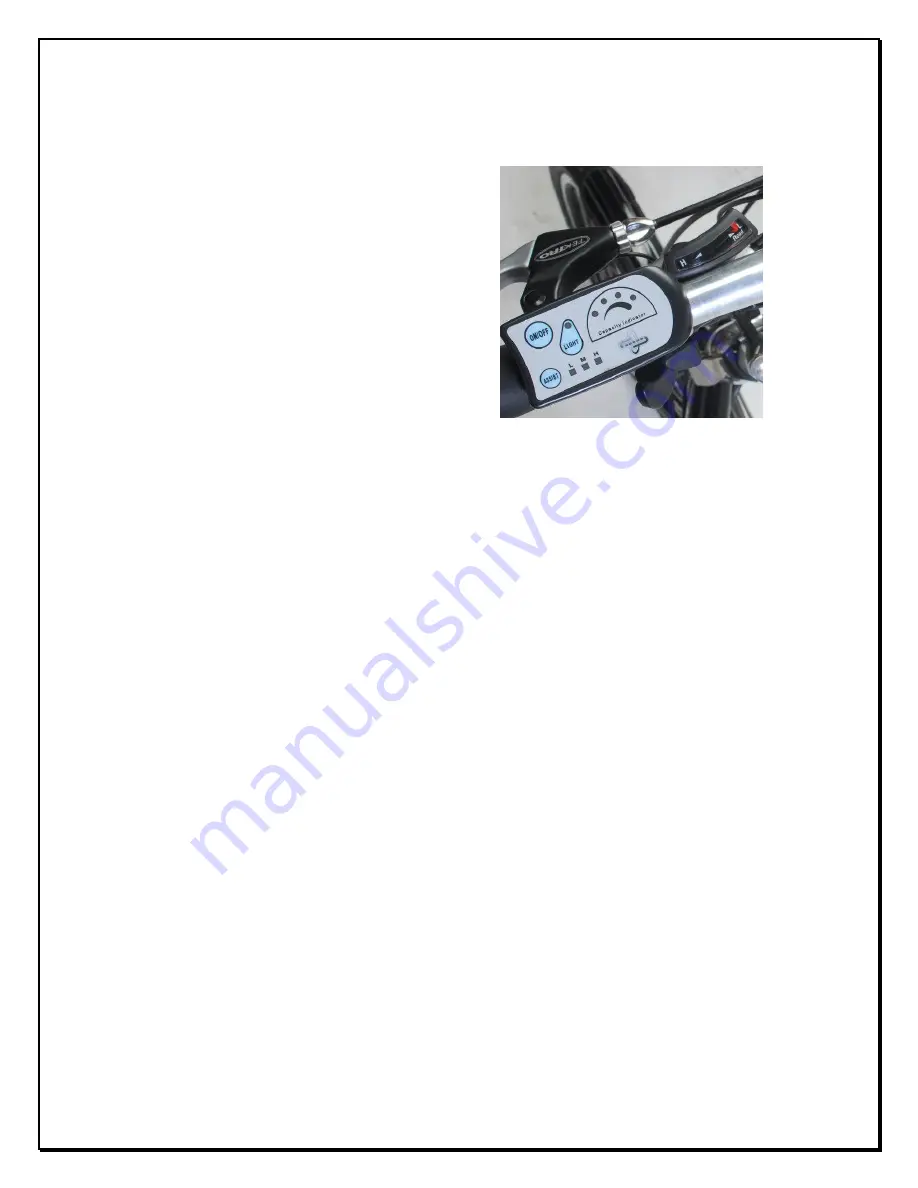
10 The battery capacity box

10.1

When the battery is switched on and the
ON/OFF button in the handle bar is
pressed the lights on the capacity
indicator on the handle bars will
illuminate showing the battery capacity
available. When the battery is switched
off the lights will go out and you will not
get any assistance from the battery or
motor. The bike is then an unpowered
push bike.

11 Gear shifters

11.1

805fe has 16 gears, 2 front chain drives (34 and 50 teeth) and 8 rear sprockets (11
to 30 teeth). The front shifter will move the chain between the high gear chain
drive

H

and the low

L

. (Please refer to the picture). The rear shifter will move the

chain from the highest gear to the lowest by simply moving the lever from left to
right.

12 Pedelec mode and ASSIST button

12.1

When you first ride your Wisper bike you will notice that after one turn of the
pedals the motor will start working to assist you by adding power to the back wheel.
This is the standard or pedelec mode. To continue using the pedelec mode you
must keep turning the pedals, if you stop the motor will stop and the bike will slow
to a halt. If you start pedaling again after one turn the motor will start again.

11.2

You will find ASSIST button on the panel on the handle bars with L.M.H

low,

Medium, High

printed close to three LED’s (small lights). When the ASSIST

button is pressed and the LED illuminates the instant power in pedelec mode is
80% of the maximum power available from the motor. When the button is pressed
again and again, the LED shift between L M and H. L means 40% of the maximum
power in pedelec mode, M means 80%, H means 100%.

11.3

High mode is generally used when you need the maximum amount of assistance
from the motor. Low mode is used when you do not need the instant power of
80% or 100%. Low mode is used in high traffic situations or poor conditions such
as ice and snow when 80% of full power immediately could be dangerous.

Summary of Contents for 805FE

Page 1: ... 1 Owner s Manual Operation and Maintenance Instructions Wisper 805FE January 2011 3rd edition We strongly recommend that you read this entire manual before using your Wisper bike Wisper Limited ...

Page 2: ...ical specifications and performance Page 9 8 Simple trouble shooting Page 11 Part 2 Controls and Equipment 9 Battery on off and battery lock Page 11 10 Capacity indicator Page 12 11 Gear shifters Page 12 12 Pedelec mode Page 12 13 Throttle Page 13 14 Brakes Page 13 15 The front connection box Page 14 16 Quick release saddle height adjustment Page 14 17 Rims and spokes Page 14 18 Chain and drive wh...

Page 3: ...ycling we recommend that you attend a cycle proficiency course prior to using your electric bike As with all bicycles it is important that you stay within safe limits and adjust your riding to match conditions remember the bike will not stop as quickly on wet or icy surfaces It is the rider s responsibility to ensure they are in proper physical condition to ride a Wisper electric bicycle The bicyc...

Page 4: ...nts are likely to become submerged Wisper offers a warranty on its bikes purchased from a Wisper dealer see the owner s manual for details To validate the warranty the retail customer must register the bike at www wisperbikes com under the warranty menu within 14 days of purchase The warranties will only be valid if the procedures set out in this manual are followed For example when not in use for...

Page 5: ...e first time 1 1 Check the handle bars and handle bar stem are properly tightened 1 2 Check all other nuts and bolts and fixings are properly tightened pay particular attention to the motor fixings side kick stand yoke and steering head bearings 1 3 Check brakes and brake isolators are functioning properly 1 4 Check tyre pressures are correct and tyres are not damaged 1 5 Check reflectors and ligh...

Page 6: ...e bike until the battery is completely or close to drained and then fully charging your battery this can take up to 12 hours for the first few charges After this conditioning process you can then charge and discharge the battery as and when you require although we recommend keeping it topped up 3 2 A lithium ion battery will slowly discharge over time as it sits in storage If a battery is allowed ...

Page 7: ...uring hot weather always leave in a shaded well ventilated area 3 6 For best results always recharge the battery at room temperature 3 7 Before unloading the battery make sure it is turned off at the key and unlocked pull the battery box from the rear carrier housing Please refer to the picture 3 8 If your battery is damaged or appears to be overheating for any reason immediately return it to your...

Page 8: ...uts 70N M B Back axle nuts 46N M C Handlebar stem expander bolt 18 to 20N M D Seat pillar clamp nut bolt 5 8N M E Brake cable anchor bolt 5N M F Brake centre bolt M6 11N M G Seat clamp nuts 24N M H Cotter pin nuts R 42N M L 46N M I Gear shifter nuts 4N M J V brake caliper nuts 10N M K Rear carrier nuts 8N M L Mudguard bracket nuts 8N M Other nuts bolts torque depends on their size M4 2 5 4 0N M5 M...

Page 9: ...aler re grease the bottom bracket bearings headset bearings wheel bearings Also lubricate pedal axles where they thread into the crank arms handlebar stem 6 8 Recommended tools for proper maintenance Torque wrench with lb in or N m gradations 2 4 5 6 8 mm Allen wrenches 9 10 15 mm open end wrenches 15 mm box end wrench Socket wrench and 14 15 and 19 mm sockets T25 Torx wrench No 1 Phillips head sc...

Page 10: ...Problem Possible reasons Trouble shooting Top speed too slow 1 Low battery voltage 2 Damage to motor driveline 1 Recharge battery fully 2 Call service Power on but motor not working 1 Battery not connected 2 Fused 3 Motor connection damaged 1 Re install battery 2 Replace fuse 3 Call service Driving shorter distance per recharge 1 Tyre pressure too low 2 Undercharge or charger fault 3 Battery capac...

Page 11: ...e on off button in the battery box to on to turn off the bikes electrical system switch the on off button in the battery box to off Please refer to the picture 9 3 After the battery has been turned on the bike is ready for use The battery box capacity indicator is on the handle bar for ease of use 9 4 To lock the battery into the bike frame turn the key clockwise to the lock position engaging the ...

Page 12: ...ne turn of the pedals the motor will start working to assist you by adding power to the back wheel This is the standard or pedelec mode To continue using the pedelec mode you must keep turning the pedals if you stop the motor will stop and the bike will slow to a halt If you start pedaling again after one turn the motor will start again 11 2 You will find ASSIST button on the panel on the handle b...

Page 13: ... brakes Once a month inspect brake pads for wear If the grooves in the braking surface are less than 2 mm deep replace the pads V brake 14 3 1 Use 5mm Allen key to loosen bolt A then take the cable out Use 5mm Allen key to loosen bolts C right left then take the spacers and washers out 14 3 2 Install new brake pads then with both pads pressed against the wheel rim ensure that distance B in the dia...

Page 14: ...nection box 15 1 The front connection box allows for the easy removal for repair or replacement of any of the electronic components on the handle bars 16 Quick release saddle height adjustment 16 1 Your Wisper bike has been fitted with a quick release saddle post collar to facilitate the movement of the saddle to remove the battery or to change the riding position 16 2 It is important that the nut...

Page 15: ...ycle chain oil at least once a month 18 2 Because your bike has a rear derailleur the chain will be automatically adjusted 19 Derailleur Full details on how to adjust and maintain your derailleur can be found on our website www wisperbikes com Electric bikes Manuals ...

Page 16: ... one full replacement years two and three pro rata 6 Paintwork excluding deliberate or accidental damage Two years 7 Front and rear axle flywheel or chain wheel One year 8 Electro plating on wheel rims rack and kickstand Six months 9 Other cases that render the bike unsafe to use By negotiation 1 If the product has a quality fault within 15 days of delivery the part will be repaired or replaced or...

Page 17: ...nd components worn in normal use 6 Failure to register your bike at www wisperbikes com within 14 days of purchase It is essential to get your spokes checked and tightened after 300km If this service has not been undertaken at the correct time this may cause damage to the wheels and spokes that will not covered under our guarantee Service through Your retailer or Wisper Ltd 10 Oakenbrow Sway Hants...

Reviews: