WPS-100-NVR-4IP Installation Manual
Pg. 41
www.snapav.com Support: 866.838.5052
13- Local Display Interface
13.1- Right Side Navigation
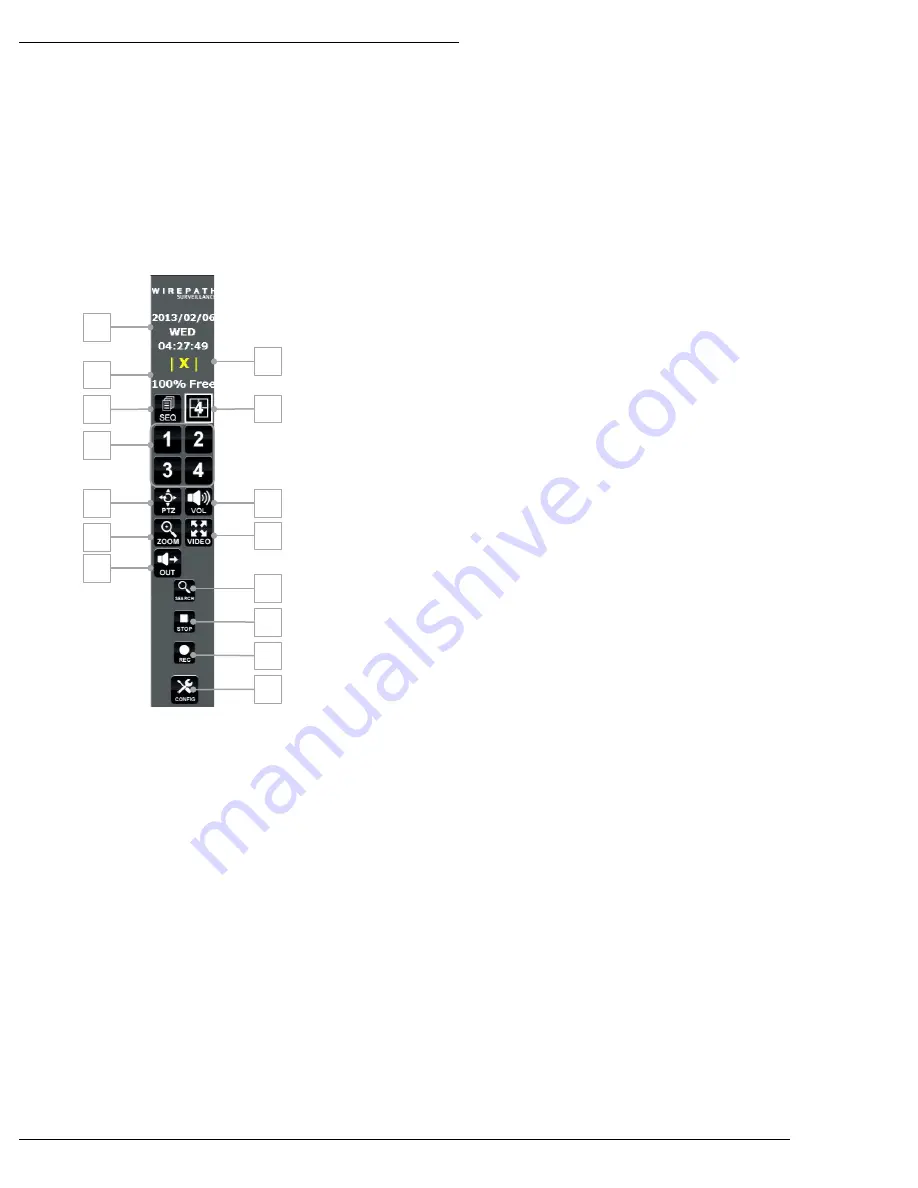
The local NVR display interface can be navigated using the IR remote or the mouse. These controls are located on the right hand
side unless Video (full screen display) is selected on the OSD or the remote.
6
7
9
11
5
8
10
12
13
14
15
4
1
2
3
1. Date and Time Display
Displays the current date and time of the NVR.
2. Recording Indicator
When the NVR is recording (scheduled or manual), REC will appear
in Red.
When not recording, [X] is displayed in Yellow.
When recording due to Motion or an Alarm, [A] is displayed in
Yellow.
3. HDD Percentage
Displays the current percentage of free space on the HDD.
4. SEQ
Sequences through all cameras configured on the NVR in a single view.
5. Split Screen
Display all 4 channels of the NVR in a Split Screen.
6. Single Channel Selection
Displays a single view of the selected channel number.
7. PTZ
Opens the PTZ menu to control a connected PTZ Camera.
Note:
The menu will not appear if the selected camera is not a PTZ
Camera.
8. Audio Volume
Mutes or un-Mutes the Audio Output from the NVR.
9. Digital Zoom
Enabled digital Zoom. Left click and drag to select desired Zoom area. Click
on the zoomed area to return to normal view.
10. Full Screen Video
Displays current view as Full Screen, right side controls are not visible in this
mode. Left click to return to normal view.
11. Audio Out
Turns Audio Out to Camera On or Off. This button does not appear when
viewing a single camera.
12. Search
Open Search menu for Recordings, Events, logs and backup.
13. Stop
Stops the currently playing recorded content.
14. Record
If NVR is not currently recording, immediately begins recording all channels.
Press Record again to stop recording.
15. Config (Configuration Menu)
Opens the NVR’s configuration menu.


