30
Maintenance
Delta Q IC650 Charger Operating Instructions
- The charger may become hot during charging. Use hand protection to safely handle the charger during
charging.
- Extension cords must be a 3-wire cord no longer than 30m (100') at 10 AWG or 7.5m (25') at 16 AWG, per UL
guidelines.
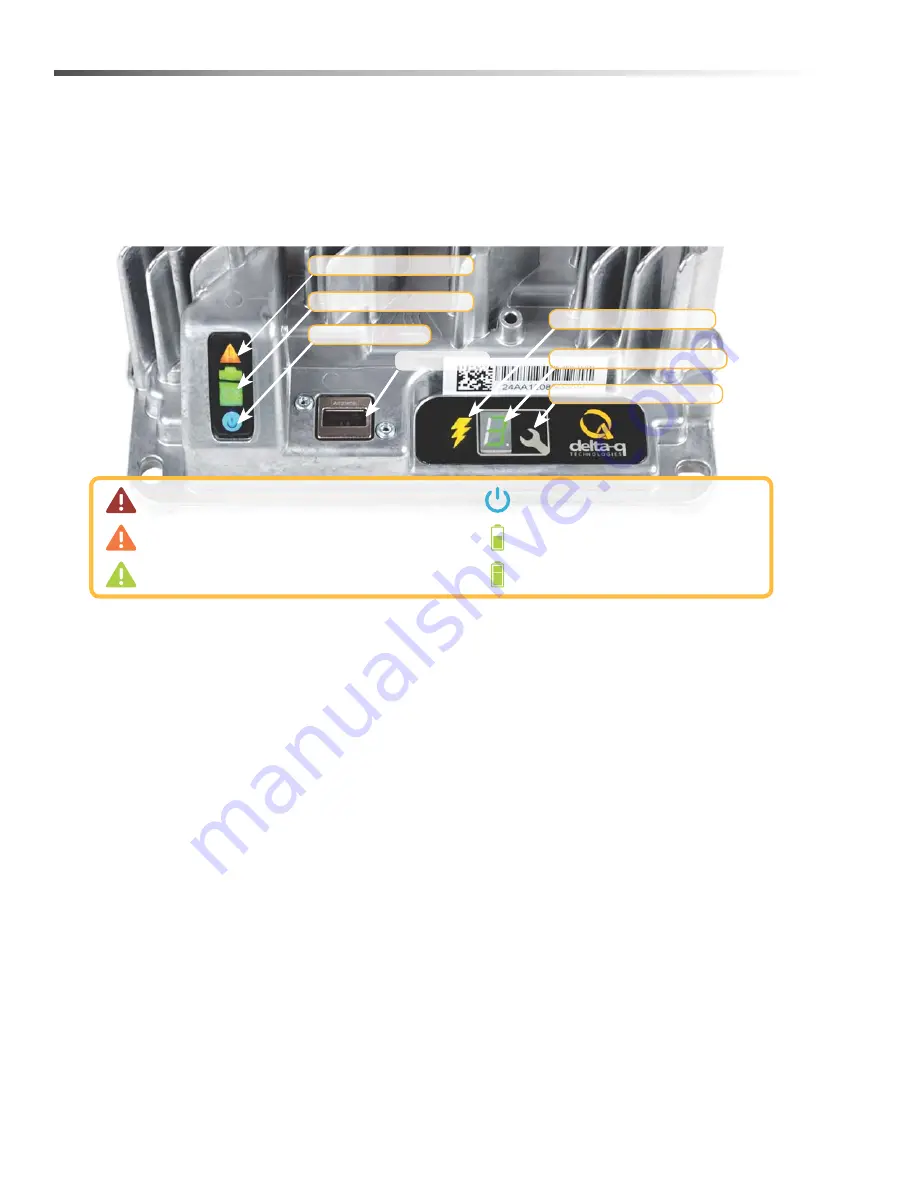
1. The USB Host Port allows data to be transferred to and from the charger using a standard USB flash drive,
including the downloading of charge tracking data and updating of the charger’s software and / or charge
profiles.
2. The Charging Output Indicator means that the charger output is active, and there is a potential risk of electric
shock.
3. The Charge Profile / Error Display shows one of four possible codes to indicate different conditions:
- ‘F’ codes meaning that an internal fault condition has caused charging to stop.
- ‘E’ codes meaning that an external error condition has caused charging to stop.
- ‘P’ code meaning that the charger programming mode is active.
- ‘USB’ code meaning that the USB interface is active, and the USB flash drive should not be removed.
The ‘E,’ ‘F’ and ‘P’ codes will appear, then are followed by three numbers and a period to indicate different
conditions (e.g. E-0-0-4). “See the Charger Fault Codes” or “Charger Error Codes” sections for details on
these conditions and their solutions.
4. The Select Charge Profile Button is used to select a charge profile from those stored on the charger. Up to 25
charge profiles can be stored. See the “Selecting A Charge Profile” section for instructions.
Fault / Error / USB Indicator
Battery Charging Indicator
AC Power Indicator
USB Host Port
1
Charging Output Indicator
2
3
4
Solid red = Charger fault
See display panel for details
Flashing amber = External error condition - caution
See display panel for details
Flashing green = USB port active
Solid green = Safe to remove USB flash drive
Flashing green = Low state of charge
Solid green = High state of charge
Flashing green = High state of charge
Solid green = charge completed
Solid blue = AC power available
Charge Profile/Error Display
Select Charge Profile Button
86398780 Operator Manual iVac 24 ATV
Summary of Contents for CV24
Page 14: ...14 Operations Drive Controls 1 2 3 4 5 6 7 8 9 10 86398780 Operator Manual iVac 24 ATV ...
Page 48: ...48 Suggested Spare Parts 86398780 Operator Manual iVac 24 ATV ...
Page 49: ...49 Notes 86398780 Operator Manual iVac 24 ATV ...
Page 52: ......
Page 56: ...4 Bumper 86398790 Spare Parts List iVac 24 ATV 1 2 5 6 3 4 3 7 8 ...
Page 76: ...24 Console Mounting From Serial Number 3 86398790 Spare Parts List iVac 24 ATV ...
Page 82: ...30 Control Panel 2 86398790 Spare Parts List iVac 24 ATV ...
Page 102: ...50 On Board Charger 86398790 Spare Parts List iVac 24 ATV ...
Page 104: ...52 Pedal Platform 3 4 5 6 7 8 9 10 11 1 2 2 2 2 86398790 Spare Parts List iVac 24 ATV ...
Page 106: ...54 Pedal Platform Mounting 86398790 Spare Parts List iVac 24 ATV ...
Page 108: ...56 Steering 86398790 Spare Parts List iVac 24 ATV 1 2 3 4 5 6 ...
Page 114: ...62 Vacuum Accessories 6 1 2 3 4 5 86398790 Spare Parts List iVac 24 ATV ...
Page 116: ...64 Accessory Hose Optional 1 2 3 86398790 Spare Parts List iVac 24 ATV ...
Page 118: ...66 Wand Bracket Optional 1 2 86398790 Spare Parts List iVac 24 ATV ...
Page 122: ...70 Wiring Diagram 1 86398790 Spare Parts List iVac 24 ATV 14A or 14B ...
Page 126: ...74 Wiring Diagram 3 86398790 Spare Parts List iVac 24 ATV ...
Page 128: ...76 Wiring Diagram 4 86398790 Spare Parts List iVac 24 ATV ...
Page 132: ...80 Wiring Diagram 6 86398790 Spare Parts List iVac 24 ATV i DRIVE i 36 70 36VDC 70A ...
Page 134: ...82 Wiring Diagram 7 86398790 Spare Parts List iVac 24 ATV ...
Page 139: ...87 86398790 Spare Parts List iVac 24 ATV Notes ...


