background image

23

Annotation Pro & Annotation Pro Plus

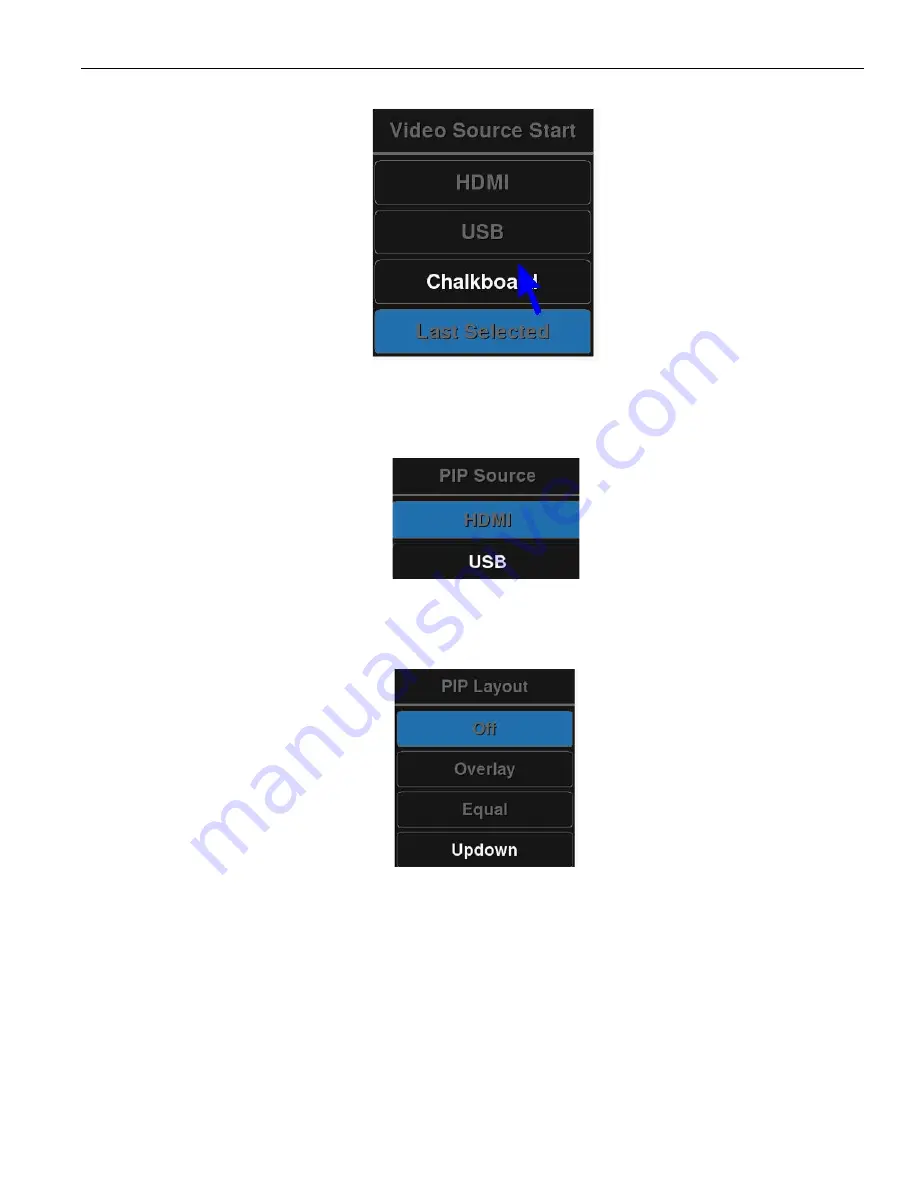
The Video Source Start menu

Picture-In-Picture (PIP) Setup

Picture-in-Picture mode allows two images or videos to be shown at once.

The PIP Source Menu

The Picture-in-Picture image or video can be provided via the HDMI or the USB. The chalkboard cannot be used as 

a source for Picture-in-Picture.


The PIP Layout Menu

The PIP Layout setting selects where the Picture-in-Picture will appear on the screen:

•  Overlay will appear in the upper right
•  Equal will split the screen, with both images/videos appearing side by side.
•  Updown will appear in the top center

Summary of Contents for AN C5

Page 1: ...AN C5 AN C5 P USER MANUAL Annotation Pro Annotation Pro Plus MAN 264D...

Page 2: ...eral Installation 10 The Back Panel 10 Connecting the Video Source and Outputs 10 Connecting Devices 10 Power On 11 Controllers Markers Overview 12 Toolbar 13 Clear All Marking 13 Erase Tool 13 Drawin...

Page 3: ...eo Output 21 EDID 21 Video Source Options 22 Default Video Source 22 Picture In Picture PIP Setup 23 Networking TCP IP TFTP SMB 24 Network Setup 24 Configure TFTP Settings 25 Configure Windows Share S...

Page 4: ...5 Clearing All Markers 35 Undoing a Marker 36 Erasing Markers 36 Using The Chalkboard 37 Saving and Storing Images and Video 37 Overview 37 Capture Options 37 Freezing Video 38 Setting the Destination...

Page 5: ...43 Glossary 44 Troubleshooting Guide 45 Appendix 47 Quick Reference for Keyboard 47 Quick Reference for Touch Screens 48 RS 232 COMM Port Pinout and Commands 49 Outside copyright information for Softw...

Page 6: ...third prong is provided for your safety If the provided plug does not fit into your outlet consult an electrician for replacement of the obsolete outlet 10 Protect the power cord from being walked on...

Page 7: ...ing Instructions Help Williams AV protect the environment Please take the time to dispose of your equipment properly Product Recycling Please do NOT dispose of your equipment in the household trash Ta...

Page 8: ...B video input It is also possible to control Annotation Pro with Crestron or AMX type room control system For instructions on configuring RS 232 devices to send commands to the Annotation Pro follow t...

Page 9: ...erlay all at once or one at a time beginning with the most recently anchored marker Ability to assign a unique marker color up to 7 to each marking device and switch between colors during a presentati...

Page 10: ...e some guidelines for setting up these devices IMPORTANT Be sure to power down the Annotation Pro before connecting or disconnecting any controllers The Annotation Pro will automatically detect instal...

Page 11: ...ted earlier in this section and install the touch screen to the monitor as directed by your touch screen man ufacturer 2 Connect a USB cable and extension to the USB port on the Annotation Pro Power O...

Page 12: ...osition arrows and pointers or make menu selections Calibrating the touch screen enhances the intuitive feel of drawing on the dis play It s essential to do a calibration the first time you start the...

Page 13: ...lear all of the current annotations Erase Tool Remove specific areas of your annotation Drawing Tools Edit the appearance of your on screen annotations Line Color Select the color you want to draw wit...

Page 14: ...menu system and make selections from it Menu Basics If the keyboard is installed it is the only way you can enter the menu sys tem If the keyboard is not installed you can access the menu system from...

Page 15: ...ange Whenever the Main Menu is visible you can select directly from it to activate a different branch of submenus Making menu selections Keyboard Use arrow to move to your selection and press the Ente...

Page 16: ...these devices will need to be manually added or need additional configuration Serial Port Settings Serial ports are used for connecting controller marker devices and used for connecting to other syst...

Page 17: ...device appears to be assigned incorrectly and is not functioning contact Tech Blue Williams AV s technical support for assistance in getting your device working Manual Serial Port Assignment WARNING...

Page 18: ...e without having to display the submenu Each time the name is selected it causes a different device type to appear The list of devices available using this method is an abbreviated version of the list...

Page 19: ...tation Pro are listed by port number with the device type displayed to the right of each number If the device type is in blue it has been assigned through the autodetect procedure at startup NOTE When...

Page 20: ...oller marker device types are able to be recognized during the initialization process all other devices must be set up manually The Annotation Pro allows you to manually adjust communication settings...

Page 21: ...t Aspect Formats dialog appears next to the Main Menu Video Output Formats Dialog for 16 x 9 Ratio 5 Select a format The Annotation Pro will immediately switch to the output format selected 6 Exit the...

Page 22: ...tion 8 Exit the menu system Video Source Options The Video Source menu allows you to select between your current Source Video or the Chalkboard background From the Touch Screen 1 Activate the menu sys...

Page 23: ...cture in Picture image or video can be provided via the HDMI or the USB The chalkboard cannot be used as a source for Picture in Picture The PIP Layout Menu The PIP Layout setting selects where the Pi...

Page 24: ...network You can print to a printer or send the Annotation Pro remote commands Network Setup 1 Activate the menu system The Main Menu appears Select the Network option The Network Menu appears Network...

Page 25: ...e with the TFTP server 1 Activate the menu system The Main Menu appears 2 Select the Network option The Network Menu appears 3 Select the TFTP option The TFTP menu appears TFTP menu 4 Enter the IP add...

Page 26: ...able to connect to your Share If it fails check your settings 8 Exit this dialog by selecting Previous Menu Calibrating and Configuring Touch Screens Calibrating Annotation Pro Touch Screen Controller...

Page 27: ...inal calibration procedures the Calibration dialog automatically disappears and you return to the menu system 5 Exit the menu system Repeat this process for each video input on your touch screen displ...

Page 28: ...sh to assign The list of touch screen areas 6 Select Previous The Touch Areas menu reappears 7 Repeat steps 4 5 and 6 until you are finished assigning touch areas 8 If you desire you can turn off touc...

Page 29: ...tion the Color Palette allows you to pre select which of the Annotation Pro s seven marking colors you wish to use during a pre sentation When the Color Palette command is activated the seven colors a...

Page 30: ...top of the screen You may select line thickness and color from here Selecting a Brightness Level You can select a brightness level for all of the markers on the overlay Adjusting the brightness can im...

Page 31: ...ion of these markers on the screen in any combination of available colors Such a combination of markers is called a marker overlay Marker overlays cannot be saved and once closed cannot be restored Th...

Page 32: ...backwards through the line options by activating the Reverse Toggle command 3 All lines drawn from this point on will appear in the newly selected line width and style From the Menu System 1 Activate...

Page 33: ...int of the straight line 2 Position the cursor anywhere on the screen where the line is to begin and anchor it A second cursor appears joined by a line to the first endpoint 3 Position the second curs...

Page 34: ...2 If desired reposition the same active pointer anywhere on the image to make your second point and continue as often as desired 3 If desired anchor the active pointer A new active pointer appear on s...

Page 35: ...label anywhere on the video image then anchor the label The line of text is anchored You can anchor a new line of text imme diately below the previously anchored text line by not moving the cursor Or...

Page 36: ...wing device When you are in Erase mode you can no longer undo markers Activating Erase Mode From the Main Menu 1 Activate the menu system The Main Menu appears 2 Select the Annotation option The Annot...

Page 37: ...u may have already anchored 6 To exit the Chalkboard repeat these steps but turn the Chalkboard option Off 7 The video source returns along with any markers you may have anchored on the chalkboard Sav...

Page 38: ...ng from Each time an image is saved the number will increment The default is 1 The num bering is remembered by the Annotation Pro even through cycling of power An example filename is img1 bmp The next...

Page 39: ...to verify the end result If you turn Verify on a dialog will appear after each save or print command asking you to verify that the image was successfully saved or printed 1 Activate the menu system T...

Page 40: ...is installed The other two commands are dependent on the Destination setting in the Capture dialog 2 The image is saved to the computer you have designated A counter appears at the lower right portio...

Page 41: ...p image in one of the following ways Touch Screen Touch the appropriate area if you assigned this command Keyboard Type ALT F3 The Get Image dialog appears 2 Select the image you wish to retrieve from...

Page 42: ...rove functionality or bug fixes NOTE The Annotation Pro must be connected to the internet to update even when updating from a USB device Before activating the Update command the update file must be co...

Page 43: ...video source will clear the annotations on screen The Chalkboard HDMI and USB Camera icons Video streams will appear in the app as long as the video content is not HDCP encrypted For instance a video...

Page 44: ...ed to a press of the button COLOR PALETTE a user defined group of colors which may be attributed to each active marker before anchored From 1 to 7 colors are available COMM PORT a serial port used for...

Page 45: ...e corresponding display Examples of video sources include DVD players cameras VGA computers standard television sets teleconference equipment slide to video converters visual presenters and more The s...

Page 46: ...l while markers are bright Monitor is automatically adjusting for the overall brightness level of the markers and the video image On the Annotation Pro activate the Change Brightness command Tone down...

Page 47: ...ands in Windows 7 8 10 1 Go to the Display settings for your system 2 In the Display window find the Screen Resolution listing 3 Select the desired resolution 4 With some operating systems you may nee...

Page 48: ...l markers are cleared from the screen Color Change Tap top left corner The marker color is changed to the next color activated in the Color Palette Draw Press and drag finger Freeze Video Tap top righ...

Page 49: ...LITY AND FITNESS FOR A PARTICULAR PURPOSE 1b Copyright c 1990 The Regents of the University of California All rights reserved Redistribution and use in source and binary forms are permitted provided t...

Page 50: ...of the University of California All rights reserved c UNIX System Laboratories Inc All or some portions of this file are derived from material licensed to the University of California by American Tele...

Page 51: ...THIS SOFTWARE EVEN IF ADVISED OF THE POSSIBILITY OF SUCH DAMAGE 13 Royal Institute of Technology Copyright c 1999 Kungliga Tekniska H gskolan Royal Institute of Technology Stockholm Sweden All rights...

Page 52: ...OR TORT INCLUDING NEGLIGENCE OR OTHERWISE ARISING IN ANY WAY OUT OF THE USE OF THIS SOFTWARE EVEN IF ADVISED OF THE POSSIBILITY OF SUCH DAMAGE 16 FreeBSD Copyright c 1997 2002 FreeBSD Project All righ...

Page 53: ...NCLUDING BUT NOT LIMITED TO THE IMPLIED WARRANTIES OF MERCHANTABILITY AND FITNESS FOR A PARTICULAR PURPOSE ARE DISCLAIMED IN NO EVENT SHALL THE AUTHOR BE LIABLE FOR ANY DIRECT INDIRECT INCIDENTAL SPEC...

Page 54: ...IS SOFTWARE EVEN IF ADVISED OF THE POSSIBILITY OF SUCH DAMAGE Copyright c 2001 2002 Swedish Institute of Computer Science All rights reserved Redistribution and use in source and binary forms with or...

Page 55: ...ed modifications or changes not expressly approved by Williams AV could void compliance with regulatory rules and thereby your authority to use this equipment United States FCC This device complies wi...

Page 56: ...CTION OF THE PRODUCTS REPLACEMENT OF THE PRODUCT NO PERSON HAS ANY AUTHORITY TO BIND WILLIAMS AV TO ANY REPRESENTATION OR WARRANTY WITH RESPECT TO THE Annotation Pro SYSTEM UNAUTHORIZED REPAIRS OR MOD...

Page 57: ...57 Annotation Pro Annotation Pro Plus This page is intentionally blank...

Page 58: ...info williamsav com www williamsav com 800 843 3544 INTL 1 952 943 2252 2021 Williams AV LLC MAN 264D...

Reviews: