38
18
Installation of outdoor unit
Step four: connect indoor and outdoor pipes
1. Remove the screw on the right han-
dle of outdoor unit and then remove
the handle.
2. Remove the screw cap of valve and
aim the pipe joint at the bellmouth of
pipe.
3. Pretightening the union nut with hand.
4. Tighten the union nut with torque
wrench by referring to the sheet
below.
handle
screw
gas pipe
liquid pipe
liquid
valve
gas valve
union nut
pipe joint
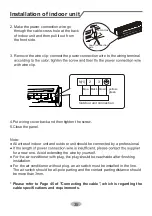
1. Remove the wire clip; connect the power connection wire and signal control
wire (only for cooling and heating unit) to the wiring terminal according to the
color; fix them with screw.
handle
Model
Liquid Pipe
size
Torque
(
kg.m
)
Nut
width
Min.
thicknes
Gas Pipe
size
Torque
(
N.m
)
Nut
width
Min.
thickness
ASA09000R φ6(1/4 inch)
1.5~2
17mm
22mm
0.7mm
ASA12000R φ6(1/4 inch)
1.5~2
17mm
24mm
0.8mm
ASA18000R φ6(1/4 inch)
1.5~2
17mm
24mm
0.8mm
ASA22000R φ6(1/4 inch)
1.5~2
17mm
0.5mm
φ9.52(3/8 inch) 3.1~3.5
0.5mm
φ12(1/2 inch) 5.0~5.5
0.5mm
φ12(1/2 inch) 5.0~5.5
0.5mm
φ16(5/8 inch) 6.0~6.5
27mm
0.8mm
N(1)
2
blue black
(brown)
yellow-
green
Indoor unit connection
9K, 12K,18K Cool only type:
Indoor unit connection
2
2
K Cool only type
:
N(1)
2
3
blue black brown
(red)
yellow-
green
ASV09000R
ASV12000R
ASV18000R
ASV22000R
ASH09000R
ASH12000R
ASH18000R
ASH22000R
ϕ6 (1/4 inch)
ϕ6 (1/4 inch)
ϕ6 (1/4 inch)
ϕ6 (1/4 inch)
ϕ6 (1/4 inch)
ϕ6 (1/4 inch)
ϕ6 (1/4 inch)
ϕ6 (1/4 inch)
1.5~2
1.5~2
1.5~2
1.5~2
1.5~2
1.5~2
1.5~2
1.5~2
17mm
17mm
17mm
17mm
17mm
17mm
17mm
17mm
0.6mm
0.6mm
0.6mm
0.6mm
0.6mm
0.6mm
0.6mm
0.6mm
ϕ9.52 (3/8 inch)
ϕ9.52 (3/8 inch)
ϕ16 (5/8 inch)
ϕ16 (5/8 inch)
ϕ9.52 (3/8 inch)
ϕ9.52 (3/8 inch)
ϕ16 (5/8 inch)
ϕ16 (5/8 inch)
3.1~3.5
3.1~3.5
6.0~6.5
6.0~6.5
3.1~3.5
3.1~3.5
6.0~6.5
6.0~6.5
22mm
22mm
27mm
27mm
22mm
22mm
27mm
27mm
0.71mm
0.71mm
0.71mm
0.71mm
0.71mm
0.71mm
0.71mm
0.71mm
Model
Liquid Pipe Torque Nut
Min.
Gas Pipe
Torque Nut
Min.
size
(kg.m) width thickness size
(N.m) width thickness
35
Installation of outdoor unit
Step four: connect indoor and outdoor pipes
1. Remove the screw on the right han-
dle of outdoor unit and then remove
the handle.
2. Remove the screw cap of valve and
aim the pipe joint at the bellmouth of
pipe.
3. Pretightening the union nut with
hand.
4. Tighten the union nut with torque
wrench by referring to the sheet
below.
gas pipe
liquid pipe
liquid
valve
gas valve
union nut
pipe joint
Hex nut diameter Tightening torque
(N.m)
ĭ
ĭ
ĭ
ĭ
ĭ
30~40
45~55
a
70~75
15~20
1. Remove the wire clip; connect the power connection wire and signal control
wire (only for cooling and heating unit) to the wiring terminal according to the
connection
handle
screw
N(1) 2
3
brown
black
blue
yellow-
green
35
Installation of outdoor unit
Step four: connect indoor and outdoor pipes
1. Remove the screw on the right han-
dle of outdoor unit and then remove
the handle.
2. Remove the screw cap of valve and
aim the pipe joint at the bellmouth of
pipe.
3. Pretightening the union nut with
hand.
4. Tighten the union nut with torque
wrench by referring to the sheet
below.
gas pipe
liquid pipe
liquid
valve
gas valve
union nut
pipe joint
Hex nut diameter Tightening torque
(N.m)
ĭ
ĭ
ĭ
ĭ
ĭ
30~40
45~55
a
70~75
15~20
1. Remove the wire clip; connect the power connection wire and signal control
wire (only for cooling and heating unit) to the wiring terminal according to the
Outdoor unit connection
handle
screw
N(1) 2
3
brown
black
blue
yellow-
green
Indoor unit
Summary of Contents for ASH09000R
Page 13: ...Introduction for buttons on remote controller 10 Note ...
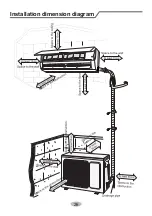
Page 29: ...26 Installation dimension diagram ...
Page 82: ...室內機的安裝 79 持 ...
Page 86: ...室內機的安裝 83 ...


