background image

28

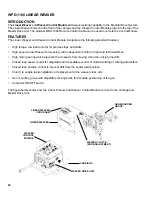
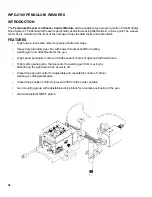
WPD-2100 PENDULUM  WEAVER II
INTRODUCTION

The 

Pendulum Weaver

 and 

Weaver Control Module

 add a pendulum-type weaving motion to the Modular 

Drive System. The Pendulum Weaver is particularly useful for weaving fillet welds in a corner joint. The weaver 

motor box is mounted to the front of the carriage using standard racks and rackholders. 

FEATURES 

•   High torque, low inertia motor for precise starts and stops.


•   Heavy duty planetary gear box with powerful output shaft for rotating 


welding gun and attachments for the gun.


•   High speed pendulum motion with independent control of right and left dwell times.


•   High motor gearing ratio, that prevents the welding gun from moving by    


backdriving the gear train when power is off.


•   Closed loop speed control for adjustable and repeatable control of critical   


welding or cutting parameters.


•   Closed loop position control to prevent drift from the center position.


•   Gun mounting group with adjustable racking block for accurate positioning of the gun.


•   Weld Contactor ON/OFF switch.

Summary of Contents for BUG-O SYSTEMS MDS-1002

Page 1: ...ion information below for future reference This information can be found on your machine nameplate Model Number Serial Number Date of Purchase Whenever you request replacement parts or information on...

Page 2: ...Never remove or bypass the equip ment power cord ground Verify the equipment is grounded in accor dance with all applicable local and national electrical safety codes If none exist use International...

Page 3: ...s as small as possible The larger the gap the higher the voltage and the higher the interference 5 Some plasma or welding units will inject high frequency interference into the AC power line Use separ...

Page 4: ...WPD 2100 Pendulum Weaver II Introduction Features 29 30 Pendulum Weaver II Installation Setup and Alignment 31 Pendulum Weaver II Technical Data Dimensions 32 WPD 2100 Pendulum Weaver II Exploded Vie...

Page 5: ...stitch welding parameters The MDS 1004 Stitch Module has closed position feedback so all distances are set in inches or mm as opposed to time and are repeatable The MDS 1055 Universal Limit Kit adds...

Page 6: ...es placement of the releasable carriage anywhere on the track 5 Optional cable mounting bar with anchor clamp to keep the welding cables and contact wires away from the work surface 6 Contactor ON OFF...

Page 7: ...tate the Master Drive clutch knob B fully counter clockwise to disengage the drive pinion The carriage can now be placed anywhere on the track Turn the wheel engagement knob A clockwise to engage the...

Page 8: ...ity Vertical 60 lbs 27 kg International Robotics Standards Rating Horizontal 100 lbs 45 kg Speed Range 2 120 in min 51 3048 mm min Net Weight 10 lbs 4 5 kg Shipping Weight 13 lbs 5 9 kg MASTER DRIVE U...

Page 9: ...012 Mounting Block 28 1 MPD 1090 Matched Clutch Plts 29 1 BUG 2593 Glide Flat 30 1 MPD 1015 Gear Motor 60 1 31 1 MPD 1016 Clutch Assembly Includes items 32 through 37 32 1 BUG 1216 Ball Joint 33 1 BUG...

Page 10: ...onnectors are not wired 1 1 The Connector on one end is flipped For example Pin 1 goes to connector 18 Most signals on the 50 pin connector come in one 50 pin connector and exit on the other 50 pin co...

Page 11: ...20 VAC 240 VAC 42 VAC F1 F2 Fuses 2 MPD 1058 5A 2 MPD 1058 5A 2 MPD 1058 5A New P N Old P N New P N Old P N New P N Old P N PC Power Cord BUG 9454 MPD 1001 BUG 9454 240 MPD 1003 BUG 9454 42 MPD 1005 P...

Page 12: ...KE OUT SPEED CONTROL PCB 2 18 LINE C3 C4 PCB 3 10 LINE RIBBON B POSITION BRAKE FAN FAN SPEED CARD SIGNALS C2 ITEM DESCRIPTION PART NO B Brake Assembly WPD 1012 Cl Contactor Cable Assembly MPD 1036 C2...

Page 13: ...Net Weight 1 75 lbs 0 8 kg Shipping Weight 3 0 lbs 1 4 kg MODULES TECHNICAL DATA DIMENSIONS 2 50 64 mm MDS 1002 MDS 1003 MDS 1004 MDS 1005 6 00 152 mm 7 50 191 mm 6 00 152 mm 3 38 86 mm 7 50 191 mm M...

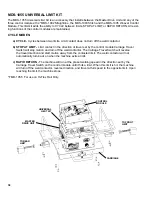
Page 14: ...independent 1 Amp contacts pins A B and C D at the weld contactor receptacle NOTE A safety interlock will automatically open the weld contacts if the motor overload protection halts ma chine motion C...

Page 15: ...itch acts as a weld contact en able and the stitch module cycles the contacts on and off NOTE A safety interlock will automatically open the weld contacts if the motor overload protection halts machin...

Page 16: ...Weld Contact or the welder will never cycle on and off SKIP TIME This control functions only when the mode switch is set to Stitch Skip time sets how long the machine travels between welds 0 3 15 sec...

Page 17: ...er feedback is employed to ensure the traveled distances match the set distances The module provides an extra contactor output This output and the output on the Modular Drive can be disabled or enable...

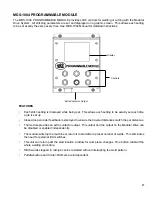
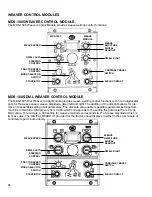
Page 18: ...H WELD CONTACT WEAVER CONTROL MODULES The MDS 1005 Dial Weaver Control Module provides weave welding control functions with 3 turn digital dial pots for the weave speed weave amplitude dwell left and...

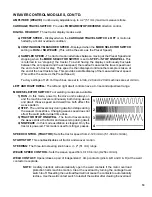
Page 19: ...justment range MODE SELECTOR SWITCH Four welding modes are available SPEED CONTROL TRACTOR Sets the tractor speed from 2 120 in min 5 1 304 8 cm min START STOP This enables disables all tractor and we...

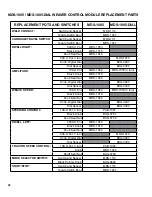
Page 20: ...1018 Knob Seal Nut MDS 1046 Knob Digital Dial BUG 3297 Dial Spacer BUG 3302 WEAVE SPEED 10K Pot MDS 1052 MDS 1078 3 turn Black Knob MDS 1018 Knob Seal Nut MDS 1046 Knob Digital Dial BUG 3297 Dial Spa...

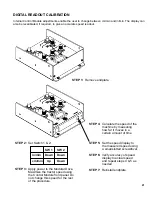
Page 21: ...of the machine by measuring how far it moves in a certain amount of time STEP 3 Apply power to the Modular Drive Maximize the tractor speed using the Control Module front panel Do not change this spe...

Page 22: ...trol of right and left dwell times High motor gearing which prevents the crossarm from moving when the unit is turned off Closed loop speed control for adjustable and repeatable control of critical we...

Page 23: ...m Net Weight 13 5 lbs 6 0 kg Shipping Weight 16 5 lbs 7 5 kg Speed 2 110 in min 51 2794 mm min Cycles 2 5 cycles per second at 1 8 3mm stroke 1 6 cycles per second at 1 4 6mm stroke 1 0 cycles per sec...

Page 24: ...ld fit together easily and do not need forced Attach the Linear Weaver to the carriage using the two weaver mounting bolts DO NOT SUBSTITUTE LONGER BOLTS Retighten the bolts that hold the Master Drive...

Page 25: ...t and then the extreme right Turn on the oscillator at the same time with the controls set to maximum weave width Readjust the crossarm or the gun if the racking fixture hits the case during operation...

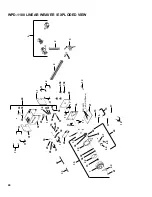
Page 26: ...40 1 13 22 36 38 29 39 37 3 35 44 48 47 46 45 43 24 27 31 30 28 10 17 15 14 6 58 7 58 9 33 42 18 25 26 16 16 34 21 25 18 19 23 32 31 12 11 20 8 5 2 4 12 11 52 51 50 54 53 55 49 57 52 56 17 17 17 17 1...

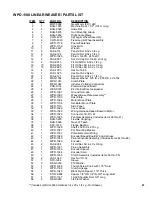
Page 27: ...002 Weaver Base Plate Assembly 28 1 WPD 1103 Dust Plate 29 1 WPD 1004 Motor Mount Plate 30 1 WPD 1106 Oscillator Mount Plate 31 2 WPD 1110 Side Panel 32 1 WPD 1020 Cover Panel 33 1 WPD 1022 Wiring Har...

Page 28: ...ops Heavy duty planetary gear box with powerful output shaft for rotating welding gun and attachments for the gun High speed pendulum motion with independent control of right and left dwell times High...

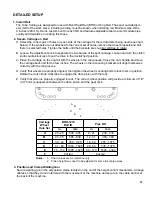
Page 29: ...the four captive screws on the elec tronics box Bolt the mounting plate onto the front of the carriage below the electronics box and bolt the rackholder onto the mounting plate Insert the 14 355 mm r...

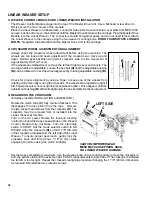
Page 30: ...TANT When the welding gun is clamped in place with the nozzle pointing into the weld groove the centerline of the wire must pass through the axis of the gearbox output shaft as shown in Figure A which...

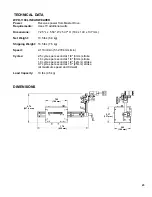
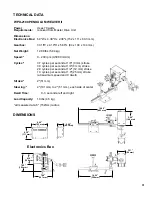
Page 31: ...cycles per second at 1 8 3 mm stroke 3 0 cycles per second at 1 4 6 mm stroke 2 0 cycles per second at 1 2 12 mm stroke 1 3 cycles per second at 1 0 25 mm stroke at maximum speed and 0 dwell Stroke 2...

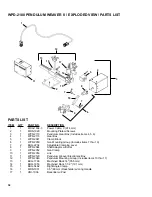
Page 32: ...Group Includes items 7 thru 10 7 2 BUG 2234 Adjustable Clamping Lever 8 1 WPD 2044 Shaft Adaptor w Collar 9 1 WPD 2052 Gun Clamp 10 1 WPD 2053 Link 11 1 WPD 2120 Pendulum Weaver Electronics Box 12 1...

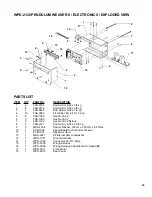
Page 33: ...an Hd Scr 8 32 x 2 3 4 Lg 9 2 MDS 1034 Spacer Washer 125 ID x 255 OD x 06 Thick 10 1 PCB 1009 Speed Board for Pendulum Weaver 11 1 PCB 1021 Capacitor Card 12 1 WAS 0221 8 Internal Star Lockwasher 13 1...

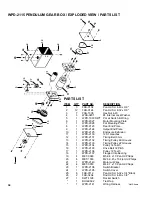
Page 34: ...ng Belt 3mm 13 1 WPD 2132 Timing Pulley 60 Grooves 14 1 WPD 2133 Timing Pulley 22 Grooves 15 1 WPD 2134 Pulley 14 Teeth 16 1 WPD 2135 Drive Belt 32 Pitch 17 1 WPD 2136 Pulley 72 Teeth 18 1 WPD 2137 Fl...

Page 35: ...WEAVER WIRING DIAGRAM Notes The encoder section outlined is for the WPD 1000 Linear Weaver only The PC Card to filter power is only used in WPD 2000 Series Pendulum Weavers Wiring diagram will also w...

Page 36: ...984 External Adj Leg Wheel Assembly 2 2 FAS 0545 Soc Hd Cap Scr 10 32 x 1 2 Lg 3 2 MPD 1045 Fixed Leg Wheel Assembly 4 1 MPD 1049 Handle Black 5 1 MPD 1059 Knob Screw Included w carriage 6 1 MPD 1066...

Page 37: ...erly engaged in rack The correct wheel position will provide a minimum of 1 8 3 175 mm engagement between the drive pinion and the gear rack 3 Position and Clamp Welding Gun Secure welding gun in the...

Page 38: ...by the control module Carriage Travel Switch will stop motion and turn off the weld contactor The Carriage Travel Switch will reverse the travel direction and start motion away from the contacted lim...

Page 39: ...l AHC for the Linear Weaver WPD 1100 that controls the welding tip to work distance and maintains a constant weld current helping to provide uniform weld penetration The CAS 2050 senses the actual wel...

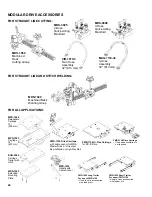
Page 40: ...1065 Releasable Carriage 12 305 mm MPD 1055 Carriage 18 457 mm BUG 2205 Carriage Trailer with Hitch MDS 1045 Extended Mounting Plate FMD 1105 Drive Carriage with cable anchor for MDS Master Drive or U...

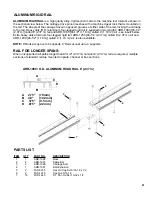
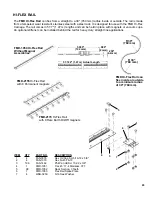
Page 41: ...four legged rigid rail ARR 1250 93 1 2 2 37 m called 8 2 37 m rail and ARR 1200 46 1 2 1 18 m called 4 1 18 m rail is also available NOTE 8 Rails accept up to 8 supports 4 Rails accept up to 4 suppor...

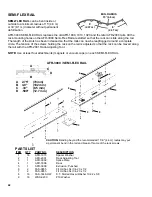
Page 42: ...moved along the rail with the AFR 2001 Rack Adjusting Tool NOTE Use at least four attachments magnets or vacuum cups on each SEMI FLEX RAIL CAUTION Bending beyond the recommended 15 0 4 6 m radius ma...

Page 43: ...cations FMD 1050 Hi Flex Rail Without Magnet Assemblies R 30 760 mm R 30 760 mm FMD Hi Flex Rail can flex inside or outside to a minimum radius of 30 760 mm 3 995 102 mm 080 2 mm 250 6 4 mm 57 722 1 4...

Page 44: ...ies improves handling 200 lb 90 kg holding capacity All XXX 2010 HH are High Heat models and are rated at 180 C 356 F for high temperature applications Swivel Magnets Magnet bar swivel with release re...

Page 45: ...ll of 50 lbs 22 6 kg VACUUM SUPPORT KIT ARV 2020 Vacuum Pump Kit 120V ARV 2030 Vacuum Pump Kit 240V ARV 1051 ARV 1036 ARV 1036 VACUUM SUPPORT BAR EXPLODED VIEW PARTS LIST 4 3 1 8 3 4 5 7 2 6 The stand...

Page 46: ...ower Components 13 1 ARV 2013 Handle 14 1 ARV 2011 Body 15 4 ARV 2010 Vane 16 1 ARV 2009 Shroud 17 2 ARV 2003 End Cap 18 2 ARV 2004 Felt 19 2 ARV 2005 O ring 20 2 ARV 2002 End Cap Assembly Includes pa...

Page 47: ...Control Cable and Universal Limit Kit All attached components are removed to limit the number of components affecting the operation and complexity of the system Assemble a base system composed of a C...

Page 48: ...as any type of motion enable switch turn it to enable 1 If the tractor does not work properly proceed with step 2A 2 If the tractor operates correctly the accessory removed from the accessory port is...

Page 49: ...he board No tractor speed control and display is lit Operator Error Stitch Control Module 2A Set the MODE switch to CONTINUOUS WELD and the CARRIAGE TRAVEL switch to STOP Turn the SPEED CONTROL clockw...

Page 50: ...off and then turns on again check for shorted motor connections If none are found replace the speed card 3 If the L5 turns on and then stays on check that the control module is set up as defined abov...

Page 51: ...nly or moves erratically Bad control card bad weaver speed card or loose set screws on the servo pot s flexible coupling coupling is used on WPD 1000 only 6A On the WPD 1000 linear weaver only tighten...

Page 52: ...Figure 3 Install one voltmeter lead on TP6 and the other on TP7 see Figure 1 Turn on the unit set the weaver control module MODE SELECT switch to RUN no weave and the START STOP switch to START If rea...

Page 53: ...ly moved towards the center of the carriage engaged see page 6 Carriage wheels out of adjustment Follow setup procedure for Wheel Adjustment and Alignment page 7 Worn or damaged rail Visually inspect...

Page 54: ...lways unplug the power cord before opening the case Figure 1 Troubleshooting Test Points TEST POINTS TP1 15V TP2 GND TP3 15V TP4 Tractor Speed Command TP5 Tractor Speed Command TP6 Weaver Speed Comman...

Page 55: ...THE CASE OR SERIOUS INJURY MAY RESULT 1 Unplug the power cord Figure 3 Procedure for Opening the Master Drive Case Figure 2 Master Drive Accessory Port 4 Open the case 2 Unbolt the Master Drive from t...

Page 56: ...oth internal and external to the Universal Limit Kit 4 If the machine does not move at all measure the voltage across each limit switch on the PC board while cycling the switch on and off The voltage...

Page 57: ...E CONNECTOR 4 T F ELBOW PCB 1000 1 PRECISION SPEED CARD PCB 1005 120 24 1 POWER SUPPLY 120 240V SPK 1002 MODULAR DRIVE SYSTEM 240V SPARE PARTS KIT PARTS LIST PART NO QTY DESCRIPTION 100 0422 1 POWER E...

Page 58: ...CK FAS 0124 4 8 32 x 3 8 PAN HD BLK OXIDE FAS 0504 4 SOC HD CAP 4 40 x 3 8 FAS 0525 4 SOC HD CAP 8 32 x 1 2 FAS 0557 4 SOC HD CAP 1 4 20 x 3 4 FAS 0815 4 FLT HD SLT SCR 6 32 x 1 2 FAS 0902 4 4 40 x 1...

Page 59: ...tion of the use of certain hazardous substances RoHS Standards EN 12100 2010 Safety of Machinery General principles for design Risk assessment and risk reduction EN 60204 1 2016 Safety of machinery El...

Page 60: ...er obligations or li abilities whatsoever with respect to machines or parts furnished by Manufacturer Manufacturer shall not in any event be liable to Distributor or any customer for any loss of profi...

Reviews: