344940 REV2 03/17/2020
©
Copyright 2020 Wayne Dalton, a division of Overhead Door Corporation
10
Remove the guides and drill the appropriate size mounting holes for the fasteners provided (listed as “Guides-to-Wall” on hardware shipping list). Locate them in the TOP of
the slot. Repeat this process for the remaining holes. Install top and bottom bolts in both guides with hardware provided. Check the “C” dimension and compare with the
installation drawing.
IMPORTANT:
THE GUIDE TO GUIDE DISTANCE, OR “C” DIMENSION ON THE INSTALLATION DRAWING MUST BE AS SPECIFIED. (See Figure #4.)
Using a string and a level, ensure that the guides are parallel to each other, shimming if necessary to achieve vertical and horizontal leveling. Now install the remaining bolts.
IMPORTANT:
THE FASTENERS SUPPLIED MEET ALL NFPA 80 REQUIREMENTS SET FORTH. USE OF ANY OTHER TYPE FASTENER MUST BE ON THE APPROVED SUBSTITUTION LIST
IN NFPA 80 AND CANNOT BE OF A LESSER DIAMETER.
Between Jambs (Brackets Under Lintel) Shutters:
The inner and outer guides are factory assembled, but must be disassembled in order to be installed.
Note that “pack-out” angles are also required, and are slotted to match the guides. Group the parts of
each guide together since they are handed and not interchangeable. Next, determine the location of the
“bolt line” (BL) for the guide mounting bolts on the wall. (Follow this procedure for either masonry or steel
jambs-see Figure #4.)
Choose one guide/packout angle to be used as a template. Temporarily clamp the assembly in the proper
jamb (i.e., left assembly in left jamb) at the exact location in the opening the shutter is to be mounted.
After determining that the guide outer channel is plumb, level and properly spaced into the opening,
carefully scribe the location of each packout angle mounting slot on the jamb. Repeat this procedure for
the opposite side making sure that the channel is located at exactly the same distance into the opening.
Remove the guide angle assembly and drill the appropriate size mounting holes for the fasteners
provided (listed as “Guides-to-Wall” on hardware shipping list). Locate them in the TOP of the slot. Repeat
this process for the remaining holes. It is a good practice to align a chalk line with the center of the top
and bottom slot, and snap a line to better locate the drill.
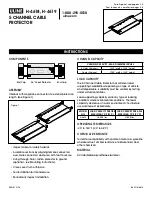
Install both the pack-out angle and outer guide angle together on each jamb starting with the top and
bottom bolts using the hardware provided. Using a string and a level, ensure that the guides are parallel
to each other, shimming if necessary to achieve vertical and horizontal leveling. Now install the remaining
bolts.
BOLT
GALVANIZED WASHERS
MOUNTING BOLTS DEPENDENT
UPON JAMB CONDITION
LOCATE BOLTS IN
TOP OF SLOTS
PACKED OUT EXPLODED VIEW
LEFT HAND SHOWN