VAMP 221, Operation And Configuration Instructions. Technical Description
The Epson 221 Instruction Manual is a comprehensive guide for getting the most out of your Epson 221 printer. It covers all aspects of setup, troubleshooting, and maintenance, ensuring optimal performance. Download this free manual from manualshive.com to unlock the full potential of your device hassle-free.
Share
Download


Reviews:
No comments
Related manuals for 221
REG650 ANSI
Brand: ABB Pages: 144
RELION RET670
Brand: ABB Pages: 240
100 Series
Brand: 3M Pages: 26

C Series
Brand: Eaton Pages: 8

850
Brand: GE Multilin Pages: 870
SecoGear
Brand: GE Pages: 56
C170
Brand: Valex Pages: 6

M4000
Brand: K&K Pages: 10

WORKTUNES WIRELESS
Brand: 3M Pages: 23

M9700
Brand: K&K Pages: 9

ZEN
Brand: Kask Pages: 64

SE-SR2
Brand: Datalogic Pages: 16
LARYVOX TAPE
Brand: Fahl Pages: 4
D-86651
Brand: Hama Pages: 8
SENTINEL
Brand: I-Gard Pages: 12

90287
Brand: P+P Pages: 7
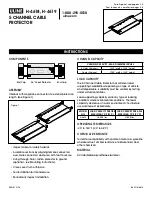
H-4618
Brand: U-Line Pages: 6

H-4078
Brand: U-Line Pages: 3


