830872-0001 REV 12/07/2022
©Copyright 2022 Wayne Dalton, a division of Overhead Door Corporation
21
16. CLUTCH ADJUSTMENT
NOTE:
The clutch is intended to provide protection for the door, the operator and associated
equipment. It is not intended for entrapment protection.
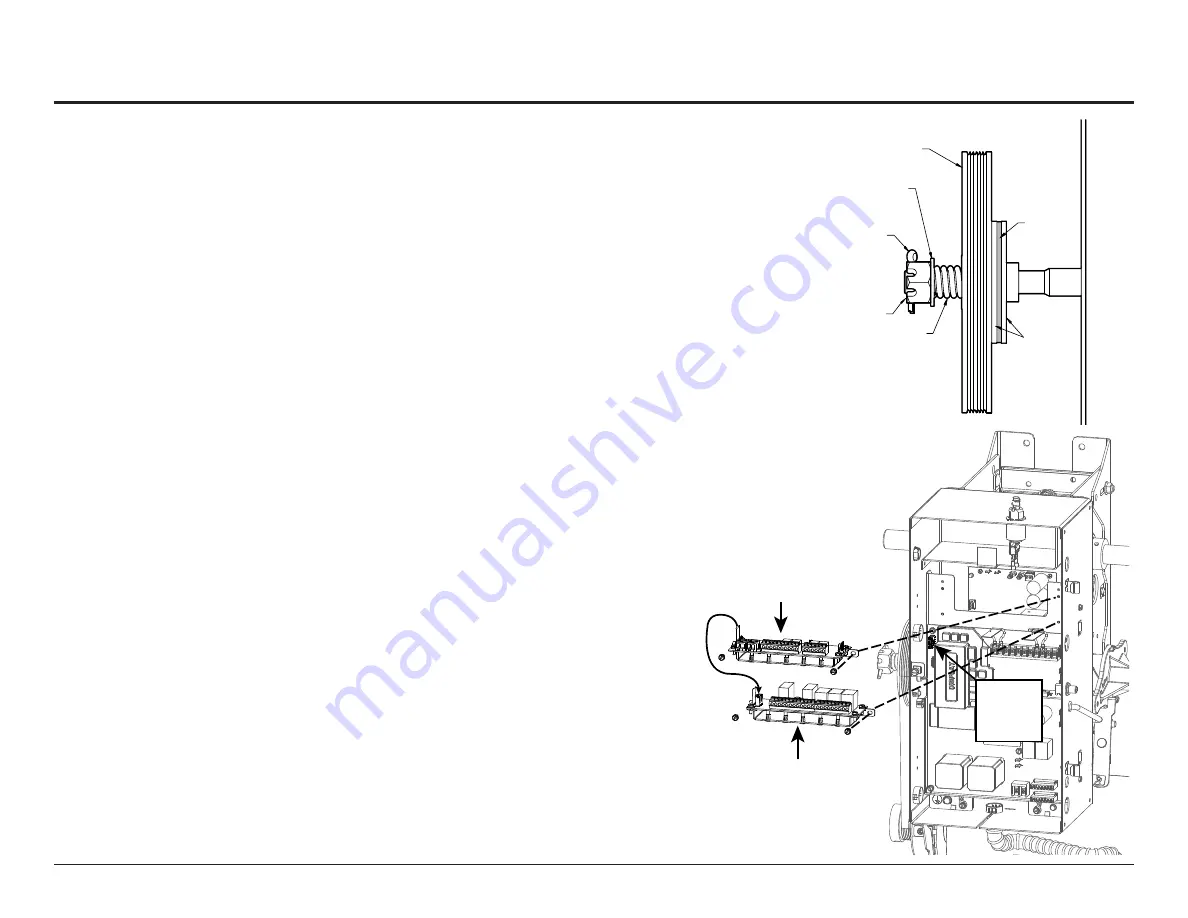
To Adjust the Clutch: Figure 32
• Decrease the compression on the clutch until the operator will not lift the door.
• Turning the adjustment castle nut counter-clockwise will decrease compression and clockwise
will increase compression.
• Gradually increase compression until the operator will perform a complete open and close cycle
without clutch slippage.
• Insert a cotter pin through the adjustment castle nut and bend a leg of the cotter pin to hold it
in place.
NOTE:
Periodically check the system for proper clutch action. If clutch starts to slip after working
properly for some time , check manual operation of door BEFORE adjusting clutch. The door may not
be operating freely or the counterbalance spring may need adjusting. Repairs and adjustments must
be performed by a trained service representative using proper tools and instructions.
OPTIONAL AUXILIARY BOARD (AOM OR TCM)
Only one auxiliary board can be used with this opener.
• Unplug FDO module ribbon harness from main control board plug connector.
See Figure 33
• Remove the two screws mounting the FDO module to plate.
• Use the two screws included with the auxiliary board and mount to plate where FDO
module was.
• Plug auxiliary board ribbon harness into plug connector on main control board.
• Reinstall FDO module onto plate just above the auxiliary board.
• Plug FDO module ribbon harness into connector on auxiliary board.
NOTE:
Additional menu items will appear during programming. See the instructions
included with the Auxiliary board to see changes.
4.10
Clutch Adjustment
NOTE:
Additional menu items will appear
during programming. See the instructions
included with the Auxiliary board to see
changes.
To Adjust the Clutch: Fig, 24
1) Decrease the compression on the clutch until the operator
will not lift the door.
•
Turning the adjustment castle nut counter-clockwise
will decrease compression and clockwise will increase
compression.
2) Gradually increase compression until the operator will
perform a complete open and close cycle without clutch
slippage.
3) Insert a cotter pin through the adjustment castle nut and
bend a leg of the cotter pin to hold it in place.
NOTE:
The clutch is intended to provide protection for the door,
the operator and associated equipment. It is not intended for
entrapment protection.
NOTE:
Periodically check the system for proper clutch action.
If clutch starts to slip after working properly for some time ,
check manual operation of door BEFORE adjusting clutch. The door may not be operating freely or the
counterbalance spring may need adjusting. Repairs and adjustments must be performed by a trained
service representative using proper tools and instructions.
CLUTCH PULLEY
WASHER
COTTER PIN
ADJUSTING NUT
CLUTCH
PAD
CLUTCH
PLATE
SPRING
1) Unplug FDO module ribbon harness from main control board
plug connector. Fig. 25
2) Remove the two screws mounting the FDO module to plate.
3) Use the two screws included with the auxiliary board and
mount to plate where FDO module was.
4) Plug auxiliary board ribbon harness into plug connector on
main control board.
5) Reinstall FDO module onto plate just above the auxiliary
board.
6) Plug FDO module ribbon harness into connector on auxiliary
board.
Only one auxiliary board can be used with this opener.
Optional Auxiliary Board (AOM or TCM)
FDO Module
AUX Board
Ribbon
Harness
Plug
Section 4: Installation
Fig 24
Fig 25
Figure 33
Figure 32
Operator Install (continued)


