Page 9
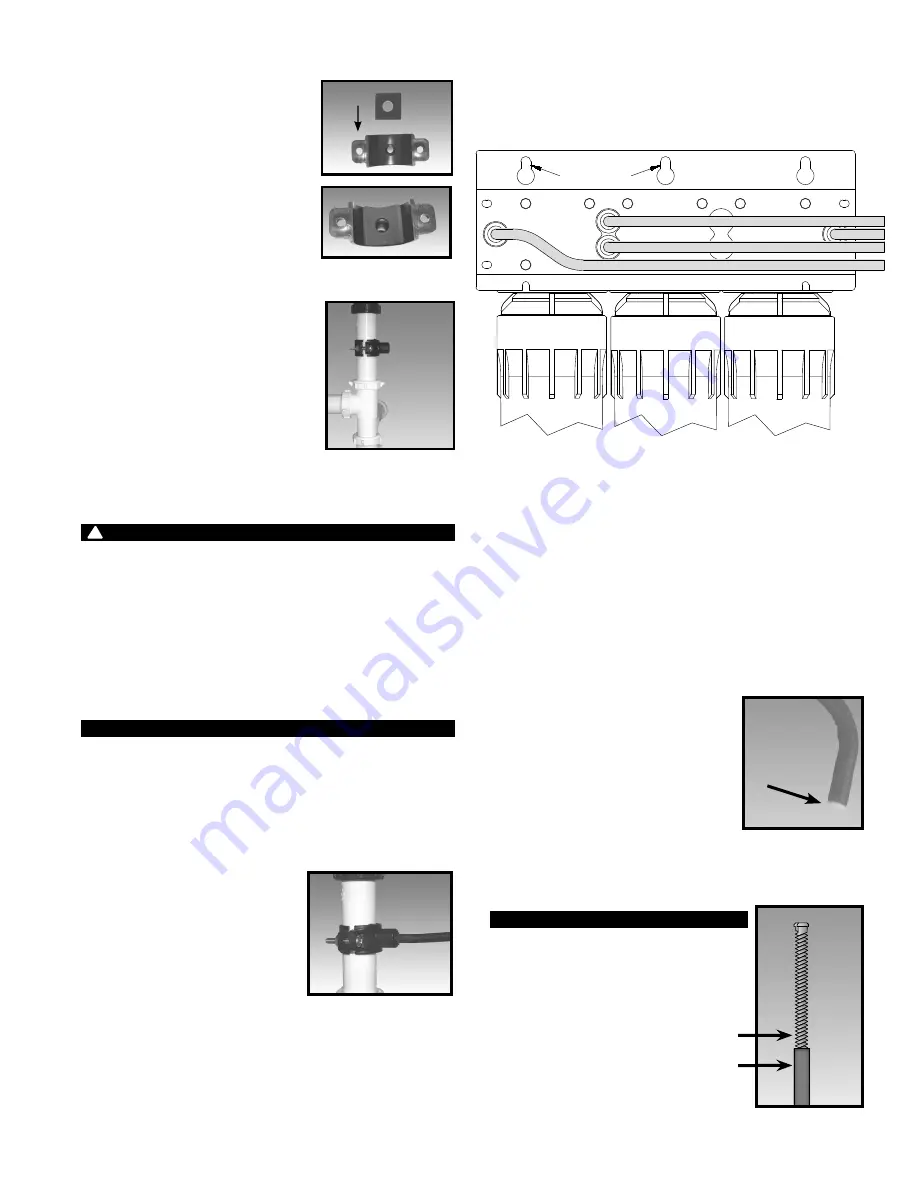
Rear View of 3 stage Reverse
Osmosis System
Blue Tube Connection (From FAUCET To The
Reverse Osmosis (RO) Module)
Red Tube Connection (From FAUCET To The
Reverse Osmosis (RO) Module)
Do not over tighten the screws. It may crack the drain saddle.
CAUTION
!
Step 2
- The small square black
foam gasket with a circle
cut out of the middle
must be applied to the
inside of the drain saddle.
Remove sticky tape
backing and stick to the
drain saddle as shown.
Step 3
- The drain saddle must
be installed at least 1 ½
"
above the nut of the P-Trap
elbow or cross bar from the
garbage disposal to insure
proper drainage. Using the
1/4
"
drill bit, drill into the
drain pipe at best available
location as specified above,
for drain saddle installation.
Take extreme caution to
only drill through one side of
the drain pipe.
Step 4
- Assemble the drain saddle around the drain pipe
and align drain saddle fitting opening with the hole
drilled in the previous step - you may use a small
screwdriver to feed through the drain saddle into the
drain pipe to aid with the alignment. Using a Phillips
screw driver tighten the drain saddle bolts evenly and
securely on both sides.
Step 5
- Measure the 3/8
"
black
tube from faucet to the
drain saddle on the drain
pipe and make a straight
cut to the correct length.
Step 6
- Connect the black tube to
the open quick connect
fitting on the drain saddle
by pushing the tube all the way to the tube stop.
Step 1
- Locate the 1/4
"
BLUE tube from the RO faucet.
Position the module as indicated in the “rear view”
picture. Insert the Blue Faucet tube into the 1/4”
quick connect fitting (position A) located behind the
GAC Filter head making sure the tube is pushed in all
the way to the tube stop.
See Diagram Above.
Step 1
- Locate the 1/4
"
RED tube
attached to the RO faucet.
Insert the Flow Restrictor
into the bent open end of the
RED tube as shown in the
picture to the right. Insert the
end of the red tube with the
90 degree bend into the 1/4”
quick connect fitting ( position
B) located behind the RO
Membrane head making sure the tube is pushed in
all the way to the tube stop.
See Diagram Above
.
NOTICE
NOTICE
The black 3/8" drain tube must be as SHORT and STRAIGHT as
possible to the drain saddle, making a downward slope from faucet
to drain saddle to allow for proper drainage. This is a gravity fed
line and if there is any bend or dip in the tube, the rinse water will
not flow into the drain properly. Water may back up and come out
the air gap hole in the back of the faucet.
The Flow Restrictor is installed inside of the
red tube at the bent end. DO NOT REMOVE THE
FLOW RESTRICTOR OR CUT THE RED TUBING AS
IT WILL DAMAGE THE FLOW RESTRICTOR.
Flow
Restrictor
Insert
Flow Restrictor
Red Tubing to Manifold
(Attached to faucet)
CARBON BLOCK
GREEN TUBE
BLUE TUBE -TANK
RED TUBE - BRINE
BLUE TUBE - FAUCET
H2O-F12
RO MEMBRANE
H2O-F16
GAC
H2O-F17
MOUNTING HOLES
A
B
C
D
Summary of Contents for H2O-DWRO300
Page 31: ...Page 31 ...
Page 49: ...Page 49 ...


