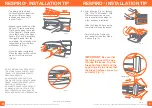
5. Using the step ladder, attach the top cap by sliding it into the
top of the center pole, making sure all the bows are hooked
properly and the holes are aligned. Insert the attached pin to
lock the cap into place. Note: The top cap must be locked into
place or the bows could come loose. Failure to secure the top
cap can result in damage to the Permabrella and may cause
injury.
6. Using the leather patch on the inside of the umbrella top as
a guide, place the top on the frame and position on the trame.
Open the frame slightly, cranking the winch handle clockwise.
Starting with one hook, attach it to the bow and snap the
boot around the bow. Go to the opposite side, and continue
alternating until all hooks and boots have been completed.
Note: A pair of pliers may help in the attachment of the hooks.
7. Finish cranking the unit open until the lower casting is
approximately 1’0” above the hole for the safety pin.
Do not
over crank.
Insert safety pin attached to the lower casting,
and remove the winch handle.
8. To lower umbrella, remove safety pin. Turn winch handle
counter-clockwise and lower uit slowly until the lower casting
is 6-8 inches above the face plate. Remove the winch handle.
Over cranking in either direction may cause the cable to
become crimped and render the cable ineffective.
9. To remove the unit simply reverse steps 3 through 6.
Maintenance
Periodically check the cable condition and bolts for
tightness. Routine adjustment should be expected. The top
should be removed during the off season. Store the top in a
cool dry area. Never store while wet or damp.
Caution
When high winds are expected, place the unit in the closed
position.
6”
www.waterlootent.com 1-800-537-1193
3105 Airport Blvd. Waterloo IA, 50703
Correct
Incorrect
Permabrella Top
Boot
Bow and Brace should be aligned vertically in the
upper and lower castling. Misaligned castings will
cause damage to the cable.
Step 5
Step 6
Step 8


