background image

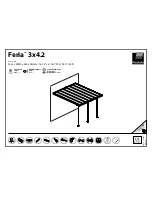
Installing the Top and Frame

1. Remove the top cap from the pole.

2. Raise the center pole and slide it into the ground sleeve. 

Align the pole and ground sleeve holes, and bolt ino place 

using the two 3/8” x 5” bolts. Using the winch handle, crank 

the winch clockwise so the lower casting sits approximately 5” 

above the ground level.

3. Using the 3/8” - 16x1” bolts and the 3/8” self locking 

nuts, attach the braces to the bows, make sure the brace is 

centered between the “ears” on the bow and the “hooks” on 

the bow and brace are both facing the same direction.

4. From the ground, place the hook end of the brace into the 

lower casting, making sure it is secured on the ring. Grasp 

the outside end of the bow and slowly “raise” the bow until the 

hook is aligned with upper casting. Repeat procedure until all 

bows and braces are attached. 

Make sure each bow and 

hinge are lined up vertically between the upper and lower 

casting.

Permabrella

Installation Instructions

Top Cap

Step 1 & 2

Step 3

Step 4

Upper Casting

Lower Casting

Ground Sleeve

Brace

Bow

Bow

Upper Casting

Safety Pin Hole

5’

Summary of Contents for Permabrella

Page 1: ...1 3 8 Slef Locking Nuts 14 8 IMPORTANT Consult a local utility company prior to installation Proper installation and site conditions are the responibility of the installer Check for any obstacles prior to site preparation Permabrella Installation Instructions WWW WATERLOOTENT COM 1 800 537 1193 3105 Airport Blvd Waterloo IA 50703 MANPOWER REQUIRED Two installers are required to install both top an...

Page 2: ...the lower section is set flush with the finish grade Bolt the top section to lower section with the included bolts Level and brace the ground sleeve pour in concrete and allow to set for at least 72 hours When unit is not in use remove top section and replace with center plate Finish Grade 3 8 16 x 5 Nut and Bolt 2 Required Top section attaches to lower section Center plate is used to cover lower ...

Page 3: ...ace is centered between the ears on the bow and the hooks on the bow and brace are both facing the same direction 4 From the ground place the hook end of the brace into the lower casting making sure it is secured on the ring Grasp the outside end of the bow and slowly raise the bow until the hook is aligned with upper casting Repeat procedure until all bows and braces are attached Make sure each b...

Page 4: ...ng is approximately 1 0 above the hole for the safety pin Do not over crank Insert safety pin attached to the lower casting and remove the winch handle 8 To lower umbrella remove safety pin Turn winch handle counter clockwise and lower uit slowly until the lower casting is 6 8 inches above the face plate Remove the winch handle Over cranking in either direction may cause the cable to become crimpe...

Reviews: