CUBE
Manual
Page 42 – Revision 10‐8‐2018
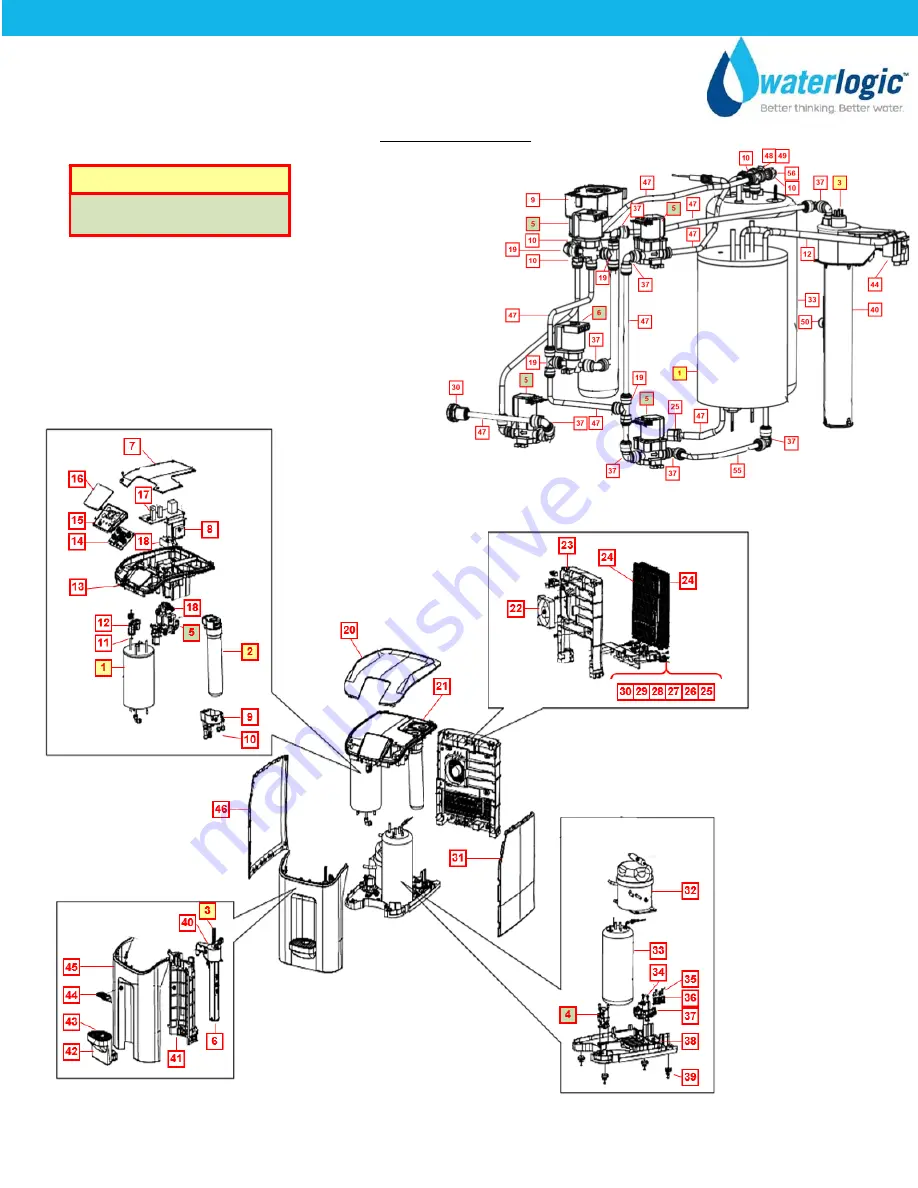
CUBE DRAWINGS
Yellow = Consumables
Green = Recommended spare parts
Wetted Parts
Page 1: ...Saving Sleep Mode UV Dosage is adequate when illuminated UV Purification Alert Replace UV Lamp Cold and Ambient water will not dispense without properly functioning FIREWALL UV purification that ensu...
Page 2: ...t parts that can be obtained from Waterlogic or an Authorized Waterlogic Dealer failure to do so will void the Warranty See Installation and Service Manual for additional information Hot Tank HT 0001...
Page 3: ...TRAVIOLET RADIATION Protect your skin and eyes against ultraviolet rays Never look directly at an operating UV light Disconnect before removing UV Lamp CAUTION UV LAMPS ARE HAZARDOUS Lamps are conside...
Page 4: ...is a small hole in the side of the tank outlet tube that allows air and water to pass into the vent chamber as it is heated Water in the vent chamber is suctioned back through the outlet tube vent hol...
Page 5: ...s located on back of unit O OFF 2 Unplug power to unit 3 With a Phillips Head Screwdriver remove the two screws at back of the Top Cover if installed 4 Remove Top Cover by placing your hands on the to...
Page 6: ...the overloads on the Hot Tank There are nuts that secure the metal box to the Hot Tank however the nuts are loose enough to remove them metal box 7 Press Red Button on each overload to reset there are...
Page 7: ...ROTECTIVE EQUIPMENT REQUIRED Always ensure proper ventilation and use rubber or nitrile gloves and eye protection when using chemicals Refer to Material Safety Data Sheet for specific requirements of...
Page 8: ...d push it towards the rear of the CUBE then lift to remove 6 Next remove the Filter closest to the front of the machine Insert your finger into the round hole of the lever and pull the lever up to the...
Page 9: ...caling powder to Empty Filter Body 13 Screw the Filter Body to the filter head in a counter clockwise motion it must be securely tightened 14 a Insert the Filter Assembly back into its cradle aligning...
Page 10: ...k for 20 minutes After 20 minutes select the Hot Water Icon select the Dispense button and flush 3 gallons of Hot water through the CUBE 20 Turn off the water supply at the isolation point 21 Select t...
Page 11: ...r head by turning the base in clockwise direction 27 Pour away the excess water ensure any remnants of decaling solution have been flushed 28 Remove the Filter Cartridge from the filter head 29 Screw...
Page 12: ...tall the two screws at the rear of the machine that secure the Top Cover if screws were removed in Step 4 32 Turn on the water supply at the isolation point 33 Reconnect the power lead and insert it i...
Page 13: ...avoid injury CAUTION REPLACE HOT TANK EVERY 3 5 YEARS The Hot Tank and its controls should be replaced a minimum of every three to five years to ensure efficient operation WARNING REINSTALL ALL PANELS...
Page 14: ...flow rate and or pressure or an unusual taste in the water WARNING Read and understand the contents of this manual before attempting to service CUBE Failure to follow the instructions in this manual...
Page 15: ...er to the front of the machine and pull the lever up to the vertical position 7 Pull the lever straight up to remove the filter assembly slight force may be required 8 Remove the Filter Body from the...
Page 16: ...Lock the filter by closing the locking lever until it clicks into place 13 Replace Top Cover and Screws 14 Turn on the Water Supply 15 Turn on Red Power Switch I ON Do not turn on Green Heater Compre...
Page 17: ...eak or damage the internal parts of the CUBE 4 Insert the new UV Lamp while holding the white end caps only Insert the UV Lamp ensuring you have pushed it all the way down until it cannot go any furth...
Page 18: ...e UV Lamp is working correctly by checking the PCB LED There should be no warning icons flashing Note UV Lamp Sensor is temperature sensitive During extended periods of use especially when filling or...
Page 19: ...to unit 2 With a Phillips Head Screwdriver remove the two screws at back of the Top Cover if installed 3 Remove Top Cover by placing your hands on the top and pushing the Top Cover towards the rear Li...
Page 20: ...th a Phillips Head Screwdriver remove the four screws that attach the Selection Dispense PCB to the Mainframe Remove the Selection Dispense PCB 7 With a Phillips Head Screwdriver remove the two screws...
Page 21: ...owards rear of the CUBE 11 Firmly pull up the UV Lamp while only holding the lamp by the white end caps NOTE Do not pull the UV lamp out at an angle as it may break or damage the internal parts of the...
Page 22: ...artz Sleeve Spiral from housing 16 Remove blue CDS fixing rubber and elbow from quartz spiral 17 Put blue CDS final rubber and elbow on new quartz spiral Support when attaching rubber 18 Place silicon...
Page 23: ...this occurs 1 Remove Top Cover 2 Remove 5 screws from inner top cover to access electronics 3A Locate interlock switch at rear of unit two brown wires with white quick connects 3B Bypass the interlock...
Page 24: ...ault is set to 3 hours Press and hold Hot Water Icon for 10 seconds until you hear the CUBE beep 2 To set Energy Saving Sleep Mode to 72 hours press and hold the Extra Hot water icon for 10 seconds un...
Page 25: ...CUBE Manual Page 37 Revision 10 8 2018 PROGRAMMING DP SET UP COLD WATER TEMPERATURE CUBE Main PCB DP Switch 2 1 DOWN 2 DOWN...
Page 26: ...CUBE Manual Page 38 Revision 10 8 2018 PROGRAMMING DP SET UP HOT WATER TEMPERATURE CUBE Main PCB DP Switch 2 3 UP 4 DOWN...
Page 27: ...ilter changes depends on your water quality and your water usage For example if there is a lot of sediment and or particles in your water then you will have to change your filters more frequently than...
Page 28: ...VICE TIMER Reset Filter Service Timer Reset by selecting the hot and cold icons simultaneously and holding them for 10 seconds The unit will beep and the filter service indicator light will turn off o...
Page 29: ...OGRAMMING DP SET UP FOR UV SETTINGS CUBE Main PCB DP Switch 1 This setting is only applicable for PCB s with three switches on DIP 1 NOTE For PCB s with only two switches there is no DIP switch for th...
Page 30: ...CUBE Manual Page 42 Revision 10 8 2018 CUBE DRAWINGS Yellow Consumables Green Recommended spare parts Wetted Parts...
Page 31: ...embly CT 2090 C Yes Recommended Spare Parts 4 PU 4164 Solenoid Valve with Terminal at Outlet Position Recommend Stocking 2 each per every 10 units purchased PU 4164 Yes 5 12 1500 Solenoid Valve DC24V...
Page 32: ...6141 No 15 NA User Interface PCB Bracket PL 1394 Yes 16 LP 7326 User Interface Overlay Label LP 7326 Yes 17 EN 6140 LB0 00 Main PCB EN 6140 LB0 00 Yes 18 12 8315 UV 15 W 120V 60Hz Electronic Ballast...
Page 33: ...120V 15A with wire EL 0021 L00 00 No 29 19 1090 Power Line Noise Filter ElectroMagnetic Interference filter EMI EL 5029 Yes 30 10 3067 Bulkhead Union x John Guest P N PI1208S PU 4028 Yes 31 NA Left Si...
Page 34: ...ection Sensor Bracket PL 1311 Yes 37 Purchase from John Guest JG Equal Elbow Connector 1 4 PI0308S PU 4008 No 38 NA Base Plate PL 1387 No 39 NA Rubber Foot ST 8350 No 40 NA FW 4 Mark VI AL Mirror with...
Page 35: ...opper PI0808S used with Bulkhead Union x John Guest P N PI1208S PU 4086 No 49 AK 0014 B Flow Restrictor for Sparkling Water 1 8 mm hole AK 0014 B Yes 50 AK 0064 UV Sensor with Wire AK 0064 Yes 50 1 NA...
Page 36: ...CUBE Manual Page 48 Revision 10 8 2018 CUBE WATER FLOW DIAGRAM Reverse Flow Orientation 1 5 3 2 4...
Page 37: ...ual Page 49 Revision 10 8 2018 CUBE ELECTRICAL DIAGRAM DANGER HIGH VOLTAGE ELECTRICAL HAZARD PCB Printed Circuit Board contains High Voltage Only trained and qualified technicians should attempt live...