background image

English   

- 8 -

Power Connection

IMPORTANT

: The TV set is designed to operate on 

220-240V AC, 50 Hz.

• After  unpacking,  allow  the  TV  set  to  reach  the 

ambient room temperature before you connect the 

set to the mains.

• Plug the power cable to the mains socket outlet.


Using Side USB Input

• You can connect USB devices to your TV by using 

the USB input of the TV. This feature allows you to 

display/play  JPG, 

video  (optional)

  and  MP3  files 

stored in a USB stick.

• It is possible that certain types of USB devices 

(e.g. 

MP3 Players)

 may not be compatible with this TV. 

•  You  may  back  up  your  files  before  making  any 

connections  to  the TV  set  in  order  to  avoid  any 

possible data loss. Note that manufacturer will not 

be responsible for any file damage or data loss.

 • Do not pull out USB module while playing a file.

CAUTION: Quickly plugging and unplugging USB 

devices, is a very hazardous operation. Especially, 

do  not  repeatedly  quickly  plug  and  unplug  the 

drive. This may cause physical damage to the USB 

player and especially the USB device itself.

SIDE VIEW        USB MEMORY

USB Memory Connection

• Plug your USB device to the USB input of the TV.

IMPORTANT:  The  TV  supports  only  FAT32  disk 

formatting. NTFS format is not supported.

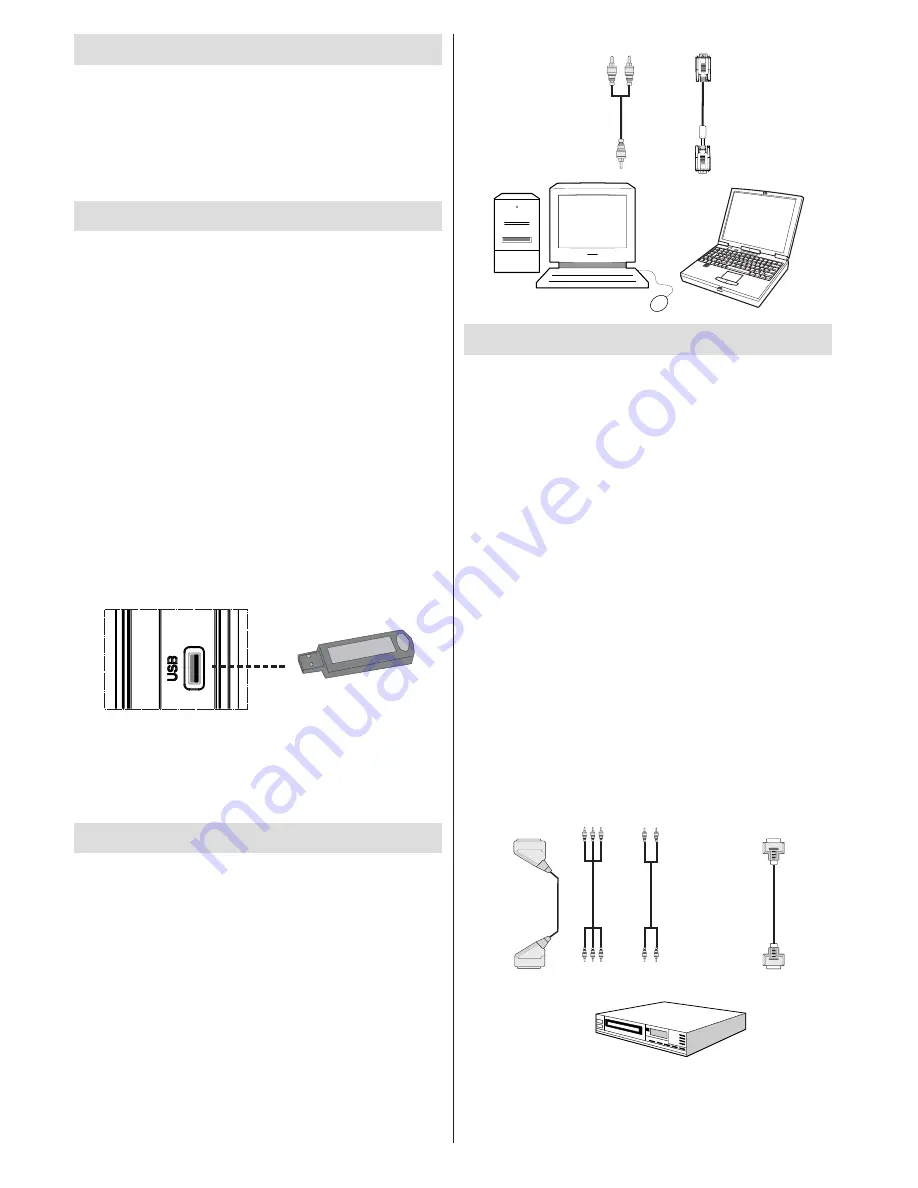
Connecting the LCD TV to a PC

For  displaying  your  computer’s  screen  image  on 

your LCD TV, you can connect your computer to the 

TV set.
• Power off both computer and display before making 

any connections.

• Use 15-pin D-sub display cable to connect a PC to 

the LCD TV.

• When the connection is made, switch to PC source. 

See  “Input selection” section.

• Set the resolution that suits your viewing requirements. 

Resolution information can be found in the appendix 

parts.

PC  audio  cable

(not  supplied)

to  AUDIO  INPUTS 

on  the  TV

PC  RGB  cable

(not  supplied)

to  PC  input

Audio

Inputs

PC  Input

Connecting to a DVD Player

If  you  want  to  connect  a  DVD  player  to  your  LCD 

TV,  you  can  use  connectors  of  the  TV  set.  DVD 

players may have different connectors. Please refer 

to your DVD player’s instruction book for additional 

information.  Power  off  both  the TV  and  the  device 

before making any connections.

Note

:  Cables  shown  in  the  illustration  are  not 

supplied.

• If your DVD player has an HDMI socket, you can 

connect via HDMI. When you connect to DVD player 

as illustrated below, switch to HDMI source. See, 

“Input Selection” section.

•  Most  DVD  players  are  connected  through 

COMPONENT SOCKETS. Use a component video 

cable to connect  video input. For enabling audio, 

use a component audio cable as illustrated below. 

When  the  connection  is  made,  switch  to  YPbPr 

source. See, “Input selection” section.

• You may also connect through the 

SCART socket

Use a SCART cable as shown below.

Note

: These three methods of connection perform the 

same function but in different levels of quality. It is not 

necessary to connect by all three methods.

HDMI


input

S

CART

  socket

Component 

video

inputs

Component 

audio

inputs

DVD  Player

Summary of Contents for WP2211LCD

Page 1: ...COLOUR TELEVISION WITH REMOTE CONTROL OPERATING INSTRUCTIONS WP2211LCD BE WALKER WISE logon to www walker ie...

Page 2: ...Operations 10 Operation with the Buttons on the TV 10 Operation with the Remote Control 10 Initial Settings 11 Electronic Programme Guide EPG 12 Programme Options 12 Analogue Teletext 13 Widescreen 1...

Page 3: ...Limiting When no valid signal is detected after 5 minutes the TV switches itself automatically to standby mode PLL Frequency Search PC input Plug Play for Windows 98 ME 2000 XP Vista Windows 7 Audio...

Page 4: ...intense heat such as an electric heater Ensure that no open flame sources such as lighted candles are placed on top of the TV Batteries should not be exposed to excessive heat such as sunshine fire or...

Page 5: ...perating mode when you leave your house Connection to a Television Distribution System Cable TV etc from Tuner Device connected to the protective earthing of the building installation through the main...

Page 6: ...16 Green Picture menu Page down Subtitle 17 onoff in DTV mode Red Sound menu Page up Channel list 18 mode selection in DTV mode Menu on off 19 Ok Confirm Channel list in DTV mode 20 Cursor Left 21 AV...

Page 7: ...ts YPbPr 2 are used for connecting component video You can connect the component video and audio sockets with a device that has component output Connect the component video cables between the COMPONEN...

Page 8: ...atellite Receiver or DVD Player These devices must be connected via the HDMI sockets or Component Socket These sockets can accept either 480i 480p 576p 576i 720p 1080i 1080p optional signals No sound...

Page 9: ...t Power off both computer and display before making any connections Use 15 pin D sub display cable to connect a PC to the LCD TV When the connection is made switch to PC source See Input selection sec...

Page 10: ...in the Sound menu as On External Speakers A device that supports SPDIF signal Connecting Other Equipment via Scart Most devices support SCART connection You can connect a DVD recorder a VCR or a decod...

Page 11: ...ecrease volume or button to increase volume so a volume level scale slider will be displayed on the screen Programme Selection Press P CH button to select the next programme or P CH button to select t...

Page 12: ...transmission channels searching for digital terrestrial TV broadcasts and displaying the names of channels found This process will take a few minutes To cancel searching you can press M button at any...

Page 13: ...programmes of previous day BLUE button Next day displays the programmes of the next day INFO Details displays the programmes in detail OK View Timer shows the highlighted channel sets the reminder for...

Page 14: ...enu make sure that the first item Channel List is highlighted and press the OK button to display the Channel List You can use following buttons for Move Delete and Lock functions Channel List is the p...

Page 15: ...favourite you should highlight the Favourites item at the bottom of the Channel List menu Then press OK button and Edit Favourite List menu appears on the screen Adding a Channel to a Favourites List...

Page 16: ...en highlight Common Interface and press OK button When no module is inserted No Common Interface module detected message appears on the screen Refer to the module instruction manual for details of the...

Page 17: ...p it safe Time Settings Time setting will not be available for UK In the configuration menu highlight the Time Settings item by pressing or buttons Press OK and Time Settings sub menu will be displaye...

Page 18: ...Description Optional Audio description refers to an additional narration track for blind and visually impaired viewers of visual media You can use this feature only if the broadcaster supports that ad...

Page 19: ...elected automatic search starts Selecting No cancels automatic search After search is completed for digital channels a message asking whether to search for analogue channels appears on the screen High...

Page 20: ...ings for more information After active antenna mode option is selected a message asking for automatic search appears on the screen Highlight Yes item by pressing or buttons and press OK button to star...

Page 21: ...art again and again Loop GREEN Slideshow goes on continuously and icon turns the highlighted icon Info Activate the operations bar Video Playback optional Play Red button Starts the video playback Sto...

Page 22: ...the remote control will have no function while Game Mode is on Picture Zoom Select Picture Zoom by pressing or button Use or buttons to change picture zoom to Auto 16 9 4 3 Panoramic 14 9 Cinema Subti...

Page 23: ...ct Press or button to set as On or Off Store Press or button to select Store Press or OK button to store the settings Stored will be displayed on the screen Feature Menu Sleep Timer Press or button to...

Page 24: ...an HDMI device and switch the TV to HDMI mode this feature will be visible except for 1080i 1080P resolution Full Mode optional If you connect a device via HDMI connectors and set 1080i 1080P resolut...

Page 25: ...r button to select the other letters By pressing the RED button you can store the name Move Select the programme which you want to move by navigation buttons Press the GREEN button By navigation butto...

Page 26: ...owards the top or bottom of the screen Select V Position item by using or button Use or button to adjust the value Phase Depending on the resolution and scan frequency that you input to the TV set you...

Page 27: ...the ZOOM mode change to another ZOOM mode manually 16 9 This uniformly stretches the left and right sides of a normal picture 4 3 aspect ratio to fill the wide TV screen For 16 9 aspect ratio pictures...

Page 28: ...le displaying a persistent image LCD TVs image persistence may disappear after a short time Try turning off the TV for a while To avoid this do not leave the screen in still picture for extended perio...

Page 29: ...5 67 5 VESA 16 1152 870 75 68 9 MAC 17 1280 768 60 47 7 VESA 18 1360 768 60 47 7 19 1280 960 60 60 0 VESA 20 1280 1024 60 64 0 VESA 21 1280 1024 75 80 0 VESA 22 1600 1200 60 75 0 VESA Appendix B AV an...

Page 30: ...48KHz mp3 MPEG 1 2 Layer 1 2 3 MP3 Sample Rate 8K 48KHz Bit Rate 32K 320Kbps Photo jpg Baseline JPEG WxH 14592x12288 Up to 179 Mega pixel Support format 444 440 422 420 Grayscale Progressive JPEG Up t...

Page 31: ...e display DIMENSIONS mm DxLxH With foot 118 x 532x 376 Weight Kg 4 70 DxLxH Without foot 60 x 532 x 347 Weight Kg 4 55 Digital Reception DVB T Transmission Standards DVB T MPEG2 DVB T MPEG4 HD i DEMOD...

Page 32: ...reen or green and yellow The wire which is coloured blue or black must be connected to the terminal which is marked with the letter N or coloured Black The wire which is coloured brown or red must be...

Page 33: ...50174018...

Reviews: