background image

English   

- 12 -

General Operation

Pressing  the 

TV/DTV

  button  at  any  time  while 

watching  television  programmes  will  switch  the TV 

set  to  the  digital  terrestrial  television  broadcasting.

Information Banner

• Whenever you change the channel using the 

P + 

or


P -

 button or numeric buttons, the TV displays the 

broadcast picture along with an information banner 

at the bottom of the screen. This will remain on the 

screen for approximately a few seconds. 

• The information banner can also be displayed by 

pressing the 

INFO

 button at any time while watching 

the TV. Pressing 

INFO

 button again removes the 

banner.

If  the  selected  channel  is  locked,  you  must  enter 

the correct four digit key to view the channel. In this 

case,  a  dialog  box  asking  for  the  lock  key  will  be 

displayed:

Electronic Programme Guide (EPG)

Some, but not all, channels send information about 

the current and next events. Please note that event 

information is updated automatically. If there are no 

event  information  data  available  for  channels,EPG 

will be displayed with blanks.
• Press 

GUIDE

 button to view the 

EPG

 menu.

•  Press  “ ”  or  “ ”  buttons  to  navigate  through  

channels.

• Press “ ” or “ ” buttons to navigate through the 

programme list.

RED  button  (Shrink):

  makes  the  info  boxes 

smaller.

GREEN  button  (Expand):

  makes  the  info  boxes 

larger.

YELLOW  button  (Prev.  Day):

  displays  the 

programmes of previous day.

BLUE button (Next day):

 displays the programmes 

of the next  day.

INFO (Details):

 displays the programmes in detail.

OK (View / Timer):

 shows the highlighted channel / 

sets the reminder for future programmes.

Numeric buttons (Jump):

 go to preferred channel 

directly via numeric buttons.

P<P: 

Jump to current broadcast.
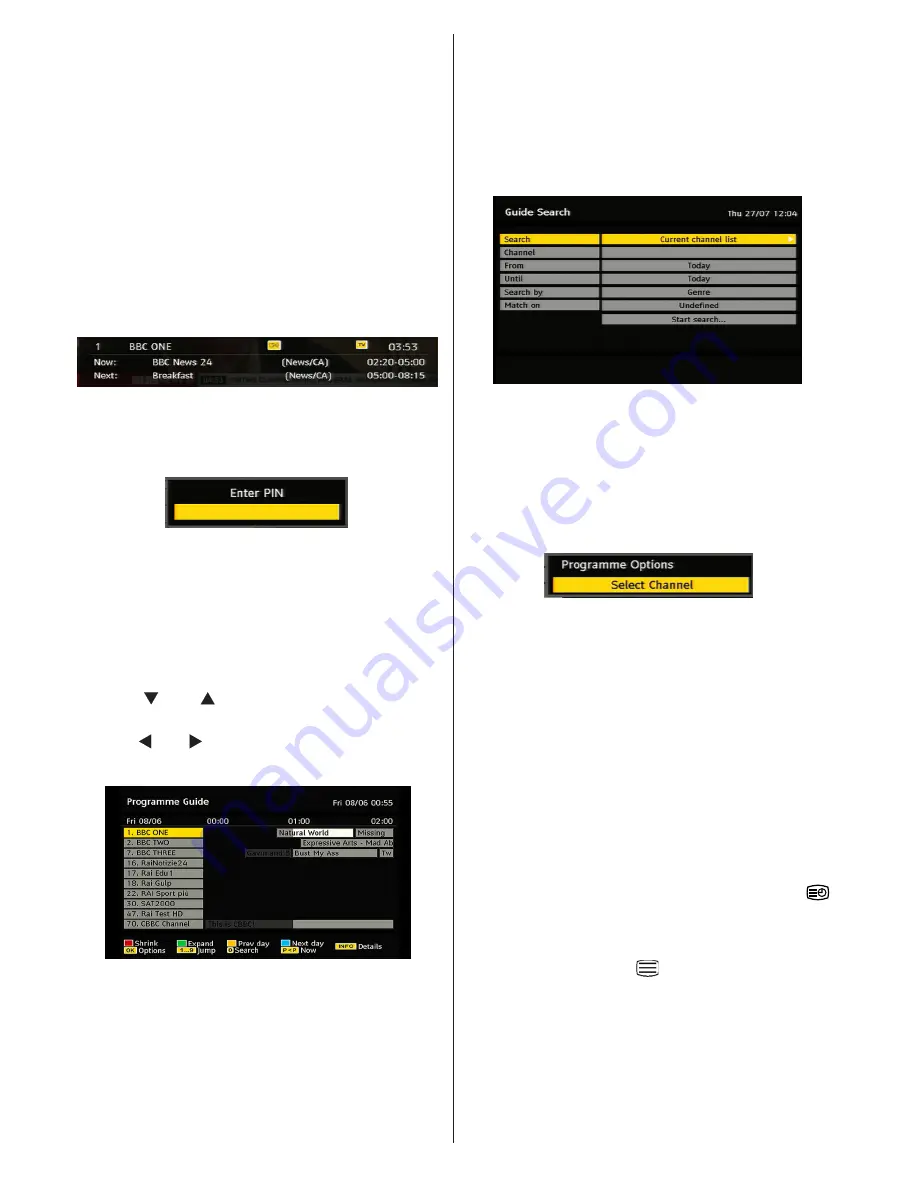
0 (SEARCH):

 activates “Guide Search” window 

Press 

“0”

 button to view Guide Search menu. Using 

this  feature,  you  can  search  the  programme  guide 

database in accordance with the genre selected or 

with name match.

Programme Options

In  EPG  menu,  press  the 

OK

  button  to  enter  the 

“Programme Options” menu.

Using  this  option,  you  can  switch  to  the  selected 

channel.

Over Air Download 

To ensure that your IDTV always has the most up-

to-date  information,  please  ensure  that,  after  use, 

it  is  set  to  standby  mode. At  3 A.M.  each  day,  the 

IDTV automatically searches for any updates which 

may  be  broadcast  and  will  download  this  to  your 

IDTV automatically. This operation will normally take 

approximately 30 minutes.

Displaying Subtitles

With  digital  terrestrial  broadcasting  (DVB-T),  some 

programmes are broadcast with subtitles. 

Note

: You can enable subtitles by pressing the 

(For UK**) or 

GREEN


(for EU*) button.

Digital Teletext (For UK only**)

• Press the TELETEXT (

) button.

• The digital teletext information appears.
• Operate it with the coloured buttons, /// buttons and 

OK button.

The operation method may differ depending on the 

contents of the digital teletext.
Follow  the  instructions  displayed  on  digital  teletext 

screen.

Summary of Contents for WP2211LCD

Page 1: ...COLOUR TELEVISION WITH REMOTE CONTROL OPERATING INSTRUCTIONS WP2211LCD BE WALKER WISE logon to www walker ie...

Page 2: ...Operations 10 Operation with the Buttons on the TV 10 Operation with the Remote Control 10 Initial Settings 11 Electronic Programme Guide EPG 12 Programme Options 12 Analogue Teletext 13 Widescreen 1...

Page 3: ...Limiting When no valid signal is detected after 5 minutes the TV switches itself automatically to standby mode PLL Frequency Search PC input Plug Play for Windows 98 ME 2000 XP Vista Windows 7 Audio...

Page 4: ...intense heat such as an electric heater Ensure that no open flame sources such as lighted candles are placed on top of the TV Batteries should not be exposed to excessive heat such as sunshine fire or...

Page 5: ...perating mode when you leave your house Connection to a Television Distribution System Cable TV etc from Tuner Device connected to the protective earthing of the building installation through the main...

Page 6: ...16 Green Picture menu Page down Subtitle 17 onoff in DTV mode Red Sound menu Page up Channel list 18 mode selection in DTV mode Menu on off 19 Ok Confirm Channel list in DTV mode 20 Cursor Left 21 AV...

Page 7: ...ts YPbPr 2 are used for connecting component video You can connect the component video and audio sockets with a device that has component output Connect the component video cables between the COMPONEN...

Page 8: ...atellite Receiver or DVD Player These devices must be connected via the HDMI sockets or Component Socket These sockets can accept either 480i 480p 576p 576i 720p 1080i 1080p optional signals No sound...

Page 9: ...t Power off both computer and display before making any connections Use 15 pin D sub display cable to connect a PC to the LCD TV When the connection is made switch to PC source See Input selection sec...

Page 10: ...in the Sound menu as On External Speakers A device that supports SPDIF signal Connecting Other Equipment via Scart Most devices support SCART connection You can connect a DVD recorder a VCR or a decod...

Page 11: ...ecrease volume or button to increase volume so a volume level scale slider will be displayed on the screen Programme Selection Press P CH button to select the next programme or P CH button to select t...

Page 12: ...transmission channels searching for digital terrestrial TV broadcasts and displaying the names of channels found This process will take a few minutes To cancel searching you can press M button at any...

Page 13: ...programmes of previous day BLUE button Next day displays the programmes of the next day INFO Details displays the programmes in detail OK View Timer shows the highlighted channel sets the reminder for...

Page 14: ...enu make sure that the first item Channel List is highlighted and press the OK button to display the Channel List You can use following buttons for Move Delete and Lock functions Channel List is the p...

Page 15: ...favourite you should highlight the Favourites item at the bottom of the Channel List menu Then press OK button and Edit Favourite List menu appears on the screen Adding a Channel to a Favourites List...

Page 16: ...en highlight Common Interface and press OK button When no module is inserted No Common Interface module detected message appears on the screen Refer to the module instruction manual for details of the...

Page 17: ...p it safe Time Settings Time setting will not be available for UK In the configuration menu highlight the Time Settings item by pressing or buttons Press OK and Time Settings sub menu will be displaye...

Page 18: ...Description Optional Audio description refers to an additional narration track for blind and visually impaired viewers of visual media You can use this feature only if the broadcaster supports that ad...

Page 19: ...elected automatic search starts Selecting No cancels automatic search After search is completed for digital channels a message asking whether to search for analogue channels appears on the screen High...

Page 20: ...ings for more information After active antenna mode option is selected a message asking for automatic search appears on the screen Highlight Yes item by pressing or buttons and press OK button to star...

Page 21: ...art again and again Loop GREEN Slideshow goes on continuously and icon turns the highlighted icon Info Activate the operations bar Video Playback optional Play Red button Starts the video playback Sto...

Page 22: ...the remote control will have no function while Game Mode is on Picture Zoom Select Picture Zoom by pressing or button Use or buttons to change picture zoom to Auto 16 9 4 3 Panoramic 14 9 Cinema Subti...

Page 23: ...ct Press or button to set as On or Off Store Press or button to select Store Press or OK button to store the settings Stored will be displayed on the screen Feature Menu Sleep Timer Press or button to...

Page 24: ...an HDMI device and switch the TV to HDMI mode this feature will be visible except for 1080i 1080P resolution Full Mode optional If you connect a device via HDMI connectors and set 1080i 1080P resolut...

Page 25: ...r button to select the other letters By pressing the RED button you can store the name Move Select the programme which you want to move by navigation buttons Press the GREEN button By navigation butto...

Page 26: ...owards the top or bottom of the screen Select V Position item by using or button Use or button to adjust the value Phase Depending on the resolution and scan frequency that you input to the TV set you...

Page 27: ...the ZOOM mode change to another ZOOM mode manually 16 9 This uniformly stretches the left and right sides of a normal picture 4 3 aspect ratio to fill the wide TV screen For 16 9 aspect ratio pictures...

Page 28: ...le displaying a persistent image LCD TVs image persistence may disappear after a short time Try turning off the TV for a while To avoid this do not leave the screen in still picture for extended perio...

Page 29: ...5 67 5 VESA 16 1152 870 75 68 9 MAC 17 1280 768 60 47 7 VESA 18 1360 768 60 47 7 19 1280 960 60 60 0 VESA 20 1280 1024 60 64 0 VESA 21 1280 1024 75 80 0 VESA 22 1600 1200 60 75 0 VESA Appendix B AV an...

Page 30: ...48KHz mp3 MPEG 1 2 Layer 1 2 3 MP3 Sample Rate 8K 48KHz Bit Rate 32K 320Kbps Photo jpg Baseline JPEG WxH 14592x12288 Up to 179 Mega pixel Support format 444 440 422 420 Grayscale Progressive JPEG Up t...

Page 31: ...e display DIMENSIONS mm DxLxH With foot 118 x 532x 376 Weight Kg 4 70 DxLxH Without foot 60 x 532 x 347 Weight Kg 4 55 Digital Reception DVB T Transmission Standards DVB T MPEG2 DVB T MPEG4 HD i DEMOD...

Page 32: ...reen or green and yellow The wire which is coloured blue or black must be connected to the terminal which is marked with the letter N or coloured Black The wire which is coloured brown or red must be...

Page 33: ...50174018...

Reviews: