background image

87

16.  Drawings and legends

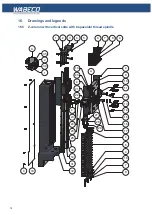
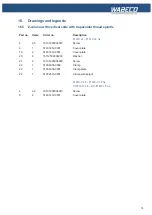
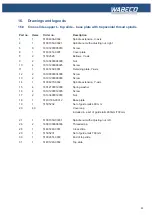
16.9  Spindle X-axis with trapezoidal thread spindle

16.9.1  F1410 LF – F1410 LF hs

Part no. Items

Order no.

Description

1

1

51401155-00011

Spindle bearing

2

2

51502112

Ball bearing

3

1

51004040-0003

Adjusting ring

4

1

51502027-0001

Pressure spring

5

1

51502131

Steel ball

6

1

51006750-00011

Scale ring (80 intervals) 

7

1

51507026-0001

Hand wheel

8

1

51502552-0001

Spindle 

9

2

16091300006006

Threaded pin

10

2

16112500006001

Washer

11

2

16191200006025

Screw

Summary of Contents for F1410 LF

Page 1: ...Operating instructions Milling machines CNC milling machines with linear guides F1410 LF F1410 LF hs F1410 C LF F1410 C LF hs CC F1410 LF CC F1410 LF hs ...

Page 2: ...gnised For all queries and replacement part orders please always specify the machine number see type plate Reprinting and reproductions of any kind even extracts require the written permission of WABECO The transportation and protective packaging is made of the following materials Corrugated card Polystyrene without Freon Polyethylene foil Timber as single use pallet untreated Euro pallet multiple...

Page 3: ...g the machine 18 4 1 Identification of the model 18 4 2 F1410 LF F1410 LF hs 18 4 2 1 Declaration of noise levels 18 4 2 2 Technical data 19 4 2 3 Dimensions F1410 LF 1 4 kW with trapezoidal thread spindle 20 4 2 4 Dimensions F1410 LF 1 4 kW with ball screws 21 4 2 5 Dimensions F1410 LF hs 2 0 kW with trapezoidal thread spindle 22 4 2 6 Dimensions F1410 LF hs 2 0 kW with ball screws 23 4 3 F1410 C...

Page 4: ...4 Operational faults and the elimination of such 50 15 Control elements 53 15 1 Control elements F1410 LF 1 4 kW 53 15 2 Control elements F1410 LF hs 2 0 kW 54 15 3 Control elements F1410 C LF 1 4 kW 55 15 4 Control elements F1410 C LF hs 2 0 kW 56 15 5 Control elements CC F1410 LF 1 4 kW 57 15 5 1 Switch cover on CNC control panel 58 15 6 Control elements CC F1410 LF hs 2 0 kW 59 15 6 1 Switch co...

Page 5: ...ndle Y axis with ball screws 110 16 16 1 F1410 LF F1410 LF hs 110 16 16 2 F1410 C LF F1410 C LF hs CC F1410 LF CC F1410 LF hs 112 16 17 Limit switch for X axis 114 16 17 1 F1410 C LF F1410 C LF hs CC F1410 LF CC F1410 LF hs 114 16 18 Limit switch for Y axis 115 16 18 1 F1410 C LF F1410 C LF hs CC F1410 LF CC F1410 LF hs 115 16 19 Limit switch for Z axis 116 16 19 1 F1410 C LF F1410 C LF hs CC F141...

Page 6: ...ne safety cabin to the machine base cabinet optional 149 19 3 Safety regulations for the handling of cooling lubricant 150 19 4 Filling the coolant unit integrated in the machine safety cabin 150 19 5 Operating the coolant unit with CNC controller 150 19 6 Positioning the segmented coolant hose 150 19 7 Controlling the flow of coolant using the coolant shut off valve 150 19 8 Drawing and legend 15...

Page 7: ...l version meets the following relevant regulations EU Machine Directive 2006 42 EG EMC Directive 2014 30 EU EU Low Voltage Directive 2014 35 EU In order to fulfill implement the requirements of the directives named above the already published and applicable standards were drawn upon EN ISO 12100 2010 DIN EN 60204 1 2007 DIN EN 13128 2009 Proxy for the compilation of the technical documentation is ...

Page 8: ...on meets the following relevant regulations EU Machine Directive 2006 42 EG EMC Directive 2014 30 EU EU Low Voltage Directive 2014 35 EU In order to fulfill implement the requirements of the directives named above the already published and applicable standards were drawn upon EN ISO 12100 2010 DIN EN 60204 1 2007 DIN EN 13128 2009 Proxy for the compilation of the technical documentation is the ope...

Page 9: ...ion meets the following relevant regulations EU Machine Directive 2006 42 EG EMC Directive 2014 30 EU EU Low Voltage Directive 2014 35 EU In order to fulfill implement the requirements of the directives named above the already published and applicable standards were drawn upon EN ISO 12100 2010 DIN EN 60204 1 2007 DIN EN 13128 2009 Proxy for the compilation of the technical documentation is the op...

Page 10: ...to the milling machine Walter Blombach GmbH accepts no responsibility for property damage and personal injury caused as a result of any modifications to the milling machine by the user that have not expressly been authorised by the company 1 4 Safety regulations for proper use The machine may represent a source of danger if it is not used correctly For this reason it is important that the followin...

Page 11: ... an emission noise level as of 80 dB A at the workplace ear defenders must be worn 9 The machine may not operate without supervision 10 Secure your machine in such a way that it cannot be switched on by children Persons who have not been trained may not operate the machine 11 Before using the machine make sure it is in good working condition Pay special attention to any damage to the grounded plug...

Page 12: ...ee and warranty is voided if accessories and replacement parts are use that are not designed for the machine 22 To avoid insufficient lighting we recommend setting up a light source that provides a value of at least 500 Lux at the tool s cutting edge 23 Do not remove the generated shavings with your hand Use the appropriate tools hand held sweeper hook brush 24 Tools and workpieces may never be ch...

Page 13: ...d protection The machine is fitted with an overload protection feature This overload protection feature switches the main drive motor off automatically when the machine is overloaded The machine can only then be switched on after a waiting period 1 5 2 for milling machines for the installation of a CNC controller and for CNC milling machines Machine safety cabin optional In CNC mode the door to th...

Page 14: ...amages to be reported If this is the case we ask you to communicate this information immediately Subsequent claims cannot be recognised The boring and milling machine must be set up on a suitable even and firm surface Suitable surfaces are for example A machine base cabinet available optionally A separate workbench with a level surface spirit level that is strong enough to carry the weight of the ...

Page 15: ...e We recommend three people to lift the machine using the positions shown 1 In doing so two people should hold the machine on the left and right of the upper skid the third should hold and balance the ma chine at the end of the base plate Due to the weight of the machine it is advisable to lift the machine by crane if this is possible To lift wrap suitable lashing 2 as shown around the head of the...

Page 16: ...l distance up 2 Remove the wooden support below the milling spindle 3 at least on one side loosen the transport lock 1 the bolts 2 4 the transport lock 1 must be slidable without resistance 5 if this is not the case then the milling head must be moved via the hand wheel ofthe Z axis far enough away so that the wire cables under tension and are supportingthe weight now the transport lock 1 is relie...

Page 17: ...ng a suitable control computer pay attention to the system prerequisites of the control software These are listed on the rear of the CD case sent with the machine Follow the instructions in the start manual of the software to install the control software on the computer The start manual can be found in the CD case of the control software included with the machine In the next step the software must...

Page 18: ...s Declaration of noise levels in accordance with DIN EN ISO 3744 Emission values in idle F1410 LF F1410 LF hs Emission sound pressure level at the workplace at 50 66 8 dB A 74 8 dB A at 100 66 7 dB A 76 4 dB A Sound power level at 50 73 7 dB A 84 1 dB A bei 100 79 1 dB A 80 3 dB A At an emission sound pressure level from 80 dB A and above at the workplace ear protection is required 4 2 F1410 LF F1...

Page 19: ... Hz Nominal performance of the spindle motor 1 4 kW 2 0 kW Spindle revolutions infinite 140 3000 rpm 100 7500 rpm Machine precision True running accuracy of the tool spindle 0 01 mm Milling head Swiveling feature in both sides 90 90 to 90 Tool spindle Tool holder MT2 tightening thread M10 optional MT3 tightening thread M12 ISO30 DIN2080 tightening thread M12 Work table 700 x 180 mm Number of T slo...

Page 20: ...regarding the machine 4 2 3 Dimensions F1410 LF 1 4 kW with trapezoidal thread spindle 4 2 F1410 LF F1410 LF hs 53 305 404 197 min 70 max 350 min 710 max 990 185 180 225 250 max 710 max 505 700 690 min 0 max 200 35 720 950 ...

Page 21: ...ations regarding the machine 4 2 4 Dimensions F1410 LF 1 4 kW with ball screws 4 2 F1410 LF F1410 LF hs 305 197 53 200 775 min 710 max 990 225 250 max 505 max 710 700 185 180 min 0 max 200 min 70 max 350 404 690 950 ...

Page 22: ...arding the machine 4 2 5 Dimensions F1410 LF hs 2 0 kW with trapezoidal threaded spindle 4 2 F1410 LF F1410 LF hs 53 305 404 197 min 70 max 350 min 900 max 1180 180 225 250 max 710 max 505 700 690 35 720 185 min 0 max 200 950 ...

Page 23: ...ions regarding the machine 4 2 6 Dimensions F1410 LF hs 2 0 kW with ball screws 4 2 F1410 LF F1410 LF hs 305 197 53 200 775 min 900 max 1180 225 250 max 505 max 710 700 180 min 70 max 350 404 690 185 min 0 max 200 950 ...

Page 24: ...ion values in idle F1410 C LF F1410 C LF hs Emission sound pressure level at the workplace at 50 66 8 dB A 74 8 dB A at 100 66 7 dB A 76 4 dB A Sound power level at 50 73 7 dB A 84 1 dB A at 100 79 1 dB A 80 3 dB A At an emission sound pressure level from 80 dB A and above at the workplace ear protection is required 4 3 F1410 C LF F1410 C LF hs ...

Page 25: ...drive motor Nominal voltage 230 V Nominal frequency 50 60 Hz Nominal performance of the spindle motor 1 4 kW 2 0 kW Spindle revolutions infinite 140 3000 rpm 100 7500 rpm Machine precision True running accuracy of the tool spindle 0 01 mm Milling head Swiveling feature in both directions 90 90 to 90 Tool spindle Tool holder MT2 tightening thread M10 optional MT3 tightening thread M12 ISO30 DIN2080...

Page 26: ...ding the machine 4 3 3 Dimensions F1410 C LF 1 4 kW with trapezoidal thread spindle 4 3 F1410 C LF F1410 C LF hs 305 404 700 35 150 197 180 min 0 max 200 185 min 710 max 990 740 min 70 max 350 53 225 250 max 720 max 505 700 960 ...

Page 27: ...ons regarding the machine 4 3 4 Dimensions F1410 C LF 1 4 kW with ball screws 4 3 F1410 C LF F1410 C LF hs 775 200 700 404 53 305 min 70 max 350 197 180 185 min 0 max 200 min 710 max 990 700 225 250 max 720 max 505 960 ...

Page 28: ...ng the machine 4 3 5 Dimensions F1410 C LF hs 2 0 kW with trapezoidal thread spindle 4 3 F1410 C LF F1410 C LF hs 305 404 700 35 150 197 180 min 900 max 1180 740 min 70 max 350 53 225 250 max 720 max 505 700 960 185 min 0 max 200 ...

Page 29: ...s regarding the machine 4 3 6 Dimensions F1410 C LF hs 2 0 kW with ball screws 4 3 F1410 C LF F1410 C LF hs 775 200 700 404 53 305 min 70 max 350 197 180 min 900 max 1180 700 225 250 max 720 max 505 960 185 min 0 max 200 ...

Page 30: ...n values in idle CC F1410 LF CC F1410 LF hs Emission sound pressure level at the workplace at 50 66 8 dB A 74 8 dB A at 100 66 7 dB A 76 4 dB A Sound power level at 50 73 7 dB A 84 1 dB A at 100 79 1 dB A 80 3 dB A At an emission sound pressure level from 80 dB A and above at the workplace ear protection is required 4 4 CC F1410 LF CC F1410 LF hs ...

Page 31: ... 1 4 kW 2 0 kW Spindle revolutions infinite 140 3000 rpm 100 7500 rpm Machine precision True running accuracy of the tool spindle 0 01 mm Milling head Swiveling feature in both directions 90 90 to 90 Tool spindle MT3 Tool holder MT2 tightening thread M10 optional MT3 tightening thread M12 ISO30 DIN2080 tightening thread M12 Work table 700 x 180 mm Number of T slots 3 Width of T slots 12 mm Positio...

Page 32: ...ng the machine 4 4 3 Dimensions CC F1410 LF 1 4 kW with trapezoidal thread spindle 4 4 CC F1410 LF CC F1410 LF hs 305 404 700 35 150 197 180 min 0 max 200 185 min 710 max 990 740 min 70 max 350 53 225 250 max 720 max 505 700 960 ...

Page 33: ...s regarding the machine 4 4 4 Dimensions CC F1410 LF 1 4 kW with ball screws 4 4 CC F1410 LF CC F1410 LF hs 775 200 700 404 53 305 min 70 max 350 197 180 185 min 0 max 200 min 710 max 990 700 225 250 max 720 max 505 960 ...

Page 34: ... the machine 4 4 5 Dimensions CC F1410 LF hs 2 0 kW with trapezoidal thread spindle 4 4 CC F1410 LF CC F1410 LF hs 305 404 700 35 150 197 180 min 900 max 1180 740 min 70 max 350 53 225 250 max 720 max 505 700 185 min 0 max 200 960 ...

Page 35: ...regarding the machine 4 4 6 Dimensions CC F1410 LF hs 2 0 kW with ball screws 4 4 CC F1410 LF CC F1410 LF hs 775 200 700 404 53 305 min 70 max 350 197 180 min 900 max 1180 700 225 250 max 720 max 505 185 min 0 max 200 960 ...

Page 36: ...an be infinitely set using the potentiometer For the 1 4 kW motor the infinite settings range from 140 to 3000 rpm for the 2 0 kW motor from 100 to 7500 rpm 1 4 kW motor Revolutions rpm 1 140 5 140 10 150 15 160 20 200 25 300 30 400 35 700 40 850 45 1000 50 1200 55 1500 60 1900 65 2500 70 2800 80 3000 90 3000 100 3000 2 0 kW motor Revolutions rpm 2 50 3 100 4 200 5 350 10 700 15 1000 20 1400 25 17...

Page 37: ...must remain on STOP for approximately 10 seconds to enable the motor to reset To change the direction of rotation of the main drive motor the switch must rest on STOP for about 1 second to allow the relays on the control board enough time to switch In the event of the main drive motor being overloaded it will switch itself off automatically The main drive motor can only be switched back on again a...

Page 38: ...erials for example steel ordinary boring oil must be used The borer is always to be removed from the workpiece with the spindle rotating When using non metal materials for example wood tearing on breakthrough can be prevents by clamping a piece of waste wood under the workpiece to be processed For wood workpieces with a veneer or plastic coating always work from the side with the veneerWi th very ...

Page 39: ...the collet until it clicks 4 The collet can now move freely in the central take up shoulder and does not fall out when the collet is turned upside down 1 Hold the tensioning nut in one hand 2 Press up against the collet 3 The lateral pressure on the collet pushes this out of the take up shoulder of the tensioning nut and it can now be removed from the nut 6 2 Removal A A 1 1 ...

Page 40: ...l has been hand tightened the holding bolt 4 is used to hold the tool spindle 3 and tighten the tool tightening screw 2 clockwise without great strength using the Allen key 1 Removing tools with an inner thread 1 Hold the tool spindle 3 with the holding bolt 4 2 Undo the tool tightening screw 2 using the Allen key 1 by turning anti clockwise To undo the tool tightening screw 2 turn the Allen key 1...

Page 41: ...41 7 Fitting and removing the tools 42 6 Spannen und Ausdrücken der Werkzeuge 1 2 3 4 5 ...

Page 42: ...head to the left or right to the desired degree position 4 To secure the milling head in the desired position tighten the hexagonal screw 4 and hexagonal nut 5 Bringing the milling head back to the normal position 5 Undo the hexagonal screw 4 and the hexagonal nut 5 on the vertical slide in such a way that the milling head can be swiveled 6 Bring the milling head back to the vertical position 7 Af...

Page 43: ...lling machine spindle to a defined dimension 1 Set the required depth with the activation lever 4 2 Read the depth off at the scale ring 3 3 Rotate the depth stop 2 to the correct position so that it touches the milling head 4 Then tighten the hexagonal screw 1 securely 1 2 3 4 ...

Page 44: ...h trapezoidal threaded spindle of 4 mm with ball screws of 5 mm Scale ring Y axis 8 with trapezoidal threaded spindle of 4 mm with ball screws of 5 mm Scale ring Z axis 2 with trapezoidal threaded spindle of 2 mm with ball screws of 2 5 mm Another option for moving the tool spindle is to use the rotation motion of the activation lever 4 After undoing the clamping lever 1 the rotation motion may be...

Page 45: ...45 10 Feed motions of the X Y and Z axes Figure F1410 LF F1410 LF hs Figure F1410 C LF F1410 C LF hs CC F1410 LF CC F1410 LF hs 10 1 7 5 4 2 3 8 9 11 12 6 8 1 6 5 4 2 3 7 9 ...

Page 46: ...ustment is neither required nor possible 11 1 X axis 1 To adjust the spindle nut in the X axis 2 the cross slide support is moved to the middle 2 After undoing the threaded pin 1 the adjustment nut 3 is rotated slightly in a clockwise direction This rotation causes both nuts to tension each other and removes the play from the operation of the trapezoidal thread spindle 3 After the setting has been...

Page 47: ...oves the play from the operation of the trapezoidal thread spindle 3 After the setting has been made tighten the threaded pin 4 back up again 4 Install the bellows 7 and tighten screws 8 11 3 Z axis 1 To adjust the spindle nut in the Z axis 2 unscrew the cover plate on the back of the Z column 2 After undoing the threaded pin 1 the adjustment nut 3 is rotated slightly in a clockwise direction This...

Page 48: ...rface with fine sandpaper Check the tension of the gear belt and adjust if necessary Check the play in the feed spindles and set if necessary 13 Lubrication of the machine The lubrication process reduces wear and friction increases the lifetime protects metal surfaces from corrosion We recommend A class 2NLGI multi purpose grease for lubrication A lubrication oil with a viscosity of 100 mm s for o...

Page 49: ...bearings are closed in by design and are greased for life of the machine at point of manufacture The tracks if installed as well as the ball roll spindles of the milling machines with linear guides LF are maintenance free and need no lubrication Every 8 hours of operation Every 8 hours of operation 1 2 2 2 1 1 1 1 ...

Page 50: ...ller must be unlo cked For machines with a 1 4 kW drive motor the motor must be switched on again using the ON OFF switch after the emergen cy off switch is unlocked After unlocking wait approximately 5 seconds before switching the machine on For machines with a 2 0 kW drive motor the spindle turn switch must first be set to stop after the emergency off switch is unlocked In this position wait app...

Page 51: ...ication Wrong coolant set Check the ratio of coolant and correct if necessary Do not use pure water to cool Tool holder cannot be inserted into the main spindle Incorrect tool ball in the tool holder Only use the appropriate tool holders for the machine Use tool with take up Turn the tool tightening screw back further See Fitting and removing the tools Inner cone of the main spindle or outer cone ...

Page 52: ... for the relevant material Tool holder cannot be removed from the main spindle Tool was not inserted accor ding to instructions tool screw can be unscrewed upwards In the event of a remove tool tightening screw a suitable and sufficiently long threaded rod may be turned through the spindle into the tool holder A blow on the end of the threaded rod will detach the tool holder from the main spindle ...

Page 53: ... of the cross slide support 7 Tool tightening screw 8 Clamping lever for securing the protective hood 9 Clamping lever for securing the tool spindle 10 Activation lever for moving the tool spindle sleeve stroke 11 Clamping lever for adjusting the longitudinal motion X axis of the cross slide support 12 Clamping lever for securing the transverse motion Y axis at the cross slide support 13 Hexagonal...

Page 54: ...or adjusting the transverse motion Y axis of the cross slide support 8 Clamping lever for securing the protective hood 9 Clamping lever for securing the tool spindle 10 Activation lever for moving the tool spindle sleeve stroke 11 Clamping lever for adjusting the longitudinal motion X axis of the cross slide support 12 Clamping lever for securing the transverse motion Y axis at the cross slide sup...

Page 55: ... adjusting the longitudinal motion X axis of the cross slide support 6 Hand wheel for adjusting the transverse motion Y axis of the cross slide support 7 Tool tightening screw 8 Clamping lever for securing the protective hood 9 Clamping lever for securing the tool spindle 10 Activation lever for moving the tool spindle sleeve stroke 11 Hexagonal nut for swiveling the milling head 12 Index bolt for...

Page 56: ... boring and milling depth 6 Hand wheel for adjusting the longitudinal motion X axis of the cross slide support 7 Hand wheel for adjusting the transverse motion Y axis of the cross slide support 8 Clamping lever for securing the protective hood 9 Clamping lever for securing the tool spindle 10 Activation lever for moving the tool spindle sleeve stroke 11 Hexagonal nut for swiveling the milling head...

Page 57: ...cross slide support 11 Hand wheel for adjusting the transverse motion Y axis of the cross slide support 12 Clamping lever for securing the protective hood 13 Clamping lever for securing the tool spindle 14 Activation lever for moving the tool spindle sleeve stroke 15 Hexagonal nut for swiveling the milling head 16 Index bolt for securing the milling head 17 Depth stop for boring 13 12 16 17 15 8 1...

Page 58: ...h 2 Mode selection switch CNC operation Idle position Set up mode 3 Potentiometer rotating knob for speed selection of the electrical drive motor 4 ON OFF switch with under voltage trigger 5 Coolant ON OFF if coolant pump is connected 6 Diodes to display the status of the controller 7 Reset switch for controller 3 1 4 5 2 6 7 ...

Page 59: ...e cross slide support 11 Hand wheel for adjusting the transverse motion Y axis of the cross slide support 12 Clamping lever for securing the protective hood 13 Clamping lever for securing the tool spindle 14 Activation lever for moving the tool spindle sleeve stroke 15 Hexagonal nut for swiveling the milling head 16 Index bolt for securing the milling head 17 Depth stop for boring 12 16 15 9 10 11...

Page 60: ...switch CNC operation Idle position Set up mode 3 Potentiometer rotating knob for speed selection of the electrical drive motor 4 3 setting switch of the electrical drive motor I START RIGHT 0 STOP II START LEFT 5 Coolant ON OFF if coolant pump is connected 6 Diodes to display the status of the controller 7 Reset switch for controller 1 2 3 4 5 6 7 ...

Page 61: ...rt no Items Order no Description 1 1 51400283 0003 Protective hood 2 1 51006535 0002 Clamp holder 3 1 51507029 Tensioning lever 4 1 51004010 0010 Guide rod 5 3 16191200004010 Screw 6 2 16112500004000 Washer 7 1 51007250 0001 Push piece 4 5 2 7 3 5 6 1 ...

Page 62: ...62 16 Drawings and legends 16 2 Electronic hood with 1 4 kW motor 16 2 1 F1410 LF F1410 C LF 15 11 10 10 1 13 10 3 10 2 8 1 3 7 5 8 2 6 2 9 1 12 8 9 4 5 1 1 ...

Page 63: ... 8 1 4 16191200004010 Screw 8 2 4 16112500004000 Washer 9 1 51500401 0002 Board holder without cut out 9 1 1 51500401 0003 Board holder with cut out 10 1 16191200004020 Screw 10 1 1 51501304 Symbol for earthed connection 10 2 2 16193400004000 Nut 10 3 2 16167980004000 Fanned washer 11 Tool tightening screw 11 1 91200010130 01 MT2 with tightening thread M10 1 91200012160 01 MT3 or ISO30 with tighte...

Page 64: ...64 16 Drawings and legends 16 2 Electronic hood with 1 4 kW motor 16 2 2 CC F1410 LF 1 5 7 6 4 3 2 ...

Page 65: ...n key 2 1 51007430 0001 8 mm for tool tightening screw 1 51007440 0001 10 mm for tool tightening screw MT3 or ISO30 3 1 51401504 0001 Cover hood 4 Tool tightening screw 4 1 91200010130 01 MT2 with tightening thread M10 1 91200012160 01 MT3 or ISO30 with tightening thread M12 5 4 16179810003095 Screw 6 4 16191200004010 Screw 7 4 16112500004000 Washer ...

Page 66: ...66 16 Drawings and legends 16 3 Milling head with 1 4 kW motor 27 31 28 29 30 36 37 32 38 33 39 1 17 21 34 10 22 16 14 26 5 9 6 25 24 16 20 19 3 8 13 12 7 3 4 2 11 40 ...

Page 67: ...T3 1 51003475 0002 ISO30 16 2 51502115 Ball bearing 17 1 51003475 0001 Sleeve 19 1 51004050 0007 Nut thin 20 1 51004050 0008 Nut thick 21 1 51003910 0003 Parallel key 22 1 51004030 0007 Gear shaft 24 2 16191200006100 Screw 25 2 51004025 0023 Spacer 26 1 51500102 0001 Motor with gear wheel 1 51500108 0001 2 carbon brushes with brush holder 27 1 51006575 0002 Hub 28 1 51401148 Activation lever 29 1 ...

Page 68: ... 16 Drawings and legends 16 4 Milling head with 2 0 kW motor 27 31 22 28 30 52 43 41 44 12 29 13 11 2 7 9 4 49 8 36 23 33 37 1 21 42 34 10 38 39 32 19 20 24 18 17 16 14 45 25 5 15 6 50 48 3 53 35 51 9 26 ...

Page 69: ...16191200006090 Screw 14 Tool spindle 14 1 51005045 0001 MT2 1 51003465 0001 MT3 1 51003475 0002 ISO30 15 1 51007970 0002 Spring wire 16 2 51502135 Ball bearing 17 1 51003475 0001 Sleeve 18 2 51502200 Nilos ring 19 1 51004050 0007 Nut thin 20 1 51004050 0008 Nut thick 21 1 51003910 0003 Parallel key 22 1 51004030 0007 Gear shaft 24 2 16191200008090 Screw 25 1 51006650 0003 Flange 26 1 51500128 0003...

Page 70: ... 16 Drawings and legends 16 4 Milling head with 2 0 kW motor 27 31 22 28 30 52 43 41 44 12 29 13 11 2 7 9 4 49 8 36 23 33 37 1 21 42 34 10 38 39 32 19 20 24 18 17 16 14 45 25 5 15 6 50 48 3 53 35 51 9 26 ...

Page 71: ...8 Allen key 48 1 51007430 0002 8 mm for tool tightening screw MT2 1 51007440 0002 10 mm for tool tightening screw MT3 or ISO30 49 Tool tightening screw 49 1 91200010130 01 with thread M10 to MT2 1 91200012160 01 with thread M12 to MT3 or ISO30 52 4 16191200004010 Screw 53 1 51004008 0002 Mounting pin F1410 LF hs F1410 C LF hs 35 1 51500127 Terminal box lid with control elements 50 1 51500624 0001 ...

Page 72: ...wings and legends 16 5 Z column with vertical slide with trapezoidal thread spindle 6 1 2 3 4 5 7 8 4 4 9 10 11 12 13 14 15 16 17 4 6 4 18 7 8 19 20 4 4 23 24 22 21 25 26 27 28 29 30 14 32 31 33 4 1 34 2 35 A A ...

Page 73: ...1 1 51004050 0006 Washer 12 1 16193300010035 Washer 13 1 16193400010000 Nut 14 30 16191200006020 Screw 15 1 16112500010000 Washer 16 1 16193300010050 Screw 17 1 51503015 Aluminum scale 18 1 51401403 0001 Retaining plate Z axis down 25 1 16091300006006 Threaded pin 26 1 51507029 Tensioning lever 27 1 51007350 0002 Spindle nut right 28 4 16191200005016 Screw 29 1 51007319 0001 Adjusting nut right 30...

Page 74: ...wings and legends 16 5 Z column with vertical slide with trapezoidal thread spindle 6 1 2 3 4 5 7 8 4 4 9 10 11 12 13 14 15 16 17 4 6 4 18 7 8 19 20 4 4 23 24 22 21 25 26 27 28 29 30 14 32 31 33 4 1 34 2 35 A A ...

Page 75: ...F hs 4 26 16191200004010 Screw 9 1 51401412 0001 Cover plate 19 2 51401419 0001 Cover plate 20 4 16112500004000 Washer 21 2 16191200006030 Screw 22 1 51004335 0002 Clamp 23 1 51004335 0001 Clamp plate 24 1 51002516 0001 Clamp with spigot F1410 C LF F1410 C LF hs CC F1410 LF CC F1410 LF hs 4 22 16191200004010 Screw 9 2 51401412 0001 Cover plate ...

Page 76: ...76 16 Drawings and legends 16 6 Spindle Z axis with trapezoidal thread spindle 16 6 1 F1410 LF F1410 LF hs 9 7 4 8 6 5 4 3 2 1 ...

Page 77: ...0 LF hs Part no Items Order no Description 1 1 51502550 0001 Spindle 2 1 51502404 0001 Bevel gear 3 1 16073430004024 Spiral tensioning pin 4 2 51502112 Ball bearing 5 1 51004070 0001 Spindle flange 6 3 16191200006012 Screw 7 2 51004025 0025 Setting nut 8 1 51502208 O ring 9 1 51006545 0002 Cover cap ...

Page 78: ...78 16 Drawings and legends 16 6 Spindle Z axis with trapezoidal thread spindle 16 6 2 F1410 C LF F1410 C LF hs CC F1410 LF CC F1410 LF hs 1 3 4 5 6 4 8 17 12 9 13 14 15 18 19 20 21 16 22 10 7 2 11 23 ...

Page 79: ...6012 Screw 7 2 51004025 0025 Setting nut 8 1 51401422 0001 Motor holder 9 1 51401426 0001 Clamp motor holder 10 1 51401501 0001 Cover hood 11 1 51500122 Stepper motor 12 2 16191200006030 Screw 13 1 51502323 Gear belt 14 1 51004050 0010 Gear belt pulley 15 1 16091300006016 Threaded pin 16 4 51004010 0021 Spacer stepper motor 17 4 16160300005060 Screw 18 2 16047100014000 Securing ring 19 1 160734300...

Page 80: ...80 16 Drawings and legends 16 7 Lateral drive for Z axis with trapezoidal thread spindle 6 4 5 4 3 2 1 7 12 8 9 10 11 14 13 ...

Page 81: ... 2 51502111 Ball bearing 5 1 51004060 0001 Spindle flange 6 2 51004025 0027 Setting nut 8 1 51502131 Steel ball 9 1 51502027 0001 Pressure spring 10 3 16191200006020 Screw 11 3 16112500006001 Washer 12 2 16091300006006 Threaded pin 13 1 16073430003018 Spiral tensioning pin 14 1 51502405 Bevel gear F1410 LF F1410 LF hs 7 1 51507026 0001 Hand wheel F1410 C LF F1410 C LF hs CC F1410 LF CC F1410 LF hs...

Page 82: ...ings and legends 16 8 Cross slide support top slide base plate with trapezoidal thread spindle 9 7 8 7 6 5 4 10 11 13 12 14 16 15 17 16 15 18 19 3 20 7 20 3 29 3 30 31 1 2 5 21 3 8 3 26 3 26 23 24 7 25 2 27 22 28 ...

Page 83: ... 1 51401402 0001 Retaining plate Y axis 12 2 16196500004008 Screw 13 2 16191200008090 Screw 14 1 51006970 0002 Spindle extension Y axis 15 4 16012700012000 Spring washer 16 4 16191200012035 Screw 17 2 16193400012000 Nut 18 1 51401146 00012 Base plate 19 1 51505232 Set of guide rails 460 mm 20 40 Cover cap included in a set of guide rails 460mm 700mm 21 1 51007350 00031 Spindle nut with adjusting n...

Page 84: ...ings and legends 16 8 Cross slide support top slide base plate with trapezoidal thread spindle 9 7 8 7 6 5 4 10 11 13 12 14 16 15 17 16 15 18 19 3 20 7 20 3 29 3 30 31 1 2 5 21 3 8 3 26 3 26 23 24 7 25 2 27 22 28 ...

Page 85: ...2 4 16191200006030 Screw 3 74 16191200006020 Screw 7 10 16191200004010 Screw 22 1 51507029 Tensioning lever 23 1 51002516 0001 Clamp with spigot 24 1 51004335 0001 Clamp plate 25 1 51004335 0002 Clamp 27 1 51505223 0001 Clamp complete F1410 C LF F1410 C LF hs CC F1410 LF CC F1410 LF hs 2 2 16191200006030 Screw 3 70 16191200006020 Screw 7 8 16191200004010 Screw ...

Page 86: ...86 16 Drawings and legends 16 9 Spindle X axis with trapezoidal thread spindle 16 9 1 F1410 LF F1410 LF hs 1 2 5 4 9 7 3 9 6 11 2 8 10 ...

Page 87: ...tion 1 1 51401155 00011 Spindle bearing 2 2 51502112 Ball bearing 3 1 51004040 0003 Adjusting ring 4 1 51502027 0001 Pressure spring 5 1 51502131 Steel ball 6 1 51006750 00011 Scale ring 80 intervals 7 1 51507026 0001 Hand wheel 8 1 51502552 0001 Spindle 9 2 16091300006006 Threaded pin 10 2 16112500006001 Washer 11 2 16191200006025 Screw ...

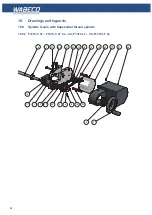
Page 88: ...6 Drawings and legends 16 9 Spindle X axis with trapezoidal thread spindle 16 9 2 F1410 C LF F1410 C LF hs CC F1410 LF CC F1410 LF hs 8 2 22 24 21 20 15 16 13 14 25 12 27 26 7 6 23 9 4 18 28 17 2 1 11 10 5 ...

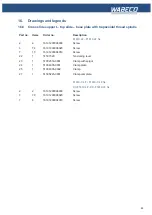
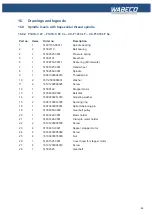
Page 89: ...pindle 9 1 16091300006010 Threaded pin 10 2 16112500006001 Washer 11 2 16191200006025 Screw 12 1 51500122 Stepper motor 13 1 51004020 0002 Belt disk 14 2 16000002214010 Adjusting washer 15 2 16047100014000 Securing ring 16 1 16073430003014 Spiral tensioning pin 18 1 51004050 0009 Gear belt pulley 20 1 51401422 0001 Motor holder 21 1 51401426 0001 Clamp to motor holder 22 2 16191200006030 Screw 23 ...

Page 90: ...90 16 Drawings and legends 16 10 Spindle Y axis with trapezoidal thread spindle 16 10 1 F1410 LF F1410 LF hs 1 2 5 4 9 7 3 9 6 11 2 8 10 ...

Page 91: ... 1 1 51401155 00011 Spindle bearing 2 2 51502112 Grooved ball bearing 3 1 51004040 0003 Pressure spring 4 1 51502027 0001 Pressure spring 5 1 51502131 Steel ball 6 1 51006750 00011 Scale ring 80 intervals 7 1 51507026 0001 Hand wheel 8 1 51502554 0001 Spindle 9 2 16091300006006 Threaded pin 10 2 16112500006001 Washer 11 2 16191200006025 Screw ...

Page 92: ... Drawings and legends 16 10 Spindle Y axis with trapezoidal thread spindle 16 10 2 F1410 C LF F1410 C LF hs CC F1410 LF CC F1410 LF hs 8 2 22 24 21 20 15 16 13 14 25 12 27 26 7 6 23 9 4 18 28 17 2 1 11 10 5 ...

Page 93: ...001 Spindle 9 1 16091300006010 Threaded pin 10 2 16112500006001 Washer 11 2 16191200006025 Screw 12 1 51500122 Stepper motor 13 1 51004020 0002 Belt disk 14 2 16000002214010 Adjusting washer 15 2 16047100014000 Securing ring 16 1 16073430003014 Spiral tensioning pin 18 1 51004050 0009 Gear belt pulley 20 1 51401422 0001 Motor holder 21 1 51401426 0001 Clamp to motor holder 22 2 16191200006030 Scre...

Page 94: ...gends 16 11 Z column with vertical slide with ball screws 1 2 4 5 3 6 7 12 11 10 9 13 14 15 7 7 16 17 18 20 19 21 22 23 24 7 13 7 25 14 15 28 27 8 30 31 29 7 7 32 33 34 21 36 37 38 26 39 40 7 7 42 41 8 26 35 A A 43 11 44 10 ...

Page 95: ...000 Nut 17 1 51401441 0001 Vertical slide 18 1 51004050 0006 Washer 19 1 16193300010035 Screw 20 1 16193400010000 Nut 21 30 16191200006020 Screw 22 1 16112500010000 Washer 23 1 16193300010050 Screw 24 1 51503015 Aluminum scale 25 1 51401403 0001 Retaining plate Z axis down 26 4 16091400004006 Threaded pin 33 4 16191200005020 Screw 34 20 Cover cap included in a set of guide rails 580mm 35 1 5150523...

Page 96: ...gends 16 11 Z column with vertical slide with ball screws 1 2 4 5 3 6 7 12 11 10 9 13 14 15 7 7 16 17 18 20 19 21 22 23 24 7 13 7 25 14 15 28 27 8 30 31 29 7 7 32 33 34 21 36 37 38 26 39 40 7 7 42 41 8 26 35 A A 43 11 44 10 ...

Page 97: ...16191200006030 Screw 16 1 51401412 0001 Cover plate 27 2 51401419 0001 Cover plate 28 4 16112500004000 Washer 29 1 51004335 0002 Clamp 30 1 51004335 0001 Clamp plate 31 1 51002516 0001 Clamp with spigot 32 1 51507029 Tensioning lever F1410 C LF F1410 C LF hs CC F1410 LF CC F1410 LF hs 7 20 16191200004010 Screw 8 4 16191200006030 Scew 16 2 51401412 0001 Cover plate ...

Page 98: ...98 16 Drawings and legends 16 12 Spindle Z axis with ball screws 16 12 1 F1410 LF F1410 LF hs ...

Page 99: ...F hs Part no Items Order no Description 1 1 51505210 0003 Spindle with spindle nut 2 1 51502404 0001 Bevel gear 3 1 16073430004024 Spiral tensioning pin 4 2 51502112 Ball bearing 5 1 51004070 0001 Spindle flange 6 3 16191200006012 Screw 7 2 51004025 0025 Setting nut 8 1 51004016 0005 Spacer ...

Page 100: ...100 16 Drawings and legends 16 12 Spindle Z axis with ball screws 16 12 2 F1410 C LF F1410 C LF hs CC F1410 LF CC F1410 LF hs 1 3 4 5 6 4 8 17 12 9 13 14 15 18 19 20 21 16 22 10 7 2 11 23 24 ...

Page 101: ...e 6 3 16191200006012 Screw 7 2 51004025 0025 Setting nut 8 1 51401422 0001 Motor holder 9 1 51401426 0001 Clamp motor holder 11 1 51500122 Cover hood 12 2 16191200006030 Stepper motor 13 1 51502323 Screw 14 1 51004050 0010 Gear belt 15 1 16091300006016 Gear belt pulley 16 4 51004010 0021 Threaded pin 17 4 16160300005060 Spacer stepper motor 18 2 16047100014000 Screw 19 1 16073430003014 Securing ri...

Page 102: ...102 16 Drawings and legends 16 13 Lateral drive for Z axis with ball screws 6 4 5 4 3 2 1 7 12 8 9 10 11 14 13 ...

Page 103: ...2111 Ball bearing 5 1 51004060 0001 Spindle flange 6 2 51004025 0027 Setting nut 8 1 51502131 Steel ball 9 1 51502027 0001 Pressure spring 10 3 16191200006020 Screw 11 3 16112500006001 Washer 12 2 16091300006006 Threaded pin 13 1 16073430003018 Spiral tensioning pin 14 1 51502405 Bevel gear F1410 LF F1410 LF hs 7 1 51507026 0001 Hand wheel F1410 C LF F1410 C LF hs CC F1410 LF CC F1410 LF hs 7 1 51...

Page 104: ...104 16 Drawings and legends 16 14 Cross slide support with ball screws 9 7 8 7 6 5 10 11 13 12 14 16 15 17 16 15 18 19 3 20 7 20 3 29 3 30 31 1 2 5 3 8 3 3 23 24 7 25 2 27 22 28 ...

Page 105: ...ew 17 2 16193400012000 Nut 18 1 51401146 00012 Base plate 19 1 51505232 Set of guide rails 460 mm 20 40 Cover cap Included in a set of guide rails 460mm 700mm 28 1 51401440 0001 Cross slide 29 1 51505231 Set of guide rails 700mm 30 1 51002051 0003 End of top slide 31 1 51401240 0002 Top slide F1410 LF F1410 LF hs 2 4 16191200006030 Screw 3 74 16191200006020 Screw 7 10 16191200004010 Screw 22 1 515...

Page 106: ...106 16 Drawings and legends 16 15 Spindle X axis with ball screws 16 15 1 F1410 LF F1410 LF hs 1 2 5 4 9 7 3 9 6 11 2 8 10 ...

Page 107: ...55 00011 Spindle bearing 2 2 51502112 Ball bearing 3 1 51004040 0003 Adjusting ring 4 1 51502027 0001 Pressure spring 5 1 51502131 Steel ball 6 1 51006750 00012 Scale ring 100 intervals 7 1 51507026 0001 Hand wheel 8 1 51505210 0002 Spindle with spindle nut 9 2 16091300006006 Threaded pin 10 2 16112500006001 Washer 11 2 16191200006025 Screw ...

Page 108: ...108 16 Drawings and legends 16 15 Spindle X axis with ball screws 16 15 2 F1410 C LF F1410 C LF hs CC F1410 LF CC F1410 LF hs 8 2 22 24 21 20 15 16 13 14 25 12 27 26 7 6 23 9 4 18 28 17 2 1 11 10 5 ...

Page 109: ...spindle nut 9 1 16091300006010 Threaded pin 10 2 16112500006001 Washer 11 2 16191200006025 Screw 12 1 51500122 Stepper motor 13 1 51004020 0002 Belt disk 14 2 16000002214010 Adjusting washer 15 2 16047100014000 Securing ring 16 1 16073430003014 Spiral tensioning pin 18 1 51004050 0009 Gear belt pulley 20 1 51401422 0001 Motor holder 21 1 51401426 0001 Clamp to motor holder 22 2 16191200006030 Scre...

Page 110: ...110 16 Drawings and legends 16 16 Spindle Y axis with ball screws 16 16 1 F1410 LF F1410 LF hs 1 2 5 4 9 7 3 9 6 11 2 8 10 ...

Page 111: ...1 51401155 00011 Spindle bearing 2 2 51502112 Grooved ball bearing 3 1 51004040 0003 Adjusting ring 4 1 51502027 0001 Pressure spring 5 1 51502131 Steel ball 6 1 51006750 00012 Scale ring 100 intervals 7 1 51507026 0001 Hand wheel 8 1 51505211 Threaded pin 9 2 16091300006006 Washer 10 2 16112500006001 Screw 11 2 16191200006025 Schraube ...

Page 112: ...112 16 Drawings and legends 16 16 Spindle Y axis with ball screws 16 16 2 F1410 C LF F1410 C LF hs CC F1410 LF CC F1410 LF hs 8 2 22 24 21 20 15 16 13 14 25 12 27 26 7 6 23 9 4 18 28 17 2 1 11 10 5 ...

Page 113: ...spindle nut 9 1 16091300006010 Threaded pin 10 2 16112500006001 Washer 11 2 16191200006025 Screw 12 1 51500122 Stepper motor 13 1 51004020 0002 Belt disk 14 2 16000002214010 Adjusting washer 15 2 16047100014000 Securing ring 16 1 16073430003014 Spiral tensioning pin 18 1 51004050 0009 Gear belt pulley 20 1 51401422 0001 Motor holder 21 1 51401426 0001 Clamp to motor holder 22 2 16191200006030 Scre...

Page 114: ...191200004010 Screw 2 6 16112500004000 Screw 3 1 51401409 0001 Cover plate 4 4 51004008 0010 Spacer cover plate 5 1 51004020 0006 Tube 6 2 16191200004020 Screw 7 1 51500633 0001 Limit switch 8 1 51001017 0002 Switching cam 9 1 51401405 0001 Top bracket 10 1 51508200 Washer 11 1 16167980003000 Fanned washer 12 16191200003006 Screw 6 7 10 11 12 8 9 2 1 5 1 2 3 4 ...

Page 115: ...cover plate 2 5 16112500004000 Washer 3 5 16191200004010 Screw 4 1 16191200003006 Screw 5 1 16167980003000 Fanned washer 6 1 51508200 Washer 7 1 51501501 Grommet 8 1 51401410 0001 Cover plate 9 2 16191200004045 Screw 10 1 51500633 0001 Limit switch 11 2 51004010 0023 Spacer sleeve 12 1 51001017 0002 Switching cam 13 1 51401406 0001 Top bracket 2 3 4 5 6 1 13 12 11 10 9 3 2 7 8 ...

Page 116: ...116 16 Drawings and legends 16 19 Limit switch for Z axis 16 19 1 F1410 C LF F1410 C LF hs CC F1410 LF CC F1410 LF hs 3 1 2 3 4 5 6 2 7 2 3 8 9 10 11 3 4 ...

Page 117: ...der no Description 1 1 51401407 0001 Top bracket 2 4 16191200004010 Screw 3 10 16112500004000 Washer 4 2 51004008 0010 Spacer cover plate 5 1 51500633 0001 Limit switch 6 2 16191200004020 Screw 7 1 51401408 0001 Cover plate 8 1 51001017 0002 Switching cam 9 1 51508200 Washer 10 1 16167980003000 Fanned washer 11 1 16191200003006 Screw ...

Page 118: ...118 16 Drawings and legends 16 20 Control panel for 1 4 kW motor 12 1 11 18 2 4 10 8 7 9 6 3 5 5 5 13 14 15 16 17 ...

Page 119: ...or 4 1 1 51500807 00021 Potentiometer complete 5 4 16179810003095 Screw 6 1 16191200004025 Screw 7 2 51501304 Symbol for earthed connection 8 1 16191200004012 Screw 9 2 16191200003010 Screw 10 1 51500601 Switch 11 1 51500606 0001 On Off switch 12 1 51401509 0001 Controller housing 13 1 51500800 0001 Noise filter 14 2 16167980003000 Fanned washer 15 2 16193400003000 Nut 16 4 16167980004000 Fanned w...

Page 120: ...120 16 Drawings and legends 16 20 Control panel for 1 4 kW motor 7 2 3 8 1 6 10 9 9 10 5 4 11 12 13 14 15 16 17 ...

Page 121: ...16167980004000 Fanned washer 4 4 16191200003010 Screw 5 2 51500401 0001 Guide rails 6 1 51501402 Control board 7 1 51401528 0001 Lid top 8 4 51501505 Counter nut 9 4 16193400003000 Nut 10 4 16167980003000 Fanned washer 11 2 51501533 Cable screw 12 2 51501523 Closure screw 13 1 51501531 Strain relief 14 1 51500920 0003 Mains cable 15 1 16191200004012 Screw 16 1 51501304 Symbol for earthed connectio...

Page 122: ...122 16 Drawings and legends 16 21 Control panel for 2 0 kW motor 5 12 1 11 5 10 9 8 7 6 18 2 3 4 5 13 14 15 16 17 ...

Page 123: ...001 Potentiometer 5 4 16179810003095 Screw 6 1 16191200004025 Screw 7 2 51501304 Symbol for earthed connection 8 1 16191200004012 Screw 9 2 16191200003010 Screw 10 1 51500601 Switch 11 1 51500602 Switch 12 1 51401509 0001 Controller housing 13 1 51500800 0001 Noise filter 14 2 16167980003000 Fanned washer 15 2 16193400003000 Nut 16 4 16167980004000 Fanned washer 17 4 16193400004000 Nut 18 1 515006...

Page 124: ...124 16 Drawings and legends 16 21 Control panel for 2 0 kW motor 7 2 3 8 1 11 12 13 14 15 16 17 ...

Page 125: ...Controller board for professional milling 2 2 16193400004000 Nut 3 2 16167980004000 Fanned washer 7 1 51401528 0001 Lid top 8 4 51501505 Counter nut 11 2 51501533 Cable screw 12 2 51501523 Closure screw 13 1 51501531 Strain relief 14 1 51500920 0003 Mains cable 15 1 16191200004012 Screw 16 1 51501304 Symbol for earthed connection 17 20 16179810003095 Screw ...

Page 126: ...126 16 Drawings and legends 16 22 Support arm for control panel 1 2 3 4 5 6 8 9 5 4 7 9 8 ...

Page 127: ...1401316 0001 Console arm 7 1 51001016 00031 Holder for controller housing 8 4 16191200006016 Screw 9 4 16112500006001 Washer Without machine safety cabin 1 1 51002051 00011 Holder for arm 2 2 16191200008020 Screw 3 2 16112500008001 Washer In connection with machine safety cabin 1 1 51002130 00031 Holder for arm 2 2 16191200010030 Screw 3 2 16112500010000 Washer ...

Page 128: ...128 16 Drawings and legends 16 23 Industrial monitor and membrane keyboard 2 14 16 4 5 17 18 21 22 20 19 24 25 23 15 6 11 7 12 8 13 9 10 1 3 15 ...

Page 129: ...0004000 Nut 7 1 51501304 Symbol for earthed connection 8 2 16193400003000 Nut 9 1 51500800 Noise filter 10 2 16191200003010 Screw 11 2 16167980004000 Fanned washer 12 1 16191200004025 Screw 13 2 16167980003000 Fanned washer 14 1 Cover 15 8 16179810003095 Screw 16 1 1152105 Controller board nccad basic 1152110 Controller board nccad professional 17 1 51500121 Fan 18 2 16191200005010 Screw 19 2 1619...

Page 130: ...entiometer with cable and connector 3 1 1 51500807 00021 Potentiometer complete 4 1 51500606 0001 On Off switch 5 1 51500601 Switch 6 2 16193400004000 Nut 7 2 16167980004000 Fanned washer 8 1 51401540 0001 Switch cover 9 LEDs with switch contained in controller package 10 4 16179810003095 Screw 11 1 51501304 Symbol for earthed connection 12 1 16191200004012 Screw 16 23 Industrial monitor and membr...

Page 131: ...ew 4 1 51500920 0003 Mains cable 5 1 51501531 Strain relief 6 2 51501523 Closure screw 7 2 51501533 Cable screw 8 2 51500401 0001 Guide rails 9 4 51501505 Counter nut 10 1 51501402 Control board 11 4 16191200003010 Screw 12 4 16167980003000 Fanned washer 13 4 16193400003000 Nut 14 2 16193400004000 Nut 15 2 16167980004000 Fanned washer 16 23 Industrial monitor and membrane keyboard 1 2 3 4 6 7 11 1...

Page 132: ...or operating modes 3 1 51500801 00011 Potentiometer 4 1 51500602 Switch 5 1 51500601 Switch 6 2 16193400004000 Nut 7 2 16167980004000 Fanned washer 8 1 51401539 0001 Switch cover 9 LEDs with switch contained in controller package 10 4 16179810003095 Screw 11 1 51501304 Symbol for earthed connection 12 1 16191200004012 Screw 16 23 Industrial monitor and membrane keyboard 2 3 6 12 11 10 1 5 4 8 9 7 ...

Page 133: ...28 0001 Cover 2 1 51501304 Symbol for earthed connection 3 1 16191200004012 Screw 4 1 51500920 0003 Mains cable 5 1 51501531 Strain relief 6 2 51501523 Closure screw 7 2 51501533 Cable screw 8 4 51501505 Counter nut 9 2 16193400004000 Nut 10 2 16167980004000 Fanned washer 16 23 Industrial monitor and membrane keyboard 1 2 3 4 6 7 9 8 5 10 ...

Page 134: ...2 Holder for arm 2 1 51002416 00011 Console arm 3 2 51004040 0006 Washer 4 2 16112500008001 Washer 5 2 51507031 0003 Clamping lever 6 1 51002100 0001 Retaining plate for industrial monitor 7 1 51004020 0013 Bolt 8 4 16112500006001 Washer 9 4 16191200006020 Screw 10 2 16191200010030 Screw 11 2 16112500010000 Washer 2 3 6 8 4 11 1 4 5 9 7 3 5 10 ...

Page 135: ...135 17 Circuit diagram 17 1 for motor 1 4 kW This document shows all the equipment for the electrical set up including connection to the power supply network see legend for circuit diagrams 17 9 ...

Page 136: ...rcuit diagram 17 2 for 1 4 kW motor and machine safety cabin This document shows all the equipment for the electrical set up including connection to the power supply network see legend for circuit diagrams 17 9 ...

Page 137: ...agram 17 3 Industrial monitor and membrane keyboard for 1 4 kW motor This document shows all the equipment for the electrical set up including connection to the power supply network see legend for circuit diagrams 17 9 ...

Page 138: ...138 17 Circuit diagram 17 4 for 2 0 kW motor This document shows all the equipment for the electrical set up including connection to the power supply network see legend for circuit diagrams 17 9 ...

Page 139: ...rcuit diagram 17 5 for motor 2 0 kW and machine safety cabin This document shows all the equipment for the electrical set up including connection to the power supply network see legend for circuit diagrams 17 9 ...

Page 140: ...agram 17 6 Industrial monitor and membrane keyboard for 2 0 kW motor This document shows all the equipment for the electrical set up including connection to the power supply network see legend for circuit diagrams 17 9 ...

Page 141: ...e Direction of rotation change green with brown see legend for circuit diagrams 17 9 Direction of rotation change green with brown see legend for circuit diagrams 17 9 This document shows all the equipment for the electrical set up including connection to the power supply network ...

Page 142: ...ng M1 Main spindle motor M2 Coolant pump M3 Fan for industrial monitor M4 Axis motor 3H8221 624 6A N1 Mains power plug N2 Motor connector N3 9 pin connector N4 Terminal board P1 Motor control board P2 CNC control board PE Protection against electric shock R1 220 KΩ Potentiometer spindle revolutions R2 10 KΩ Potentiometer spindle revolutions S1 EMERGENCY OFF S2 Main switch with low voltage trigger ...

Page 143: ...e coolant unit see diagram The diameter of the through holes in the surface must be at least 9 mm 18 2 Mounting of the coolant unit to the machine base cabinet optional The coolant unit 2 is positioned as shown on the machine base cabinet 1 The screws and washers required for assembly are included in the scope of delivery To screw the coolant unit to the machine base cabinet proceed as follows 1 C...

Page 144: ...e cabinet optional 18 3 Mounting of the coolant return plate optional The coolant return plate 2 collects dripping coolant from the workbench and returns it back to the coolant unit To mount proceed as follows 1 Fit the groove X to the protrusion Y of the coolant unit 1 1 2 1 Y X 2 ...

Page 145: ...t is only disposed of in an environmentally friendly way in accordance with the relevant guidelines Coolant is a special waste product 18 5 Filling the coolant unit A number of protective measures must be observed and taken in order to ensure that the handling of coolant does not cause health risks or environmental loads Always observe the datasheet and the safety regulations of the coolant being ...

Page 146: ...witched on Caution Coolant flow is controlled with the coolant shut off valve 18 Coolant unit optional For machines with 1 4 kW drive motor For machines with 2 0 kW hs drive motor Switch position 0 Pump switched off Switch position I Pump switched on Caution Coolant flow is controlled with the coolant shut off valve 18 7 Operating the coolant unit with CNC controller Switch for coolant pump ...

Page 147: ...ch a way that the coolant flows as directly as possible onto the blade of the cutting tool of the milling machine Attention should be paid to ensure that the nozzle does not come into contact with the cutting tool 18 9 Controlling the flow of coolant using the coolant shut off valve Coolant sgut off in the open position Maximum coolant flow Rotation of the coolant shut off Valve clockwise Flow is ...

Page 148: ...inserts 2 1 51500119 Coolant pump 2 1 1 51504348 Angle bracket 2 2 1 51504350 Collar 2 3 1 51504332 Reducing nipple 2 4 1 51502507 Coolant hose with shut off valve 3 4 16191200006016 Screw 3 1 4 16112500006001 Washer 4 4 16191300008040 Threaded pin 4 1 4 16112500008001 Washer 4 2 4 16193400008000 Nut 1 1 1 4 2 4 1 4 3 1 3 2 2 2 2 3 2 1 2 4 ...

Page 149: ...hread M8 of the ma chine safety cabin see diagram The diameter of the through holes in the surface must be at least 9 mm 19 2 Mounting of the machine safety cabin to the machine base cabinet optional The machine safety cabin 2 is positioned as shown on the machine base cabinet 1 The screws and washers required for assembly are included in the scope of delivery To screw the machine safety cabin to ...

Page 150: ...9 4 Filling the coolant unit integrated in the machine safety cabin See point 18 5 The capacity of the coolant unit integrated in the machine safety cabin is approximately 42 liters 19 5 Operating the coolant unit with CNC controller See point 18 7 19 6 Positioning the segmented coolant hose See point 18 8 19 7 Controlling the flow of coolant using the coolant shut off valve See point 18 9 1 2 ...

Page 151: ... bracket 2 2 1 51504350 Collar 2 3 1 51504332 Reducing nipple 2 4 1 51502507 Coolant hose with shut off valve 3 1 51401461 0001 Door left 4 1 51505058 Engaging insert 5 1 51401462 0001 Door right 6 2 51401133 Polycarbonate screen 7 2 51507006 Bar handle 8 1 51008630 0004 Glider 9 1 51004006 0003 Trigger bolt 10 1 51501531 Strain relief 11 1 51500619 Switch 9 8 11 4 6 2 2 3 2 1 2 2 2 4 7 1 1 1 1 1 ...

Page 152: ... to be subsequently fitted to the machine this will by default replace the milling head mounted on the milling machine To mount the mounting bracket first remove the index bolt as described in chapter Swivel milling head Then fully unscrew the hexagonal screw 2 and hexagonal nut 3 The milling head can then be removed carefully and replaced by the mounting bracket To secure the mounting bracket fit...

Page 153: ...mping screws 4 of the mounting bracket Then the drive unit can be inserted from the top with gentle backwards and forwards turns into the 43 mm diameter holding boring Then tighten the two clamping screws 4 and check the drive unit for correct seating 20 3 Drawing and legend Part no Items Order no Description 1 1 51006494 0001 Mounting bracket 2 2 16191200008070 Screw 2 1 ...

Page 154: ... rotary table 2 The workpiece to be processed is in turn clamped in the lathe chuck 21 2 Swiveling the worm shaft in and out The swiveling of the worm shaft in and out is not necessary in CNC mode But if the worm shaft is acci dentally e g by way of collision swiveled out then it must be brought back into contact with the worm gear To set proceed as follows 1 Undo the locking screw 11 the eccentri...

Page 155: ... pushed through the motor hood into the screw 13 only clockwise The rotary table should only turn with difficulty or not at all 10 The four threaded pins in the limiting ring can now be used to set the play very finely 11 The threaded pins are tighten crosswise in small stages and the movement of the rotary table is constantly checked by rotating with the Allen key 12 The play is set correctly whe...

Page 156: ...ng plate 30 to be swiveled 3 Remove the three screws 28 using the Allen key The motor holding plate may be swiveled to give better access to the screws 4 Tighten the screw 29 back up again 5 Open the cable duct 35 sufficiently to allow the cables to pass through easily 6 Remove the motor hood 33 from the motor holding plate whilst also slackening the motor cable 7 Slightly undo the four nuts 36 us...

Page 157: ...eccentric tappet 7 is set using the holding ring 6 To set the axial play of the eccentric tappet proceed as follows 1 Remove the NC drive unit see chapter Removing the NC drive unit 2 Undo the four threaded pins 26 in the holding ring 6 using a 2 5mm Allen key 3 Tighten the four fixing screws 22 of the holding ring using a 2 5 mm Allen key crosswise and me dium tight 4 With the locking screw 11 lo...

Page 158: ...m wheel 4 1 Stop ring 5 1 Worm shaft 6 1 Retaining ring 7 1 Excenter 8 1 Washer 11 1 Locking screw 13 1 Screw 14 1 Feather key 20 6 Fixing screw worm wheel 21 4 Fixing screw stop ring 22 4 Fixing screw retaining ring 25 4 Adjustment screw retaining ring 26 4 Adjustment screw stop ring 1 20 3 2 11 5 7 6 26 22 14 13 4 25 21 8 ...

Page 159: ...belt wheel 33 1 51401330 0001 Motor cover 34 1 51501505 Counter nut 35 1 51501533 Cable screw 36 4 16193400005000 Nut 37 1 51500122 Stepping motor 38 1 51004010 0021 Spacer 39 2 16047100014000 Securing ring 40 2 16000002214010 Adjusting washer 41 1 16073430003014 Spiral tensioning pin 42 1 51004020 0002 Belt disk 43 1 16160300005060 Screw 44 1 51006535 0004 Washer 45 1 16191200006012 Screw 28 33 3...

Reviews: