background image

Voom Technologies, Inc. © 2007-2013 Proprietary 

www.voomtech.com

7  Serial Interface

With the SuperDuper unit turned off, connect the supplied serial cable between 
the SuperDuper and a computer.  Using a terminal program capable of serial 
communications, such as HyperTerminal or Tera Term , configure the serial port 
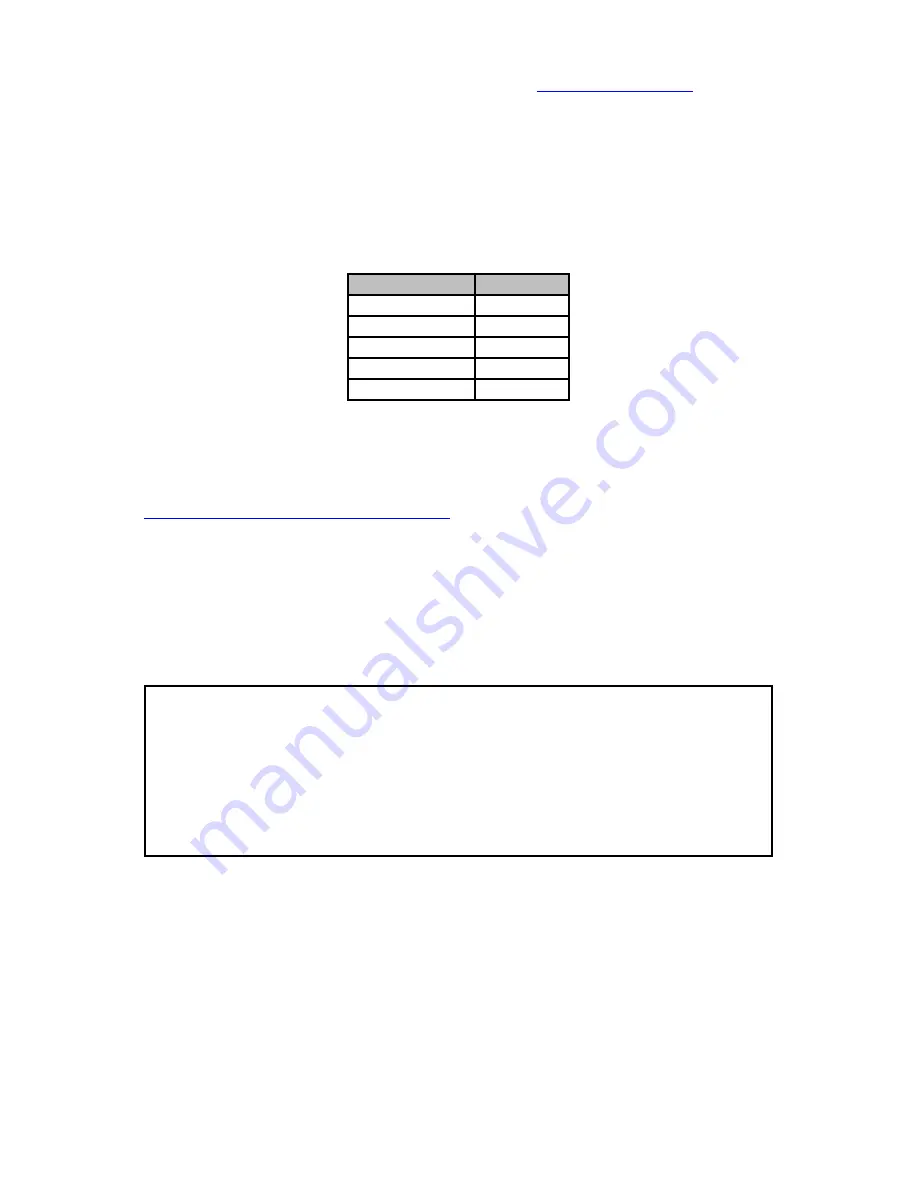
(usually COM1) as described in the table below:

Parameter

Value

Baud Rate

115200

Data Bits

8

Parity

none

Stop Bits

1

Flow Control

none

Serial Port Settings

Once the serial cable is connected and the terminal program configured, the
Shadow 3 unit may be turned on. For more detail on setting up a terminal
program please see the Other Documents on our website downloads page, 

www.voomtech.com/content/downloads

.

The serial interface provides the user access to additional commands, command 
parameters, detailed status information, and detailed failure messages.

The serial interface command menu can be displayed anytime by entering 

help


or '

?

.'  Any command options are preceded by a '

-

' and all optional parameters 

are enclosed in brackets.  The 

help

 command is shown below:

=> help
User Commands:
  Test                System configuration test
  Clone  [-vn] [blks] Clone Source drive to Target drives
  Verify       [blks] Verify all drives using SHA-256 hash
  Wipe         [blks] Wipe each of the Target drives
  HPA                 Remove HPA from Target drives
  DCO                 Remove DCO from Target drives

All examples provided in this chapter are of typical operation.

17

Summary of Contents for SuperDuper

Page 1: ...Voom SuperDuper User Guide 1 to 8 Hard Drive Duplicating Unit ...

Page 2: ...cribed herein including hardware firmware and software is manufactured from designs that are the property of Voom Technologies Inc Reproduction or reverse engineering of any part of this equipment without express written permission of Voom Technologies Inc is prohibited Copyright 2004 2013 Voom Technologies Inc All Rights Reserved Printed in U S A SuperDuper is designed developed and manufactured ...

Page 3: ... 3 3 5 Host Protected Area 5 3 3 6 Device Configuration Overlay 5 3 4 Definitions 6 4 System Configuration 7 4 1 Installing Source Drive 7 4 2 Installing Target Drives 8 5 Command Description 9 5 1 System Test Command 9 5 2 Clone Drive Command 9 5 3 Verify Drives Command 10 5 4 Wipe Drives Command 10 5 5 Remove HPA Command 10 5 6 Remove DCO Command 10 6 Button Interface 11 6 1 Reset Alarm Procedur...

Page 4: ...lone Drive Procedure 18 7 3 Verify Drives Procedure 19 7 4 Wipe Drives Procedure 20 7 5 Remove HPA Procedure 20 7 6 Remove DCO Procedure 21 8 Special Precautions 22 8 1 Using the Buttons 22 8 2 Target Drive Size Limitations 22 9 Troubleshooting 23 10 Warranty 25 10 1 Limited Warranty 25 10 1 1 Wearable Parts 26 10 2 Warranty Return Instructions 26 11 Specifications 27 11 1 CE 27 11 2 FCC Exemption...

Page 5: ...Please read the System Configuration chapter carefully before attempting to operate this device Voom Technologies Inc is not responsible for any loss of data resulting from the use disuse or misuse of this product 2 Technical Support 2 1 Support by Telephone Technical support is available to registered owners of Voom Technologies Inc products by telephone Monday through Friday 8 00am to 4 00pm Cen...

Page 6: ...h parallel and serial drives The architecture also provides a separate data bus for each drive 9 in all This multiple bus architecture allows the hardware to transfer data directly from the source drive to each of the target drives without the need for any software buffering resulting in the fastest data transfer possible The primary operations that are supported include the following Clone Drive ...

Page 7: ...mparing the resulting hash value of each target drive with the hash value of the source drive Writes an all zeros data pattern to each of the target drives simultaneously 3 3 3 User Interface The user interface for the SuperDuper Hard Drive Duplicating Unit supports both a LCD 4 line x 20 character and a serial port Input is taken through either a button control panel or a keyboard via a terminal ...

Page 8: ... designed to communicate the basic operating status to an operator who is located a distance from the unit It currently provides the following status information System Status Light Buzzer Description Ready Off Off Unit is accepting commands Executing Heartbeat Off Unit is executing last command Drive Failure Running Heartbeat Beep Unit has disable one or more target drives and is continuing to ex...

Page 9: ...e target drives and automatically remove it Note Because of the way that the HPA feature works a power cycle e g Powering off the SuperDuper unit may be required whenever managing data hidden by a HPA 3 3 6 Device Configuration Overlay The Device Configuration Overlay DCO feature set provides yet another way to hide data on a disk drive The SuperDuper Hard Drive Duplicating Unit will recognize the...

Page 10: ...ration Clone The process of performing a sector by sector copy operation from the source drive to each of the target drives Wipe The process of writing zeros to every sector of the target drives SHA Hash The value that is generated by calculating a SHA 256 hash on every sector of a drive Host Protected Area HPA A reserved area for data storage outside the normal operating file system Device Config...

Page 11: ... power adapters should be used for any SATA drive equipped with the SATA power port Do not connect 2 power cables to one drive Please use the following steps to install the source drive 1 Power off the SuperDuper unit 2 Attach the source drive to the power strip using either the Molex or SATA extension cables provided 3 For SATA drives connect one end of the SATA cable to the SuperDuper unit and t...

Page 12: ...low to install the target drives 1 Power off the SuperDuper unit 2 Attach each of the target drives to the power strip using either the Molex to Molex or Molex to SATA cables provided 3 For serial ATA drives connect one end of the SATA cable to the SuperDuper unit and the other end to the corresponding target drive 4 For parallel ATA drives first attach the blue connector of the ATA ribbon cable t...

Page 13: ... capacity which is either equal to or greater than the capacity of the source drive itself If the size of any target drive is less than the size of the source drive a failure message will be displayed and the clone operation will terminate prematurely Optionally this command can perform a verify operation after the clone operation has finished The verify operation ensures that all of the data cont...

Page 14: ...t another the wipe operation will automatically continue until each of the installed target drives is completely wiped including the largest one installed The processing of either a Host Protected Area HPA or a Device Configuration Overlay DCO is automatically handled by the SuperDuper Hard Drive Duplicating Unit If either a HPA or DCO exists on any of the target drives it will automatically be re...

Page 15: ...the next line The level information is separated from the command information using a colon e g 1 System Test refers to level 1 and a command of System Test Each of the parameters associated with a particular command e g Wipe Enabled Wipe Disabled are displayed under the command once it has been selected The prompting hierarchy used to organize the set of supported commands follows Level Prompt De...

Page 16: ... condition momentarily press the cancel button to reset alarm buzzer 6 1 2 Fast Blinking Light Error A fast blinking light indicates that all of the drives have failed and that all data transfer operations have been suspended Whenever this condition occurs power off the unit and ensure that each of the cables is securely attached to the target drives Once all of the cables are securely attached po...

Page 17: ...tion Complete The status displayed after it completes the command 6 3 Clone Drive Procedure The following table describes the normal sequence associated with performing a clone operation of the source drive using the button panel interface LCD interface Comments SuperDuper 2 01 Status Ready Drives 12345678 From the main window press menu to display the initial menu item 1 System Test Press menu ag...

Page 18: ...s of the verify operation Operation Complete The status displayed after it completes the command 6 5 Wipe Drives Procedure The following table describes the sequence associated with performing a wipe operation on each of the target drives using the button panel interface LCD interface Comments SuperDuper 2 01 Status Ready Drives 12345678 From the main window press menu to display the initial menu ...

Page 19: ... again to advance to the next menu item 2 Clone Drive Press menu again to advance to the next menu item 3 Verify Drives Press menu again to advance to the next menu item 4 Wipe Drives Press menu again to advance to the next menu item 5 Remove HPA Press enter to execute the remove HPA command Remove Target HPA OK enter cancel Press enter to acknowledge that you want to proceed Removing Target 1 HPA...

Page 20: ...enu item 2 Clone Drive Press menu again to advance to the next menu item 3 Verify Drives Press menu again to advance to the next menu item 4 Wipe Drives Press menu again to advance to the next menu item 5 Remove HPA Press menu again to advance to the next menu item 6 Remove DCO Press enter to execute the remove DCO command Remove Target DCO OK enter cancel Press enter to acknowledge that you want ...

Page 21: ...ng up a terminal program please see the Other Documents on our website downloads page www voomtech com content downloads The serial interface provides the user access to additional commands command parameters detailed status information and detailed failure messages The serial interface command menu can be displayed anytime by entering help or Any command options are preceded by a and all optional...

Page 22: ... 2 Clone Drive Procedure When using the serial interface the command syntax for testing the system configuration is given below Clone vn blks n n o wipe disable the auto wipe v v erify re verify destination blks only clone blks sectors to destination Clone Clone Source Drive OK y n y Copying 78165360 sectors from Source drive to Target drives 00 00 10 999936 sectors 58 2MB sec 3 0GB min average 00...

Page 23: ... blks blks only verify blks sectors Verify Verifying SHA Data OK y n y Verifying 156301488 sectors on All drives 00 00 09 838656 sectors 32 1MB sec 2 6GB min average 00 00 20 1935360 sectors 57 7MB sec 2 9GB min average 00 00 30 3096576 sectors 57 8MB sec 3 1GB min average 00 30 32 156301488 sectors 57 7MB sec 2 9GB min average Source SHA SHA_A 49bc20df15e412a64472421e13fe86ff SHA_B 1c5165e18b2afc...

Page 24: ...c 3 2GB min average Adjusted sector transfer count on drive 3 to 0x000052b0 Wipe operation on drive 3 is complete Target drive 3 is DONE 0x0000 0x0004 00 24 47 156301488 sectors 44 9MB sec 3 2GB min average Operation Complete 00 24 47 80 0GB 7 5 Remove HPA Procedure When using the serial interface the command syntax for removing a HPA from each of the target drives is given below HPA HPA Remove Ta...

Page 25: ... each of the target drives is given below DCO DCO Remove Target DCO OK y n y Removing DCO from Target drive 1 Removing DCO from Target drive 2 Removing DCO from Target drive 3 Removing DCO from Target drive 4 Removing DCO from Target drive 5 Removing DCO from Target drive 6 Removing DCO from Target drive 7 Removing DCO from Target drive 8 Operation Complete 21 ...

Page 26: ...l be displayed for a minimum of 0 5 seconds before the unit will respond to any operator input from the buttons In addition the buttons will be disabled whenever the duplicating unit is processing an error condition Whenever this occurs a message will be displayed to the LCD indicating that it is both processing an error condition and that the buttons are disabled Once the error condition has been...

Page 27: ...Replace the drive Source Target Drive write error A write error was detected while copying data to a drive Hint Replace the drive Source Target Drive not enough capacity The source drive is larger than the smallest target drive Hint Install a larger target drive Operation Failed Source read error Unable to recover from a read error on the Source drive Hint First check cables then replace drive Ope...

Page 28: ... drive Operation Failed Drive write error Unable to recover from a write error but could not determine if it was the Source drive or one of the Target drives Hint Manually remove one Target drive at a time until the problem is resolved If the problem persists replace the Source drive Operation Failed Drive access error Unable to recover from an error but could not determine either the type of acce...

Page 29: ...pon notification of defect in materials or workmanship and return of the product in accordance with the Warranty Return Instructions below and in concurrence with the warranty conditions as indicated above VoomTech shall either repair or replace the product at its discretion VoomTech reserves the right to replace the product with a new or like new product that has functionality equal to or exceedi...

Page 30: ...omTech representative 651 998 1618 to obtain a Return Material Authorization RMA number 2 Please be prepared to provide the VoomTech representative with the product serial number the invoice number and the date of purchase in order to facilitate this process 3 Once you receive a RMA number please pack the Product in its original packaging or any other secure box so that no damage may occur 4 Deliv...

Page 31: ...inches 152 4 mm Height light tower 17 375 inches 441 325 mm Width 17 inches 431 8 mm Depth 21 inches 533 4 mm Weight 22 pounds 10 kg 11 1 CE Users need to notify any information technology equipment users within a 60 meter radius that SuperDuper may interfere with other electronic equipment Although the manufacturer has not observed electromagnetic interference from the SuperDuper with other elect...

Reviews: