


38
b) Measuring the Capacity
Make sure that all circuit parts, circuits and components and other objects of
measurement are disconnected from the voltage and discharged.
Switch on the meter at the operating button (A).
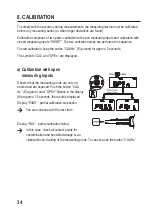
After switching on, the smart “AUTO LCR” mode is always active. Many settings are done by
the measuring device. Of course, you can also determine the settings manually by pushing the
buttons “L/C/R” (B), “D/Q/θ/ESR” (D), “CAL/Hz” (E) and “Δ/H” (C).
The measuring frequency can be selected with the button “CAL/Hz” (E). The following values
are available: 100 Hz, 120 Hz, 1 kHz, 10 kHz, 100 kHz. Every time you press it, the measured
value switches. The measuring frequency also determines the measuring range.
Connect the measuring object (e.g. a capacitor) to the measuring input.
If “OL” (overload) appears on the display, you have exceeded the measuring range. If required,
select another measuring frequency with a higher measuring range.
Remove the measuring lines from the object to be measured after completion of the measure-
ment and switch off the measuring device.


