20
1.
1.
10 Nm
2.
2.
a
b
c
D
GB / USA / Canada
Einstellung der Grundträgerbreite:
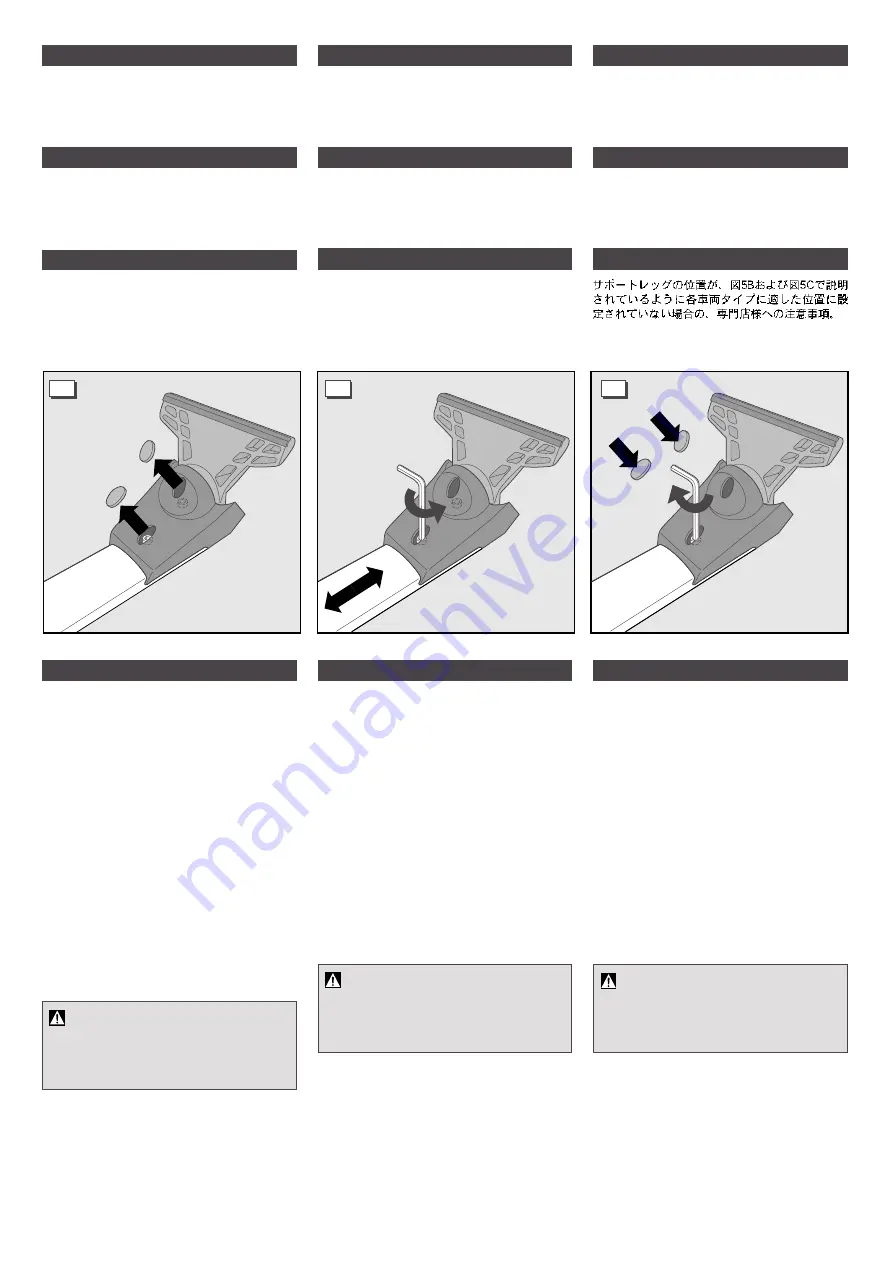
Bild a
Die beiden Kunststoffkappen auf der Unterseite der
Grundträger entfernen.
Bild b
1. Lösen Sie mit einem Innensechskantschlüssel
(Schlüsselweite 5) die zwei Schrauben soweit, bis
sich der Stützfuß verschieben läßt.
2. Stellen Sie den Grundträger auf die korrekte
Passform ein (Seite 11).
Bild c
1. Ziehen Sie die zwei Schrauben mit 10 Nm fest.
Den Grundträger auf dem Fahrzeug montieren und
die Passgenauigkeit überprüfen.
Falls die Passgenauigkeit noch nicht wie auf Seite 11
beschrieben stimmt, müssen Sie die Einstellung
gegebenenfalls wiederholen.
2. Kunststoffkappen montieren.
Achtung
Überprüfen Sie ob die Schrauben angezogen
(10 Nm) sind. Es kann sonst zum Lösen bzw.
Verlust des Grundträgers und zur Gefährdung
anderer Verkehrsteilnehmer führen.
Adjusting the roof bar width:
Figure a
Remove the two plastic caps on the underside of the
roof bar.
Figure b
Using a hex socket head wrench, (5 across flats)
undo the two bolts until the foot can be moved.
Adjust the roof bar to the correct size (page 11).
Figure c
Tighten the two bolts to 10 Nm.
Fit the roof bar to the vehicle and check the
accuracy of the fit.
If the fit does not correspond to that described in
page 11, you may need to repeat the adjustment. Fit
plastic caps.
Attention
Check whether the bolts are tight (10 Nm).
Otherwise the roof bar may become loose or
detached and produce a hazard for other road
users.
F
Réglage de la largeur du porteur :
Figure a
Retirer les deux capuchons en plastique sur la partie
inférieure du porteur.
Figure b
A l’aide d’une clé mâle coudée pour vis à six pans
creux (de 5), dévisser les deux vis jusqu’à ce que le
pied d’appui puisse être décalé. Régler le porteur
pour obtenir une application adéquate (p. 13).
Figure c
Serrer les deux vis à 10 Nm.
Monter le porteur sur le véhicule et contrôler
précisément les écarts obtenus. Si les écarts sont
encore différents de ceux indiqués dans la p. 13,
répéter le réglage. Reposer les capuchons en
plastique.
Attention
Vérifier que les vis sont bien serrées (10 Nm). Si
ce n’est pas le cas, le porteur pourrait se détacher
ou être arraché et mettre en danger d’autres
automobilistes.
Hinweis für den Fachhandel, falls, wie unter
Bild 5B und 5C beschrieben, die Lage des
Stützfußes für das entsprechende Fahrzeug
nicht korrekt eingestellt ist.
D
GB / USA / Canada
F
I
NL
S
E
CZ
J
Note for dealer, if, as described under
fig.5B and 5C, the position of the support
foot for the particular vehicle is not correctly
set.
Information pour le revendeur si la position
de la béquille pour le véhicule corres-
pondant n’est pas réglée correctement
comme sur les fig. 5B et 5C.
Avvertenza per il rivenditore specializzato,
qualora, come descritto in figura 5B e 5C, la
posizione del piede d’appoggio per il relativo
veicolo non fosse correttamente installata.
Aanwijzing voor de vakhandel, voor het geval
dat, zoals beschreven is bij afbeelding 5B en
5C, de stand van de steunvoet voor het desbe-
treffende voertuig niet correct is ingesteld.
Anvisning för fackhandeln: om stödfotens
läge för bilen ifråga inte är korrekt inställd,
enligt beskrivning under bild 5B och 5C.
Indicación para el comercio especializado
en el caso de que, como se describe en la
figura 5B y 5C, no esté correctamente
ajustada la posición del pie de apoyo para
el vehículo correspondiente.
Upozornění pro odborný obchod v případě
popsaném na obr. 5B a 5C, že poloha
opěrné nohy není pro příslušné vozidlo
správně nastavena.
Summary of Contents for 1K0 071 126
Page 19: ...19 J...
Page 24: ...Code Safety Pass...


