Quick Start
This
Quick Start
guide is for the
Vmatte HD
chromakey hardware with firmware versions 4.2 and above. The operating software is
MBS Remote 4
.
Contents
Setup Hardware
Install Software
Choose Working Environment
Select Inputs and Outputs
Configure Video Process
Store and Recall
Setup Hardware
Connections
All connectors are located on the rear panel of the
Vmatte HD
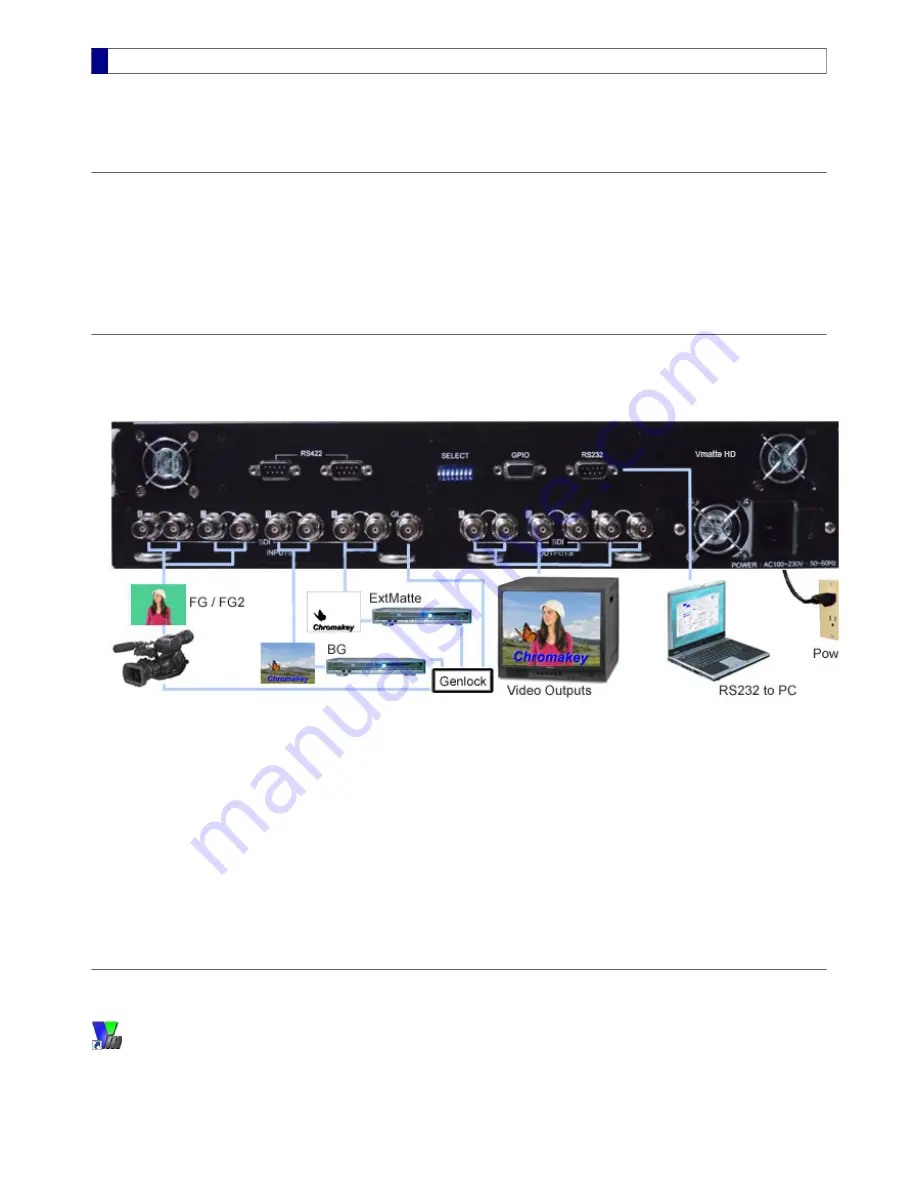
hardware. The following picture shows an example connection with four
inputs.
Plug the power cable into a 110~230V, 50~60Hz, AC power outlet
1.
Connect the RS232 cable to a PC COM port for software control (both ends are DB9 female)
2.
Connect SDI video sources to
INPUTS
connectors. At least two inputs, a foreground and a background, are required to create a
chromakey result.
3.
Connect video monitors or recording devices to output SDI or YUV connectors.
OutputA
is for preview only and
OutputB
is for
recording or broadcasting.
4.
(Optional) Connect a genlock input to the GL connector. The genlock input can be a SD black burst (bi-level) or HD tri-level genlock
source.
5.
Power On
The power button is located at the bottom-right corner of the rear panel. The
POWER
LED on the front panel lights up after the power-on
process ends. Refer to the
Front Panel
section for details.
Install Software
In the
MBS_Remote 4
installation package, double-click the file
SETUP.Exe
and follow the instructions. A desktop shortcut icon appears
after installation.
Run MBS_Remote
MBS Remote User Manual.pdf 1
2014/6/13 PM 02:23:37
1
Summary of Contents for Vmatte-HD HDL4.2
Page 1: ...Vmatte HD Chroma Keyer Operation Manual Version HDL4 2...
Page 9: ...Block Diagram Chromakey Dual ExtMatte Graphics Layer Chromakey Dual ExtMatte Dual FG 7...
Page 30: ...Composite Shrink 0 0 Composite Shrink 2 0 Black edge on the left Edge removed 28...


