


E
N
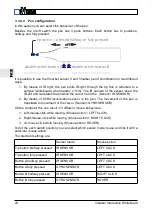
2.2.1 Setup of the Vmarker sensor when using a ceiling mount
You get the best results with the Vmarker sensor by mounting the Vmarker sensor to the
ceiling like the projector itself. In most cases the Vmarker sensor will be positioned
between the projection screen and the projector, just outside the projector beam. This
depends on the type of projector.
The shortest distance (A) between the projection screen and the Vmarker sensor has to be
1.5 times the width of the projected image (B).
These values are guidelines for the optimal conditions, the settings of the Vmarker sensor
are optimized for this setup.
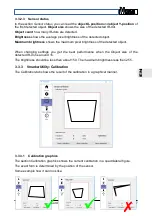
On the ‘
Settings
’ page of the VmarkerUtility you can observe the coordinates
of the IR-pen in the section ‘
Sensor status
’. When you move the IR-pen
across the projected screen you should always get values for Object X-position,
Object Y-position and Object size. If this is not the case you have to re-align the Vmarker
sensor. Particular the corners of the image are important to be able to calibrate the
Vmarker sensor.
With help of the
Sensor alignment
in VmarkerUtility you can easily align the Vmarker
sensor in most circumstances.
Vmarker Interactive Whiteboard
5
A = 1.5 x B
(image wid
th)
White Board or
other white
surface


