background image

32 


8.


PARENTAL CONTROL 

8.1


Overview 

 The Parental Control feature can be accessed during the Initial Setup of your 

tablet, or at any time after Initial Setup by touching the 


Parental


Control

 icon 

from the


Apps 

list. The Parental Control allows you to specify which 

applications can be accessed by your children, including when and for how long.  


8.2


Welcome to Parental Control 

1.


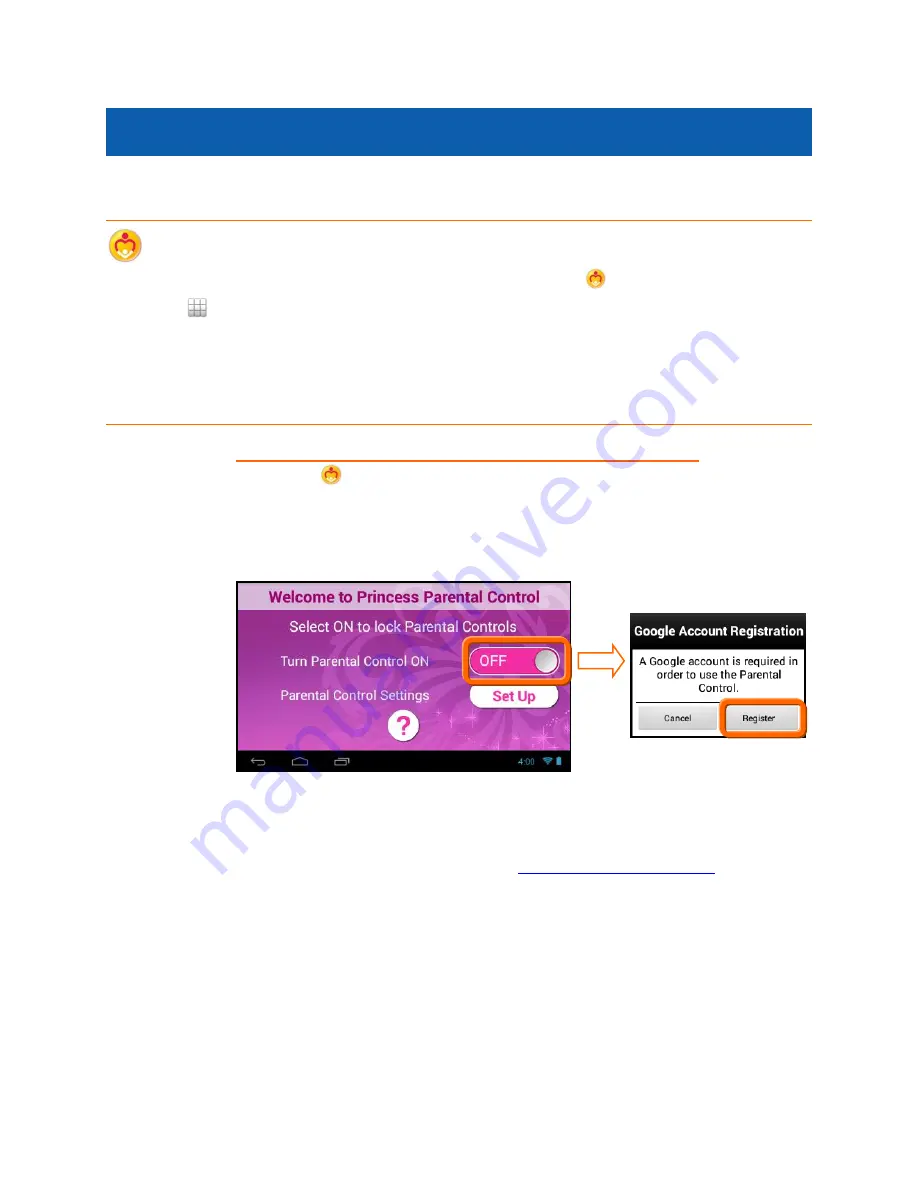
SELECTING PARENTAL CONTROL ON/OFF: 

Open the 


Parental


Control

 app. By default, the Parental Control 

feature is turned OFF, which means that all Apps can be accessed. 
To activate the Parental Control, touch the ‘Turn Parental Control 
On’ 

OFF

 option to activate it 

ON

.  


Next, you will be prompted to register a Google account, if you have 
not already completed this. Touch 

Register

 to continue with the 

Google account registration. See 

Google Account Set Up

 in the 

manual for more details regarding Google Account registration. 


Summary of Contents for CAM4302

Page 1: ...Disney Android Family Tablet with User Manual ...

Page 2: ...ol Set Up 8 3 6 Google Account Set Up 9 3 7 Activating Your Disney Theme 13 4 GETTING TO KNOW YOUR TABLET 15 4 1 Overview 15 4 2 Locking and Unlocking Your Tablet 16 5 HOME SCREEN 18 5 1 Portrait and Landscape Orientation 18 5 2 Home Screen Interface 19 5 3 Home Screen Features 20 6 OVER THE AIR UPDATES OTA 23 7 TABBED APPS MANAGER 24 7 1 Disney Tab 24 7 2 Add App Shortcut Using the Tabbed Apps Ma...

Page 3: ...o Parental Control 32 8 3 Parental Control Set up 33 9 MAIN APPLICATION SHORTCUTS 39 9 1 Photo Editor 40 9 2 Camera 44 9 3 Apps 47 9 4 Contacts 49 10 TABLET SPECIFICATIONS 59 11 VIVITAR ONE YEAR WARRANTY 60 12 FAQ 62 ...

Page 4: ...the entire family Activating your Vivitar Disney Tablet to your purchased Disney Theme After the initial setup of your tablet see the Initial Setup section of this manual for details please make sure to activate your Disney Theme as seen on the APP CARD included Please follow the steps below to activate your Disney Theme 1 Complete the initial tablet setup 2 Touch the Theme Selector icon from the ...

Page 5: ... it for the first time The Vivitar Disney Tablet is supplied with a USB cable and AC Charger Make sure your tablet is powered off Connect the USB cable to your Tablet on one end and connect the other end of the USB cable to either your computer USB Port or to the AC Charger which is then connected to an electric outlet While charging the screen displays a battery icon with a green indicator showin...

Page 6: ...ney Tablet The language option include English NOTE You can set your tablet to other languages included in the tablet s Settings This will only set the language for the Android Setup menus 3 2 Selecting WiFi Touch one of the available WiFi connections listed on screen to select your network If the Wifi connects automatically touch Connect If a password is required you will be prompted to first typ...

Page 7: ...etting or tap the box and un check the automatic setting to manually change the date and time by touching Set date Set time or Select time zone to open and edit each setting Touch Finish to continue 3 4 License Agreement Review the End User License Agreement and then touch I Agree to continue to the Parental Control Setup ...

Page 8: ... to the Home screen Each time the tablet is powered on a notification will be displayed reminding you to set up the Parental Controls NOTE If you choose Skip or Remind me Later during this initial tablet set up you can setup your Parental Control settings at any time by opening the Parental Control app from the Apps list Upon initial Parental Control set up or when accessing Gmail or the Google Pl...

Page 9: ...gle Account Follow the instructions to add your Google Account It can also be set manually at any time by using the Android Settings To access the Android settings Touch Apps then touch the Settings app Under the WIRELESS NETWORKS setting option make sure WiFi is ON and connected Under the setting option ACCOUNTS touch Add Account and then touch Google Follow the instructions to either sign in or ...

Page 10: ...ail and Password using the onscreen keyboard and touch Next or Done to continue Then touch OK to agree to the window that appears regarding Terms of Service Privacy Policy and Google Play Terms of Service NOTE You may be required to sign in on the web If you are prompted to do so touch Next to start browser sign in and follow the instructions You may be prompted to join Google Touch Join Google to...

Page 11: ... or Done once complete 2 CHOOSE USERNAME Enter a username which will be your email then touch Next or Done NOTE The email entered will be checked for availability 3 CREATE PASSWORD PASSWORD RECOVERY OPTIONS Type your password for your account minimum of 8 characters and retype to confirm your password Touch Done when complete Then touch Set up recovery options if you would like to use Google passw...

Page 12: ...ith Circles Instant Upload and Messenger using your Google Account To join touch Join Google or continue without joining by touching Not now 5 GOOGLE SERVICES The Google services option appears The default is the option to keep you up to date with news and offers from Google Play If you do not want this option then touch the box to un check it Touch Next to continue ...

Page 13: ...ou finish registering your Google Account you will automatically return to the Parental Control set up For more information regarding Parental Control Set Up see the Parental Control section of this manual 3 7 Activating Your Disney Theme Once you have completed the initial setup you now need to download and activate the same Disney Theme that is shown on your APP CARD included Please follow the s...

Page 14: ...n appears showing your selected Disney Theme NOTE The tablet must be connected to WiFi to download your Theme The Theme Serial Number can be found on the APP CARD included in the packaging This Serial Number will only download and activate your purchased Disney Theme The screens shown in this manual display examples from the Disney Princess Android Tablet Your tablet s screen colors and background...

Page 15: ... connected to the computer as device and to recharge the tablet 4 HEADPHONE JACK Audio output jack for earphone NOTE Speaker output is automatically disabled when headphone is connected to the tablet 5 MICROPHONE Used for audio chatting and sound recording 6 POWER BUTTON Press to turn the tablet on or to turn the screen on and off standby Press and hold to access the power off menu 7 VOL Decreases...

Page 16: ...se your tablet you will need to unlock it NOTE The length of time your Tablet remains inactive before going into Sleep Mode can be modified To change the length of time Enter your Tablet Settings Touch Display to open the Tablet Display features Touch the Sleep feature to open the Sleep window This displays the list of time options Select a length of time you would like your Tablet to be inactive ...

Page 17: ...e Home screen touch and hold the Lock icon When it turns into a circle drag it towards the right to the Unlock icon 2 Touch your User name 3 Enter your Parental Password then touch Next 4 2 5 Unlocking Your Tablet Parental Control ON When the Parental Control is set to ON and you have set up the applications that require your Parental Lock Code these applications then require your password to be e...

Page 18: ...ates with the tablet as you turn it Landscape Orientation Portrait Orientation The screens shown in this manual display examples from the Vivitar Disney Princess Android Tablet Your tablet s screen colors and backgrounds may vary according to your purchased Disney Tablet and selected wallpaper Note that the functionality is the same for each Vivitar Disney Tablet ...

Page 19: ... Disney Settings 4 Tabbed Apps Manager Tabs include Disney Apps Games Social 5 Back 6 Home 7 Recent Apps 8 Image Editor 9 Camera 10 Android Apps Mode 11 Contacts 12 Time 13 Wi Fi Connection Signal 14 Battery Power Level 15 Wallpaper Settings 1 2 3 4 5 6 7 8 9 10 11 12 13 14 15 ...

Page 20: ...ganize app shortcuts Select the Games tab to add and organize app shortcuts to your favorite games Select the Social tab to add and organize app shortcuts to your favorite social apps Select Settings to Add Remove Apps view the online User Manual online Help and About See Tabbed Apps Manager for more details 5 3 2 Tool Bar Shortcuts Select Photo Editor to edit photos add frames and clipart items a...

Page 21: ...rtcut displays in the selected tab on the Tabbed Apps Manager 5 To remove an App from the Tabbed Apps Manager Touch the Settings icon and then select Add Remove apps In the Add Remove Apps screen touch the Minus icon next to one of the listed apps to remove the shortcut from the Tabbed Apps Manager See Tabbed Apps Manager for more details 5 3 4 Change Home Screen Wallpaper 1 Touch and hold on a Ho...

Page 22: ...cut to the Remove icon When the shortcut and Remove icon turn red release your touch and the shortcut will be removed 5 3 6 Add Widgets to the Home Screens 1 Touch the Apps screen icon to open the APPS screen that displays a list of your tablet s applications Touch the WIDGETS tab to open the list of your tablet s widgets 2 Choose a widget you would like to add and then long touch and drag the sel...

Page 23: ... download then begins and will take some time Progress can be seen in the Notifications bar If you would like to exit the upgrade window without upgrading touch Cancel to exit and return to the previous screen 2 INSTALL THE PURCHASED THEME UPDATE A notification window appears showing that your purchased Theme has been downloaded Touch Install to begin installing the update To exit without installi...

Page 24: ...ollowing tabs Disney Apps Games Social 7 1 Disney Tab The Disney Tab includes fun and exciting links to online Disney sites and games The shortcuts are preset and additional shortcuts cannot be added or removed on this tab The Disney Tab shortcuts include Web Links to the online Disney site Games Opens a display of links to fun filled Disney games that connect you directly to the online Google Pla...

Page 25: ... Theme Networks Opens a display of online Disney Networks Touch a network icon to select that link and connect directly to the network site Disney Network links that are displayed vary per Disney Theme Channels Opens a display of online links to Disney Channels Touch a channel to connect you directly to that channel Disney Channel links that are displayed vary per Disney Theme ...

Page 26: ...n the image below 2 SELECT AN APPLICATION TO ADD Touch the Add App icon The Add App icon appears when the Tab has room for additional shortcuts NOTE You can also touch the Setting icon on the Tabbed Apps Manager to add and remove App shortcuts For more information please refer to the section Add Remove App Shortcut Using the App Settings ...

Page 27: ...able Apps currently on your tablet appears on the screen Touch an App to choose the one you would like to display in the selected Tab 3 VIEW THE SHORTCUT View the added shortcut of your selected App on the Tabbed Apps Manager ...

Page 28: ...This also allows you to remove an App shortcut from the Tabbed Apps Manager 1 ACCESS THE APP SETTINGS Touch the App Settings Icon to open the Settings window 2 ACCESS THE ADD REMOVE APPS OPTIONS Touch Add Remove Apps to open the Add Remove Apps screen The current App shortcuts displayed in each Tab appears listed under the name of each Tab ...

Page 29: ...p icon plus symbol to the right of that Tab name The Add Application screen appears displaying the list of all your Tablet Apps NOTE The same Add Application Apps list appears for each Tab Apps Games Social when adding an App shortcut The screens below display the following example adding an Application shortcut from the Apps Tab ...

Page 30: ...30 4 ADD APP SHORTCUT TO SELECTED TAB Touch one of the listed Apps to choose the one you would like to add The App shortcut appears within the selected Tab ...

Page 31: ... the App Settings Icon to open the Settings window Touch Add Remove Apps to open the Add Remove Apps screen The list of current App shortcuts appears for each Tab Touch the Remove App icon minus symbol next to one of the listed App shortcuts to automatically remove the selected App shortcut from the Tab ...

Page 32: ... 2 Welcome to Parental Control 1 SELECTING PARENTAL CONTROL ON OFF Open the Parental Control app By default the Parental Control feature is turned OFF which means that all Apps can be accessed To activate the Parental Control touch the Turn Parental Control On OFF option to activate it ON Next you will be prompted to register a Google account if you have not already completed this Touch Register t...

Page 33: ... You will then be prompted to enter your first name last name and email Enter your user information then touch Next NOTE Your existing Google email or the new Google account you defined during the Initial Setup will automatically appear If you do not have a Google Account you will be prompted to create a new account A notification will be sent to your email Account with your name and Parental Cont...

Page 34: ...dicates that your password is needed to enter the Parental Control app and all apps you have set to be locked In addition when you activate the tablet once it has been in sleep mode or turned off your password will also be required Set Edit Parental Controls Touch the Edit icon to open the Select apps for safe environment screen This will enable you to control the settings for each application on ...

Page 35: ...ps The following options are available OFF Indicates that the selected App will automatically launch without entering the Parental Lock Code If you would like to quickly deactivate all Apps with the Parental Control Lock set to OFF on all Apps you can touch Unselect All ON Indicates that the Parental Control has been activated for the selected App and your Parental Lock Code is required to be ente...

Page 36: ...reen This setting allows you to control the amount these unlocked apps can be used on daily basis based on 24 hours The following options are available OFF The default setting is OFF This indicates that there is no time limit All applications can be used for an indefinite time ON When turned ON the applications can be set to be in use as per Hours Minutes The default time is set to 24 00 Bonus Hou...

Page 37: ...cation and set the time Hour Minutes Touch Done to save your setting Swipe your finger across the tablet to the right left to view the continued list of Apps and set as desired When you have completed setting the apps to be locked touch Next to continue setting your Parental Controls 6 PARENTAL CONTROL SET UP GLOBAL TIME LIMITS All applications that you have not locked with the Parental Lock Code ...

Page 38: ... the use of applications Sunday through Sunday The default is 168 hours Time Reminder Touch the time next to the Time Reminder to add a notification that appears before the expiration time The time can be setting according to Hours Minutes up to 24 hours Back Touch Back to return to the Parental Daily Limits screen Finish Setup Touch Finish Setup to save your Parental Control settings and return t...

Page 39: ...u to easily organize and create shortcuts to your favorite apps The Home screen includes the following App shortcuts Tool Bar Shortcuts Touch Photo Editor to edit photos add frames and clipart items Touch Camera to to take pictures and record videos Touch Apps to view the available apps on your tablet Touch Contacts to add and edit your contacts Touch Wallpapers to change the tablet s background w...

Page 40: ...s Select the Games tab to add and organize app shortcuts to your favorite games Select the Social tab to add and organize app shortcuts to your favorite social apps Select Settings to Add Remove Apps view the online User Manual online Help and About See Tabbed Apps Manager for more details 9 1 Photo Editor Enhance your pictures by adding frames and clipart to share with family and friends ...

Page 41: ...e Photo Editor app is Portrait only 9 1 1 Menu Options Touch the Menu Settings icon to view the Photo Editor Menu options 1 Select picture Selects a picture to edit 2 Save Saves changes made using the editor 3 Save a copy Saves a copy of the edited photo 4 Reset Resets the photo to its original image 5 Help Opens the online Help 6 About Displays the device Build version Copyrights ...

Page 42: ...ture touch Menu and then Save a copy 4 Resetting pictures To go back to the original picture without any changes after editing it touch Menu and then Reset 9 1 3 Enhancing Your Image Touch the Enhance tab to auto enhance crop or rotate your photo AUTO ENHANCING A PICTURE 1 Select a photo 2 Select the Enhance tab and then touch the Auto Enhance icon to auto improve your picture CROPPING A PICTURE 1...

Page 43: ...Frames tab and then touch one of the frames that appears on the bottom of the screen to add it to the picture 3 Touch and drag the picture to reposition it within the frame Pinch the picture to increase or reduce the picture size 9 1 5 Adding Clipart Touch the Clipart tab to add fun and exciting clipart to your photo 1 Select a photo 2 Select the Clipart tab and then touch one of the clipart items...

Page 44: ...ust register your device with your social networking site before using the device to access the social network 9 1 7 Switching to Camera Touch the Camera icon to open the Camera app 9 2 Camera Use your device s built in camera to take pictures and record videos To access your Camera From the Home screen touch the Camera icon Alternatively touch the Apps icon from the Home screen and then the Theme...

Page 45: ...ouch the Take Photo button 5 After taking a picture touch the Image Viewer the thumbnail image of your last captured photo to view the picture in the Gallery application NOTE Images can be deleted from the Photos app 6 Touch Back or the Camera icon to return to the Capture Mode to take more photos or videos 9 2 2 Camera Settings 1 Touch the Camera Settings icon to open the Camera Settings options ...

Page 46: ...to set the Tablet for Video Capture Mode 3 Using the display as a viewfinder compose your video by aiming the lens at the subject To Zoom Slide your finger on the Zoom line on the screen towards the Zoom In or Zoom Out to focus on the area you want To configure settings see Camcorder Settings 4 To start recording touch the Record Video button During recording the red Record icon appears with the e...

Page 47: ...descent Daylight Fluorescent Cloudy Camera Settings Store location Enable or disable tagging of pictures with the GPS location Off On Restore defaults Set all Camera settings to the factory defaults Help Access the Online Vivitar Disney Tablet Help You will need to be signed into your Google account or will be prompted to create an account if needed About Display the Camera version 9 2 5 Switching...

Page 48: ...t 9 3 2 Adding shortcuts from Apps to the Home Screen 1 From the Home screen touch the Apps icon 2 Touch and hold on an App or Widget then drag it to a Home screen The selected shortcut then appears on the Home screen 3 To remove a Shortcut touch and hold the Shortcut until Remove appears at the bottom of the screen then drag the Shortcut to the Remove icon NOTE APPS and WIDGETS shortcuts cannot b...

Page 49: ... your downloaded Apps appears under the Downloaded tab 5 Touch an App to select it and then touch Uninstall and follow the prompts to uninstall the app 9 4 Contacts The Contacts app allows you to create contacts add to groups and mark favorites To access your Contacts From the Home screen touch the Contacts icon Alternatively touch the Apps icon and then the Theme Contacts icon Select the Contacts...

Page 50: ... Photo Thumbnail icon to select an existing photo from the Gallery or to take a new photo that will identify the contact Enter the contact s First and Last name in the Name fields using the onscreen keyboard Touch the More Information icon to enter additional name related fields such as the contact s Middle name Name Suffix and more Touch the Information icon to minimize the details to view the fi...

Page 51: ...acts screen Touch Cancel to exit without saving the new contact details 9 4 2 Managing Your Contacts UPDATING CONTACTS 1 To Edit a Contact Touch a name from the Contacts list to select it Touch the Edit button to edit the selected Contact s information Touch Contact fields to modify information When you finish entering the information touch Done 2 To Delete a Contact Touch a name from the Contacts...

Page 52: ...XPORTING AND IMPORTING CONTACTS To back up and restore your Contact information you can export your contact list to another device or import your contact list previously exported from another device 1 Touch the Menu icon to open the Contact Menu options and then touch Import Export 2 The following options appear Import from SD card Export to SD card Share namecard via Touch Import from SD card to ...

Page 53: ...n the Contact Menu options and then scroll down and touch Join contact Alternatively touch the Connection icon from the contact details 3 Select the contact you want to be joined together with the previously selected contact step 1 and then touch Join 4 To edit a joined Contact Select a contact with joined information Touch Edit then touch Select Joined Contact Select one contact shown in the Sele...

Page 54: ...o sync app data to synchronize information from the listed accounts 3 Touch Add account and then follow the prompts to add a new account to synchronize information QUICK ACCESS TO MANAGING YOUR CONTACT INFORMATION To quickly access and manage your contact information 1 Select the Contacts Tab 2 Select a Contact from the Contacts List 3 Touch and hold down on the selected Contact until a window app...

Page 55: ...new Group now appear to the right of the Groups list NOTE The selected Group is highlighted MANAGING YOUR GROUPS Updating Groups Touch a Group to select and display the Group details 1 To edit the selected Group s Name Touch the Menu icon and then Edit Group Name Edit the group name then touch OK to save the changes 2 To delete the selected Group Touch the Menu icon and then Delete Group At the pr...

Page 56: ...contact fields to modify information When you finish entering information touch Done Sending a Message to Group Members 1 Touch a Group to select and display the Group details 2 Touch the Menu icon and then Send Email to create a new email 3 Follow the prompts to compose and send the email QUICK ACCESS TO MANAGING YOUR CONTACT INFORMATION To quickly access and manage your group information 1 1 Sel...

Page 57: ...arked the star is yellow indicating that it has been added to Favorites A message appears on the screen Contact Name has been added to Favorites 3 To remove your Contact as a Favorite Touch a yellow Star to remove the Favorites mark The star appears gray indicating that it is not included as a Favorite A message appears on the screen Contact Name has been removed from Favorites 4 Alternatively you...

Page 58: ...vorites The list of your Contacts appears Check off the box by the contacts you would like to remove as Favorites Touch OK to save your selection and update your Favorites list QUICK ACCESS TO MANAGING YOUR FAVORITES LIST To quickly access and manage your Favorites list 1 Select the Favorites Tab 2 Select a Contact from the list 3 Touch and hold down on the selected Contact until a window appears ...

Page 59: ... up to 32GB Screen Size 4 3 Inch Screen Resolution 480 272 Pixels Touch Screen P G Wireless Connection WIFI 802 11b g n Cameras Rear Camera 0 3 Sensor Audio Headphone jack Speaker Built in Microphone Battery Rechargeable Lithium Battery 3 7V 1200mAH Power Adapter 5V 1 5A Weight 284 5g Dimension 123 4 78 4 11mm ...

Page 60: ... use including but not limited to repair by unauthorized parties tampering modification or accident What To Do When Service Is Required When returning your defective product postage pre paid for service your package should include 1 Copy of original bill of sale 2 A detailed written description of the problem 3 Your return address and telephone number Daytime MAIL TO ADDRESS BELOW In the U S Sakar...

Page 61: ...try to correct the interference by one or more of the following measures __ Reorient or relocate the receiving antenna __ Increase the separation between the equipment and receiver __ Connect the equipment into an outlet on a circuit different from that to which the receiver is connected __ Consult the dealer or experienced radio TV technician for help For Consumers in Australia Only Our goods com...

Page 62: ...k administrator of that Wi Fi network for password information Consult the full User s Manual of your device for precise information on connecting to Wi Fi Unfortunately if your device is out of the range of any nearby networks you will not be able to access any online features Q I am having issues with an app which I have downloaded What should I do A For support on any third party apps software ...

Page 63: ...d by turning the equipment off and on the user is encouraged to try to correct the interference by one or more of the following measures Reorient or relocate the receiving antenna Increase the separation between the equipment and receiver Connect the equipment into an outlet on a circuit different from that to which the receiver is connected Consult the dealer or an experienced radio TV technician...

Page 64: ...ment for safe exposure The FCC has granted an Equipment Authorization for this model phone with all reported SAR levels evaluated as in compliance with the FCC RF exposure guidelines SAR information on this Mini tablet is on file with the FCC and can be found under the Display Grant section of http www fcc gov oet fccid after searching on FCC ID XKK CAM4302 Additional information on Specific Absor...

Reviews: