background image


Technical Reference

 Manual-XPM3m                                                                                                                                     Revision Date: August 2014          


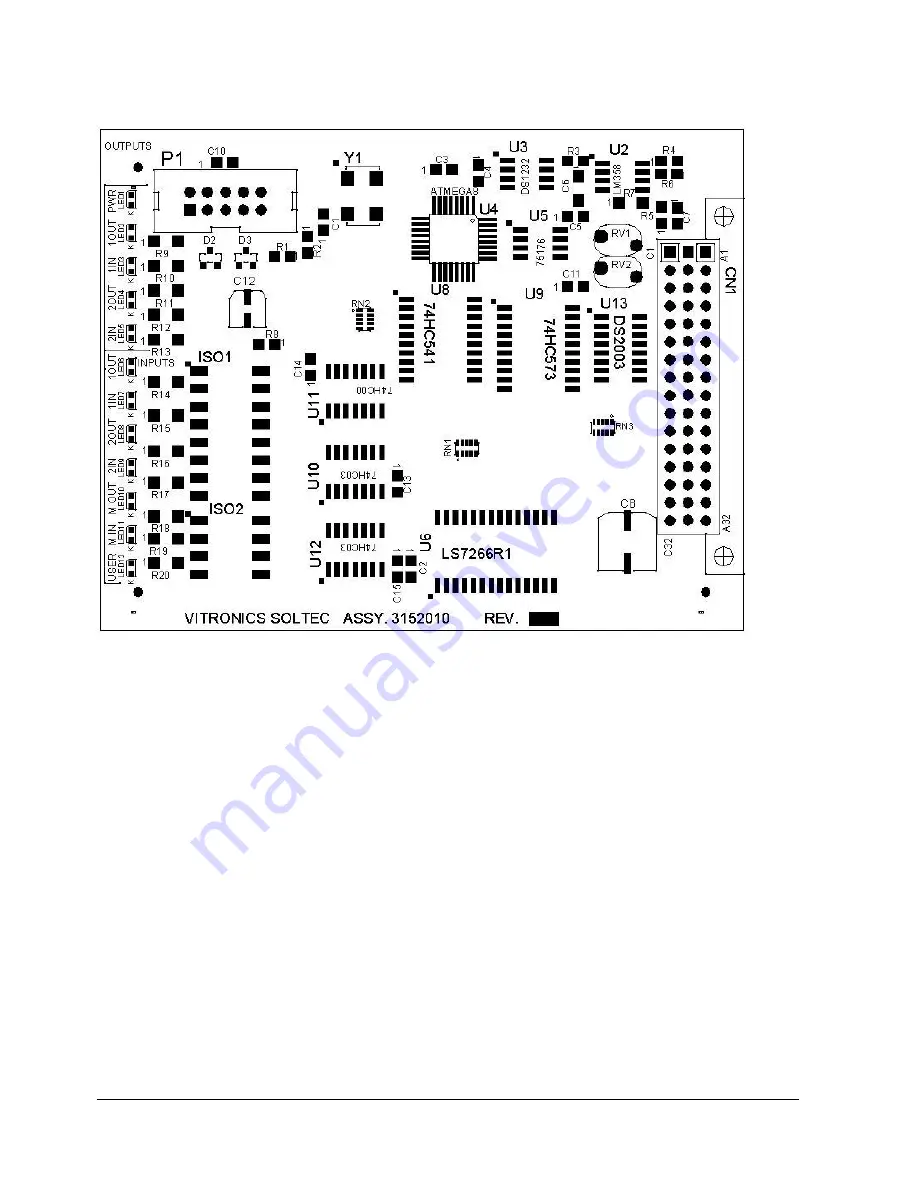
E3152010A future two axis controller board. 


Each quadrature counter has a digital input filter that is synchronized with the 8 megahertz microcontroller clock on 

the two axis rail controller board to filter out noise on the channel A and channel B inputs for each quadrature 

encoder. 


Each quadrature counter is set up to count on every state transition (count up and count down) from a quadrature 

encoder.  This is called 4X mode and results in the 250 pulse per revolution encoder used on the rail width adjust 

producing an equivalent of 1000 counts per revolution instead of 250. 


The quadrature counter used on the two axis rail controller is a 16 bit counter on the E3152001 board and a 24 bit 

counter on the E3152010 board. Each quadrature counter counts independently of the microcontroller and does not 

lose counts as long as power is not shut off to the oven. 


Channel A leading channel B results in counting up. Channel B leading channel A results in counting down.  


Summary of Contents for XPM3m

Page 1: ... August 2014 XPM3m Reflow Soldering Systems Original Instructions Technical Reference Manual ITW ELECTRONICS SUZHOU Co Ltd Visit address Workshop II 858 Zhujiang Road Suzhou New District China 215129 Telephone 86 512 6841 3378 Fax 86 512 6841 1711 ...

Page 2: ...R _______________________________________________________________________ 36 CONVEYOR TYPES 36 EDGE RAIL CONVEYOR SYSTEM 36 MESH BELT CONVEYOR SYSTEM 37 COMBINATION CONVEYOR SYSTEM 37 EDGE RAIL WITH EXTRUDED CENTER SUPPORT SYSTEM XCS 38 CONVEYOR BELT CHAIN RAIL SERVICE 39 REMOVE AND REPLACE CONVEYOR BELT 39 CONVEYOR DRIVE SYSTEM _________________________________________________________ 41 DRIVE MO...

Page 3: ... EXCHANGER 83 FIN TUBE TYPE HEAT EXCHANGER 83 XPM3m BASIC COOLING PACKAGE EC1 OPTION 84 BASIC COOLING PACKAGE COOLANT FLOW DIAGRAM EC1 OPTION 85 XPM3m EC2 COOLING PACKAGE 86 FLOW DIAGRAM EC2 OPTION 88 XPM3m ENHANCED COOLING PACKAGE EC 1 89 ENHANCED COOLING PACKAGE EC 1 FLOW DIAGRAM 90 XPM3m ENHANCED COOLING PACKAGE EC 2 91 ENHANCED COOLING PACKAGE EC 2 FLOW DIAGRAM 92 XPM3m ENHANCED COOLING PACKAG...

Page 4: ...system to allow quick identification of problems and possible solutions IMPROPER SAFETY PRECAUTIONS OR UNSAFE WORK METHODS MAY RESULT IN SERIOUS INJURY ATTENTION This Manual is NOT INTENDED as a substitute for proper technical training or educational background in the various technologies used in reflow ovens This manual is for service of Vitronics Soltec ovens by Trained Qualified Personnel An ap...

Page 5: ...014 CONTROL PANEL SYMBOLS OPERATOR CONTROL STATION Use Caution NOTICE WHEN CONTROL POWER IS INTERUPTED PARTS OF THE OVEN ARE ELECTRICALLY POWERED AND DANGEREROUS TO PERSONNEL SELECTOR SWITCH ADJUSTS RAIL IN or OUT KEY SWITCH RAISES AND LOWERS THE OVEN HOOD ...

Page 6: ...f the convection fan motors in the Oven IR Infrared refers to a component of the heat which is generated in an oven LED Light Emitting Diode DI Digital Input Board One of the boards in the Oven internal control unit MNPT Male National Pipe Thread Offload The end of the oven where product exits the tunnel Ohmmeter A precision instrument used to check and display the value of electrical resistances ...

Page 7: ...3 7854 x US gallons gal Liters l 4 55 x Imperial gallons gal Liters l 0 001 x milliliters ml meters 3 0 00455 x Imperial gallons meters 3 0 02832 x feet 3 meters 3 0 00379 x US gallons US gallons gal 0 264 x liters l US gallons 1 2012 x Imperial gallons Pressure Volumetric flow rates Bar 1 01325 x atmosphere ATM Imperial gallons minute 0 1035 x feet 3 hour Kilograms meter 2 kg m 2 10332 3 x atmosp...

Page 8: ...ontrol Overview The following pages contain subsystem diagrams relating to those described above When working on any part of the oven electrical safety measures must be observed Adherence to local safety policies as well as lockout tagout is required Use of the oven electrical schematics to assist in troubleshooting is recommended Prior to working on any of the oven subsystems please read the desc...

Page 9: ...he line side of the E stop relay K37 T1 provides 120VAC for ALL control functions throughout the oven 2 The line terminals of the Heater Contactor K2 3 To either the line terminals of the Fan Contactor K13 the primary side of the INVERTER if the oven has the Fan Speed Control Option or the three phase Fan transformer if the three phase supply voltage is higher than 240 volts CAUTION REMEMBER WHEN ...

Page 10: ...OLLER on the electrical panel 2 The CONTROLLER interprets the Computer s requests to energize de energize or modulate devices or sub systems within the oven then receives or sends the necessary signals If the required signal in or out is 5VDC or less it is handled directly by the CONTROLLER If a 120VAC output signal is needed the CONTROLLER communicates with the INPUT OUTPUT BOARD The I O board re...

Page 11: ...nal loss issues from the resistor voltage divider before it sends it to pin 9 on the Integramotor The internal Integramotor electronics require a regulated power supply between 20 and 28 volts DC to operate otherwise the electronics indicate a fault condition and the motor will not operate This voltage is supplied by the G5 power supply of the circuit The internal Integramotor electronics control ...

Page 12: ... A1 K5 K13 s contacts close 3 phase power is permitted to flow to through the Fan CIRCUIT BREAKER s F41 for all upper Fans F42 for all lower Fans to the Fans for Full Speed On Off Control b Ovens with Blower Speed Control FAN CONTACTOR K13 does not exist I 0 Board Output Relay A1 K18 in this case serves as the Enable input to the INVERTER An analog modulated Low Voltage D C output from the CONTROL...

Page 13: ...to the line terminals of the Heater Contactor K2 2 CONTROL ELEMENTS A POWER DEVICES HEATER CONTACTOR K2 coil is energized by I 0 Board Output Relay A1 K4 see Interlocks below it s contacts close three phase power is permitted to flow to the Heater CIRCUIT BREAKER s Each Heater has it s own Circuit Breaker and to the SSRs one Solid State Relay for each Heater which is the final Heater power control...

Page 14: ...m Scanner option The I A S output contacts are wired in series prior to the cell over temperature switches and power to the coil of K3 K3 is not shown on this Overview The coil of K2 is wired through the contacts of K3 When an over temperature condition is sensed the I A S board contacts open and voltage to the coil of K3 is lost This will cause K2 to de energize and ALL power will be removed from...

Page 15: ...or 2 mounted and wired to connectors OPERATION The relatively thick heater assembly has a series of holes allowing heat transfer to the oven gases passing from the Cell Cavity to the process tunnel Recirculation occurs through the low pressure intakes at the sides of the Cell These gasses are drawn into the cell cavity where they are passed through the heater and back into the process tunnel Fan S...

Page 16: ...zones An oven contains several heating zones 5 7 8 10 or 12 and 2 3 or 4 cooling zones Cooling zones are similar to heating zones except they have no heating elements and no exhausts only gas intakes A properly operating oven is an inter dependent system When a heater or fan malfunctions the balance and performance of the oven as a system may be affected Usually an irregularity in operation could ...

Page 17: ...hick heater assembly has a series of holes allowing heat transfer to the oven gases passing from the Cell Cavity to the process tunnel Recirculation occurs through the low pressure intakes at the sides of the Cell These gasses are drawn into the cell cavity where they are passed through the heater and back into the process tunnel Fan Speed controls the velocity of the heated atmosphere which influ...

Page 18: ...d conveys the combined flow to the Plant Exhaust System An oven contains several heating zones 5 7 8 10 or 12 and 2 3 or 4 cooling zones Cooling zones are identical to heating zones except they have no heating elements and no exhausts only gas intakes A properly operating oven is an inter dependent system When a heater or fan malfunctions the balance and performance of the oven as a system may be ...

Page 19: ...the oven software Click on the link for Help under Help Then click on the link for Alarm Help This will bring up the online troubleshooting document that is present in the oven software Internet Explorer may try to block the active content in this document It will be necessary to allow the blocked content in order to view the complete contents of this document ...

Page 20: ...ircuit Breaker s Both of the current paths are interrupted by the Circuit Breaker when it is open or tripped A On the Load Side of the Circuit Breaker one of the conductors goes directly to the heater terminals HT A HT B HT C on the outside of the Heater Cell B The other conductor is interrupted by the SSR When the SSR operates it conducts power from the Circuit Breaker to the heater terminals 1 1...

Page 21: ...e known See HEATER RESISTANCE CHECK LOCATIONS and connect Meter M on CBs and SSRs as shown A If the resistance is infinite open the Heater may have a broken disconnected wire or the heater element may have an open in it B If the resistance on Parallel wired Heaters see CHART Fig A is twice what it should be 1 One Heater element may be open 2 One conductor from the Heater may be disconnected 3 The ...

Page 22: ...4 T T2 6L1 4 27L3 F4 B T2 26L1 5 7L2 F5 T T2 8L3 5 27L2 F5 B T2 28L3 6 8L1 F6 T T2 8L2 6 28L1 F6 B T2 28L2 7 10L3 F7 T T2 9L1 7 30L3 F7 B T2 29L1 8 10L2 F8 T T2 11L3 8 30L2 F8 B T2 31L3 9 1L1 F9 T T2 11L2 9 31L1 F9 B T2 31L2 10 13L3 F10 T T2 12L1 10 33L3 F10 B T2 32L1 11 13L2 F11 T T2 14L3 11 33L2 F11 B T2 34L3 12 14L1 F12 T T2 14L2 12 34L1 F12 B T2 34L2 Top Heater Test Points Bottom Heater Test P...

Page 23: ...NTS PER HEATER 200 208 Volts LOW RANGE PARALLEL WIRING Test 8 2 9 1 8 65 nominal 18 0 1 open element 156 D3200402 D6126202 380 415 Volts LOW RANGE SERIES WIRING Test 33 0 36 5 34 75 nominal 156 D3200402 D6126202 220 240 Volts HIGH RANGE PARALLEL WIRING Test 11 0 12 1 11 55 nominal 24 0 1 open element 156 D3200401 D6126201 440 480 Volts HIGH RANGE SERIES WRING Test 43 9 48 5 46 2 nominal 156 D32004...

Page 24: ...s the number of heaters ON at the same time for each phase THERMOCOUPLES All thermocouples in the oven are type K and identified by a red and a yellow wire Connectors wires and terminals must be designated for use with type K thermocouples Test procedure 1 Remove the thermocouple connection block from the front of the AI board in the Anafaze controller 2 Measure the resistance of each thermocouple...

Page 25: ...nd cover it with a piece of 1 7mm vinyl tubing 4 Remove the support angle brackets on the left and right side of the heater panel 5 Remove the Philips head screw holding the front panel support bracket Remove the bracket 6 Lower the heater panel enough to gain access to the heater wires on the inside of the cell Block the panel up with a 10 or 254mm 4x4 block of wood to relieve the strain on the w...

Page 26: ... protective 1 7mm vinyl tubing through the correct hole in the panel If you did NOT circle the thermocouple s before removing the panel use another heater panel as a reference for the thermocouple position The ROSCO and the control thermocouple probes CAN NOT be mixed up and installed in the incorrect position 4 Once the thermocouple is located in its proper hole raise the heater panel into place ...

Page 27: ...y each thermocouple probe and the corresponding mounting hole Carefully straighten the thermocouple wire and cover it with a piece of 1 7mm vinyl tubing This will aid in relocating the thermocouple when reassembling the cell later 5 Remove the support angle brackets on the left and right side of the heater panel 6 Remove the Philips head screw holding the rear heater panel bracket Remove the Phili...

Page 28: ...NOT circle the thermocouple s before removing the panel use another heater panel as a reference for the thermocouple position The ROSCO and the control thermocouple probes CAN NOT be mixed up and installed in the incorrect position 4 Once the thermocouples are located in their proper holes lower the heater panel in place Remove the vinyl tubing from the thermocouple s 5 Install the support angle b...

Page 29: ...motor housing The resistance measured between each pair of phase legs should be approximately the same If the resistance of one phase leg is significantly different from the other two either there is a defective motor short in the windings or one of the motors is incorrectly connected CELL FAN MOTOR ROTATION CHECK Create a recipe to activate the cell fans only Start the recipe and observe the rota...

Page 30: ...or 3mm hex key bit for impact wrench 4mm hex key T handle or 4mm hex key bit for impact wrench Impact wrench Torque wrench calibrated in inch pounds with a range exceeding 50 inch pounds 5 65 N m click type 7mm open end wrenches 1 8 3mm or less in thickness 0 106 2 7mm Fan mounting gauge A 10 4x4 block of wood 2mm tubing Paper and pencil 1 Remove the oven sheet metal skin s to gain access to the c...

Page 31: ...ert the short end into a hole in the heater panel and gently pull up on the heater panel 10 Tip the heater panel on its side to gain access to the heater wires on the inside of the cell Block the panel in place to remove the heater wires 11 SKETCH the wire placement on the connections on the heater panel They will have to be replaced in the same order 12 Remove the four wires by using a 2 5mm hex ...

Page 32: ...r just installed Note that the fan has two setscrews and the motor shaft has two flats on it 12 With the fan blade resting on the gauge tighten the setscrews with a 3mm hex head bit on a torque wrench set to 50 inch pounds 5 65 N m Remove the gauge by sliding it forward and lifting it out of the cell 13 Retrieve the heater panel for this cell and lay it into place in the cell Be careful not to ben...

Page 33: ...m 4x4 block of wood to relieve the strain on the wires 7 Document the wire placement on the connections on top of the heater panel as you will have to replace them later in the exact same order 8 Remove the four wires by using a 2 5mm hex head key and a 7mm open end wrenche hold the bottom nut closest to the panel steady while the other unscrews the top nut to free the wire 9 IF THE HEATER FOIL TE...

Page 34: ...e between the screws in the cell plate Hold the gauge in place See drawing for the fan gauge 11 Place the matching fan blade onto the motor shaft of the motor that you just installed Note that the fan has two setscrews and the motor shaft has two flats on it 12 With the fan blade resting against the gauge tighten the setscrews with a 3mm hex key bit on a torque wrench set to 50 inch pounds 5 65 N ...

Page 35: ...n Date August 2014 5 INCHES 127mm 2 5 INCHES 63 5mm 2 75 IN 69 85mm 6 IN 152 4mm FAN MOTOR GAUGE 2 7mm Stainless steel sheet 3 4 IN 19mm Hole is to facilitate removal of gauge from under blower wheel 12mm drill bit 12mm from out outside edges ...

Page 36: ...the Edge Rail or Combination Edge Rail Belt Conveyor System The description of all three follow EDGE RAIL CONVEYOR SYSTEM The edge rail conveyor system shown below permits single or double sided surface mount printed circuit boards to be processed through the oven The standard chain conveyor carries circuit boards on 0 185 inch 4 75mm long pins extending from the chains This conveyor system provid...

Page 37: ...M The combination belt rail conveyor has both the edge rail and the mesh belt The mesh belt is below the edge rail conveyors and both conveyors are driven together The belt conveyor is shorter than the outside edge of the machine with the sheet metal covers on and shorter than the end of the rails with chain guards installed Approximately 3 inches 76 2mm between end of belt and end of rail conveyo...

Page 38: ...chain pins where the PCB sits The XCS chain can be parked between the conveyor pins on the fixed rail chain enabling the user to move the system out of the process lane when not required After a period of time both the conveyor chains and the XCS chain will stretch and it will no longer be possible to park the XCS between the fixed rail pins When this happens the conveyor chains and the XCS chain ...

Page 39: ... belt 4 Locate the triple master link on the left side of the belt Using screwdriver or chain nose pliers unhook the right hook of this master link from the belt Now using the same tool unhook the left hook of the master link from belt 5 Using a screwdriver lift the right side of the master link out Using a screwdriver unhook the left side of the master link from belt 6 Squeeze the ends of the tri...

Page 40: ...f the master link into the belt The master links should now be connecting the two belt ends 5 At the right side of the belt using a screwdriver hook the master link right hook into the last hook of the belt insert the master link hook from the top Then using a screwdriver connect the master link right hook into the first link on the bottom edge of the belt 6 Using a screwdriver slide the left side...

Page 41: ...lar method to that of a stepper motor Through switching the motor windings on and off in a specific sequence for a specific direction The faster the windings are switched on and off using the specified sequence the faster the motor rotates One major difference with a brushless motor versus a stepper motor is that a brushless motor has built in hall effect sensors that are used by the drive electro...

Page 42: ... rotating then perform the following Verify the alignment of the sprocket with the fork shaped sensor on A42 The sensing area on the fork shaped sensor is on the top most edge of the sensor and only the tips of the sprocket teeth should be extending into the opening on the sensor If the sprocket teeth extend too far the sensor won t detect the gaps between each sprocket tooth and will sense the hu...

Page 43: ...gain clear access to the motor and components 4 Remove the G5 power supply 5 Unplug the cable from the motor 6 The Motor is attached to a mounting plate with four bolts That plat is mounted with four bolts on the Oven Frame C Channel Loosen the four bolts and slide the plate to the exit end of the oven This will allow the Chain to be removed from the Drive Sprocket without removing the Master Link...

Page 44: ... the conveyor until the second chain master link shows up When it does remove it as you did on the other chain 4 Remove the 3mm hex head screws holding each rail onto the conveyor assemblies 5 Remove the rails DO NOT to let them bend or they may be permanently deformed RECONNECTING RAILS AND CHAINS 1 Reconnect each rail to its end assembly using the 3mm hex head screw 3 Install the chains in the r...

Page 45: ...een built up on your body in a controlled manner to prevent personal injury and damage to the equipment involved As long as you are properly connected to the oven ground by the antistatic wrist strap you will be at the same potential as the oven and the risk of damaging the components with static electricity will be reduced When a board with electronic components on it is removed it is important t...

Page 46: ... oven Usually a piece of frame that is not painted works well 4 Connect the wrist strap to the snap connector on the other end of the cord The strap should snap onto the connector for a positive connection 5 Put the wrist strap onto your wrist making sure that the strap is in contact with your skin all the way around your wrist Make sure that the strap is facing in the correct direction The inside...

Page 47: ...of the transformer Open the circuit breaker on the secondary load side of the transformer Verify that the secondary side of the transformer s neutral leg is grounded Re apply oven power Using a Voltmeter set the proper range measure the output voltage of the single phase control transformer X1 X4 The output voltage of the transformer should be within 10 of the nominal transformer voltage i e 108 V...

Page 48: ...ied to the system use a Voltmeter set on the proper scale measure the voltage between the live and neutral terminals on the socket this value should be nominally 120 VAC D C POWER SUPPLY The DC power regulation is internal to the A1 Board 120 VAC is converted to 24 VDC Step down switching regulators change the 24 VDC to separate 15 VDC and 5 VDC supplies These DC voltages are self regulated and ha...

Page 49: ...rd The Oven Control System receives all of its instructions from the computer by a serial interface NOTE DI OR AI BOARDS SHOULD NEVER BE INSERTED OR REMOVED WITH POWER APPLIED TO THE VITRONICS SOLTEC CONTROL SYSTEM Test procedure for D C input voltage The power requirements for the Vitronics Soltec Control System with one AI board is 5 0 VDC 2 Amps max 5 0 to 5 10 VDC 15 VDC 0 1 Amps max 12 to 15 ...

Page 50: ...0 CONTROLLER STATUS Upon power up the AI board s status lights should be in the following states Green light On steady Orange light On flashing at approximately once per second If the status lights are not in the above states check the 5 VDC at the terminal block mounted on the motherboard RS 232 Serial Communication check Make sure that the RS 232 cable connections from the PC to the controller a...

Page 51: ...t flashing then the oven controller is not responding to the commands sent by the PC Important Note If the run toggle switch on the oven controller is set in the down position the oven controller will not automatically run the application stored in its flash memory on power up and will not respond to any commands sent by the PC Momentarily press the small red reset button on the front of the oven ...

Page 52: ... Noisy communication lines can be corrected by grounding the shield of the communication line as well as moving the communication link away from any high voltage sources especially running parallel to the communications lines CONTROLLER OUTPUTS INPUT OUTPUT BOARD The Input Output board provides the ability to switch 120 VAC power through interposing relays The oven controller controls the output s...

Page 53: ...power cables they are identical are factory wired for the Computer and Monitor Plug the power cables into the receptacles on the rear of the Computer and Monitor CONTROL CIRCUIT Test procedure for safety interlock circuit Activate all circuit breakers Ensure all E stop switches are pulled out Log into the Oven control Program and reset the E Stop Alarm The E stop relay K37 should be energized If n...

Page 54: ... the mounting screws Test procedure for system ground continuity 1 Check continuity between the main ground terminal of the oven and the ground terminal on the mains connecting plug or distribution board using an Ohmmeter 2 Check continuity from the mains ground terminal of the oven to each individual component using an Ohmmeter 3 The resistance values should not exceed one Ohm Test procedure for ...

Page 55: ...d continuously flushing cleanliness Both modes are controlled automatically by the selection in the recipe file FUNCTION A series of valves are added to the individual cell intakes the Controlled Exhaust and the FFC manifold to allow automatic control of gas flows in the machine N2 MODE Nitrogen flow to the machine automatically closes individual cell intake valves closes the Air Controlled Exhaus...

Page 56: ...ure After this period the UPS will turn off shutting down the PC oven controller conveyor and hoodlift system If the operator wishes to prevent the conveyor from running the UPS backup battery should be disabled through the Oven Control Program before a power failure POWER ON DEFAULT FOR THE UPS BACKUP BATTERY Each time the oven s PC is turned on or resets the UPS backup battery unit is reset to t...

Page 57: ...he required lubricant The system generates a warning message when it calculates that the oil in the reservoir is getting low The lubricant type is Anderol Chian Oil XL220 During the lubrication process the oil is applied for two complete cycles of the chain The user may determine the number of chain cycles between automatic lubrications 67 is the default number The number of complete lubrications ...

Page 58: ...el brushes Priming Priming the system through the software can be very time consuming because of the low displacement of the pump Priming should only be necessary after 1 Servicing the auto lube system 2 The reservoir has been allowed to run dry and air has been pumped into the lube lines Location The Lubrication Tank Pump Assembly is mounted to the frame at the front of the oven inside the utilit...

Page 59: ...rication of the conveyor chain Select manual lubrication in the Oven Control Software by clicking on the Oil Can Icon This will bring up the Chain Lubrication utility dialog box Click on the box for Lube for Chain Distance The conveyor chain will run and lube oil will be applied for two complete cycles of the chain s For automatic lubrication of the conveyor chain on a regular basis Select automat...

Page 60: ...system includes a single rail extrusion and a special chain with upright supports that prevent warping of the PCB The upright support is 0 05 inches thick 1 27mm This option is available with both manual and automatic positioning This system is available on Rail Only conveyors The XCS system can be parked against the fixed rail when not in use There must be a clear space of 1 27mm 0 05 inch on the...

Page 61: ...y exhaust for its operation A small amount of compressed air flows through a Venturi mounted inside the Controlled Exhaust Tube and creates a negative pressure at the CES slot in the oven chamber This draws gas out of the Oven Chamber The oven chamber exhaust flow rate is controlled by the amount of air supplied to the oven The cooling effect of the incoming compressed air causes an accumulation o...

Page 62: ...causes flux and other outgassed contaminants to condense in the exhaust stream as it enters the box but prior to passing through the filter Contaminants are trapped in the filter and the cleaned gas continues out the exhaust duct BENEFITS Flux and other out gassed contaminants are captured in an easily changed disposable filter Provides increased protection of the facility exhaust system from cont...

Page 63: ...hile still optimizing nitrogen performance This control of gas flow insures a cleaner cooling zone with maintenance intervals significantly increased Although widely varying process parameters will cause individual maintenance intervals to differ an average expectation should be up to 8 times less frequent The Flux Evacuation System has secondary benefits In all applications there should be a noti...

Page 64: ...gen consumption into that area and by reducing the pressure in the last heated zone by fully opening the individual cell outlet The total oven exhaust is taken from this one port The recirculation loop carries low O2 PPM gas from the first cool zone into the preheat and soak sections of the heated zone maintaining low O2 PPMs throughout the tunnel The recirculation loop carries out flux contaminan...

Page 65: ... with compressed Air Flow ratios and all other process parameters remain identical MAINTENANCE The Flux Flow Control system is virtually maintenance free if operating properly To ensure this it is recommended that the inlet tube from the Flux Flow Control manifold into zone 1 be checked periodically every six months for flux residue The Flux Flow Control System is located under the sheet metal ski...

Page 66: ...ding the upper heat zones of the oven All models of Vitronics Soltec Reflow Ovens have 2 or 3 depending on oven size LINAK hoodlift Actuators with a LINAK control box directly wired to the HOOD UP and HOOD DOWN selector switch on the oven operator control panel The general arrangement of the LINAK Actuators is shown here A UPS option is available to permit opening the Oven Hood in the event of a p...

Page 67: ...n the actuator is removed Be careful to make the stack of wood stable Remove the bonnet bridge sheet metal piece on the end of the oven where the actuator will be changed Remove the two safety clips from the pin holding the actuator piston to the bracket Remove the piston pin holding the actuator piston to the bracket You may need to exert some pressure on the inner hood assembly to remove the pin...

Page 68: ...om the control box and remove the actuator cable with the actuator Remove the two safety clips from the pin holding the actuator piston to the bracket Remove the piston pin holding the actuator piston to the bracket The installation procedure is the reverse if the removal procedure ...

Page 69: ...nged The body of the actuator is accessed through the equipment cabinets on each end of the oven Carefully raise the actuator and position it in its frame location Use the mounting pin to lock the piston in place in the bracket As you are pushing the mounting pin into place install the locking shaft collars on each side of the piston Replace the two safety clips on the mounting pin Let the actuato...

Page 70: ...chronized on the oven when it is built Caution Notes The following process is used for two or three actuators on the same oven and is required only after replacement of an actuator or control box or if an actuator is out of adjustment 1 Do not turn the spindle while the actuator is plugged into the actuator control box This will send erroneous pulses to the control box causing misalignment and pos...

Page 71: ...wer channel then release the hood selector switch 5 Disconnect the power to the control box again by shutting off circuit breaker F52 for at least 5 seconds 6 On the operator control panel and turn the hood selector switch to the UP position and hold while reconnecting the main power to the actuator control box Listen for a buzzing sound coming from the control box At this point the hood selector ...

Page 72: ...three actuators to the DOWN position 4 Keep the hood selector switch engaged making sure that each actuator pulls the main heat zone down tightly against the lower channel then release the hood selector switch 5 Disconnect the power to the control box again by shutting off the F52 circuit breaker for at least 5 seconds The initialization process is now complete Periodic Inspection and Maintenance ...

Page 73: ...and scans them for an over temperature indication The control circuit inter action is In the event that an alarm condition generated from the Redundant T Cs occurs the IAS alarm contact interrupts the 24 VAC to relay K4 This in interrupts the 120 VAC to the coil of heater contactor K2 and supplies an alarm signal to the controller The IAS unit scans all redundant thermocouples wired to it for an O...

Page 74: ...d nuisance alarms due to the limitations of the existing controller The IAS alarm level setting must be set for an alarm level other then critical in order to sense and report individual temperature switch alarms This is because a critical alarm level setting will cause the cell fans to shut off immediately when an alarm occurs with a critical alarm level setting INDIVIDUAL CELL SENSING CELL MOTOR...

Page 75: ...AS alert alarm message is present which indicates that K4 on the back panel is shutting off when a heater over temperature switch is opened This test verifies that each E3152202 board is configured correctly and is also communicating correctly with the DI board and that relay K4 on the back panel shuts off when a heater over temperature switch is opened E3152202 Board Model 520 Model 730 820 Model...

Page 76: ... Master This is to signal that a frequency has been read correctly and to prompt the Master to send the data for the next nibble or the identity stamp depending on where the Master controller is in the send sequence The existing controller checks the counter input once a second and signals the Master to send data for the next nibble when the past and current counter values are equal which is typic...

Page 77: ...ty cell must be found by diagnostically testing the functions of the cell over temperature switches looking for either continuity machine power removed or voltage loss across the switch On the back top bottom side of each heater cell is a terminal block assembly Check for either continuity or 24 VDC between terminals 24 1 and 24 2 To read continuity machine power must be completely disconnected To...

Page 78: ...Technical Reference Manual XPM3m Revision Date August 2014 LIGHT TOWER Standard installed on all ovens An option NOT installed on all ovens ...

Page 79: ...Technical Reference Manual XPM3m Revision Date August 2014 LIGHT TOWER Continued ...

Page 80: ... Analyzer and on the computer monitor through the Oven Control Program PURPOSE XPM3m Nitrogen ovens are equipped with a single sampling port located in the peak zone standard or a 4 port system optional with the ability to sample from the Preheat Soak and Reflow zones and Source Gas The 4 port option has either a rotary 5 way valve located next to the Analyzer or a series of solenoid valves that a...

Page 81: ...n while timer 2 has 8 bit resolution and is used to send range and alarm information The Neutronics model 3100 analyzer has six ranges and automatically changes ranges to measure from 0ppm to 100 concentration Dipswitch 4 on S1 is used to enable the use of the two frequency generator outputs through software when the switch is set to the ON position Oxygen analyzer related parameters in the recipe...

Page 82: ...unted on both top and bottom cells Air enters the inlets and mixes with the recirculated exhaust air which in turn lowers the overall cell temperature The cooler recirculated air is then used to cool boards being processed Cooling performance is dependent on ambient air temperatures It is an uncontrolled system with only a thermocouple mounted in the top cells for temperature monitoring The amount...

Page 83: ...ng systems Removable for ease of maintenance Valved quick disconnect fittings to prevent fluid loss Interchangeable with fin tube type heat exchanger FIN TUBE TYPE HEAT EXCHANGER Used for enhanced level cooling systems High efficiency for improved cooling Removable for ease of maintenance Valved quick disconnect fittings to prevent fluid loss Interchangeable with tube type heat exchanger The cooli...

Page 84: ...changer Heat is transferred from the recirculated gas to the coolant as the gas flows around the heat exchanger tubes The heat is then carried out of the tunnel via the customer supplied coolant All upper cool cells are supplied with a hinged faceplate that is opened from the inside of the tunnel for ease of maintenance The tube type heat exchangers have valved quick disconnect couplings to preven...

Page 85: ...Technical Reference Manual XPM3m Revision Date August 2014 BASIC COOLING PACKAGE COOLANT FLOW DIAGRAM EC1 OPTION ...

Page 86: ...to supply coolant to the internal heat exchangers The heat collected by the internal heat exchangers is exhausted through the top of the bonnet via an externally mounted heat exchanger All upper cool cells with heat exchangers are supplied with hinged and latched faceplates that can be opened from the inside of the tunnel This provides access to remove clean and maintain the heat exchangers with a...

Page 87: ... for draining the system The check valve in the supply line prevents coolant flow back to the reservoir It also permits cleaning the in line strainer without draining the heat exchangers The flow switch and level switch are inputs for the Oven Control Program display of the LOW FLOW LOW COOLANT alarm TESTING The motor and supply circuit should be tested If the Voltage is NOT within the 100 to 120V...

Page 88: ...ference Manual XPM3m Revision Date August 2014 FLOW DIAGRAM EC2 OPTION The following diagram shows the Polar Cooling option configured for an oven with two cooling zones Three or four cooling zones would be similar ...

Page 89: ...ove heat from the tunnel The upper cells in the cooling section are fitted with an internal fin tube type heat exchanger As recirculated gas flows over the fin and tubes a transfer of heat from the air stream to the liquid stream is made The heat is then carried out of the tunnel via the customer supplied coolant All upper cool cells with heat exchangers are supplied with hinged and latched facepl...

Page 90: ...Technical Reference Manual XPM3m Revision Date August 2014 ENHANCED COOLING PACKAGE EC 1 FLOW DIAGRAM ...

Page 91: ... tube type heat exchanger As recirculated gas flows over the fin and tubes a transfer of heat from the air stream to the liquid stream is made The heat is then carried out of the tunnel via an on board pump and reservoir system and exhausted through the top of the bonnet via an externally mounted heat exchanger All upper cool cells with heat exchangers are supplied with hinged and latched faceplat...

Page 92: ...Technical Reference Manual XPM3m Revision Date August 2014 ENHANCED COOLING PACKAGE EC 2 FLOW DIAGRAM ...

Page 93: ...fitted with an internal fin tube type heat exchanger As recirculated gas flows over the fin and tubes a transfer of heat from the air stream to the liquid stream is made The heat is then carried out of the tunnel via an external OEM chiller This option provides an all inclusive approach to get the maximum cooling performance from XPM3m All upper cool cells with heat exchangers are supplied with hi...

Page 94: ...Technical Reference Manual XPM3m Revision Date August 2014 ENHANCED COOLING PACKAGE EC 3 FLOW DIAGRAM ...

Page 95: ...ng liquid temperature Flow Switch Set to 1gpm alarms when flow falls below set point Check Valve Prevents outlet from back filling system COOLANT SPECIFICATION Recommended Vitronics Soltec Super Cool Part No C00234 4 liters Distilled Water recommend use of an additive to prevent algae growth Lab grade Propylene Glycol mixed with Distilled Water 20 80 mixture NOTE De ionized water or other coolants...

Page 96: ... is a stand alone controller that executes commands sent by the DI board through RS485 communication The rail controller A42 only activates one of the rail direction relays A1 K23 through A1 K26 if the corresponding limit switch input is on or present The rail controller A42 activates the enable output relay A1 K22 one second after one of the rail direction relays A1 K23 through A1 K26 has been se...

Page 97: ...Verify that the jumpers are installed correctly on connector P62 on the A1 board Also verify that there is 130 VDC at connector P62 on the A1 board between pins 1 and 4 Enable the manual rail switch Select Rail IN A1 K24 or A1 K26 should energize depending on which rail is selected for movement A1 K22 should energize after a delay Select Rail OUT A1 K23 or A1 K25 should energize depending on which...

Page 98: ...30 VDC If there is no voltage present the drive circuit board is likely to be defective Otherwise adjust the SIGNAL ADJUST potentiometer on the DC drive board to produce the 90 130 VDC If steps 1 5 have been performed and the rail motor still does not operate refer to the Oven Schematics and proceed with the following 1 Verify the status of the rail limit switches by observing the status leds on t...

Page 99: ...nated as output channel A and output channel B The rotation direction of a quadrature encoder is determined by monitoring which output channel signal is ahead of or leading the other The rail width adjust on the XPM3m uses a 250 pulse per revolution quadrature encoder mounted on the end of a lead screw The lead screw is a 10 acme screw which translates to 10 turns to move a rail one inch or 2 54 c...

Page 100: ... count up and count down from a quadrature encoder This is called 4X mode and results in the 250 pulse per revolution encoder used on the rail width adjust producing an equivalent of 1000 counts per revolution instead of 250 The quadrature counter used on the two axis rail controller is a 16 bit counter on the E3152001 board and a 24 bit counter on the E3152010 board Each quadrature counter counts...

Page 101: ...2 To view this configuration will require the highest level of password The configuration can be viewed under the Vitronics Soltec menu Go to Configuration Parameters Individual Parameters Click on the button with the blue arrow pointing to the right until you come to the parameter you wish to view An axis will always reference at its fixed rail location by moving towards the fixed rail until the ...

Page 102: ...r the output signals on the 5pin connector on the A1 board for each encoder in question 5 The channel A and channel B outputs should transition from 0v to 5v while a lead screw is rotating and 5v power should be present between pin 1 and pin 4 on the 5 pin connector on each encoder 6 Verify that the plastic encoder disk is secured firmly on the lead screw by the set screw in the mounting collar 7 ...

Page 103: ...ould only be adjusted by experienced people G Signal signal adjust is found on DC drives which provide an option of being controlled by a computer If the DC drive is adjusted by a speed control potentiometer signal or signal adjust has no function Note A DC drive with computer control will have a signal manual selector switch or jumper If the input does not match the input selected the DC drive wi...

Page 104: ...108V or greater than 132V disconnect the power supply and correct the supply voltage problem 2 Disconnect the multimeter and set to measure VOLTS DC Attach leads to the motor side of the control 3 Log in to the oven software with the master password Under Vitronics Soltec Advanced Service Mode Testing go to the Conveyor tab Type in a percentage number 0 100 in the box for Conveyor then select eith...

Page 105: ...ment EITHER conveyor can send a Product at Offload signal to the downline equipment OPERATION Action by the Reflow Oven operator is not necessary for the SMEMA interface to function As long as the upline downline connections are made and a component failure has not occurred operation will be automatic when the Reflow Oven is powered up The SMEMA interface accepts a Board Available signal from the ...

Page 106: ...zero for the outfeed alarm delay disables monitoring for the downstream ready signal and is equivalent to installing a jumper wire on the SMEMA off load connector to indicate that the downstream is always ready The XPM3m has SMEMA settings for each lane for up to 2 lanes of SMEMA control and the SMEMA control for each lane operates independently as it did with ovens with a PLC The XPM3m provides o...

Page 107: ...ble assembly E3153401 on load or E3153402 off load P4 lane 1 on load or off load board sensor P5 lane 2 on load or off load board sensor P6 lane 3 on load or off load board sensor LED1 lane 1 board available at on load from SMEMA interface LED2 lane 2 board available at on load from SMEMA interface LED3 lane 1 on load or off load board sensor signal LED4 lane 2 on load or off load board sensor sig...

Page 108: ...s on the PCB DISCLAIMER OF LIABILITY AND CONTENT THE INFORMATION CONTAINED IN THIS MANUAL IS SUBJECT TO CHANGE WITHOUT PRIOR NOTICE AND IS CORRECT TO THE BEST OF OUR KNOWLEDGE AT THE TIME OF PRINTING VITRONICS SOLTEC CORPORATION ASSUMES NO RESPONSIBILITY FOR LOSS OR DAMAGES RESULTING FROM THE USE OF THIS MANUAL EXCEPT AS EXPLICITLY STATED IN THE VITRONICS SOLTEC OVEN WARRANTY STATEMENT ALL RIGHTS ...

Reviews: