background image


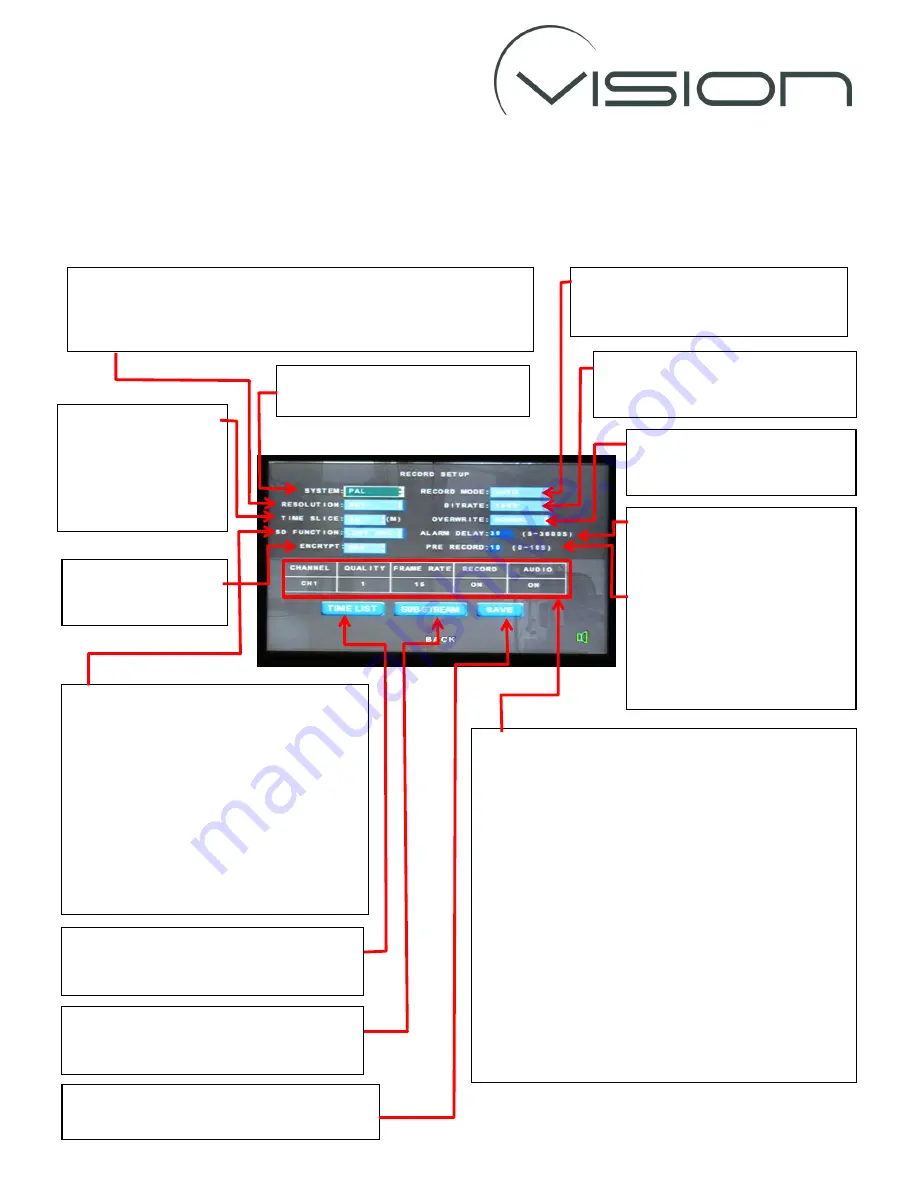
REC SET 

The 

REC SET

 settings define the recording characteristics of the DVR. 

As has been described previously use the arrow and ENTER buttons on the r/c to highlight and 
change the settings (unless otherwise described) 


All Vision systems will be 

PAL 

unless 

specifically ordered to be otherwise. 

We recommend using 

4D1

 (all channels recorded at D1 

Resolution

) or 

2D1_2CIF

 = Channels 1 & 2 recorded at D1, Channels 3 & 4 at CIF 

Resolution (This option increases recording time for a small reduction 
in quality on what are normally the less critical cameras). 
 

Auto 

Record Mode is used for 95% of 

Vehicle applications as means DVR 
always records when it is running. 

If recording 4 cameras set bit rate to 

1600

 as processor capacity cannot 

process data any faster. 

NORMAL 

mode means that the 

oldest video is overwritten when 
memory device is full. 

ALARM DELAY

 sets time period 

after an alarm event occurs that 
video is recorded for.  
 

PRE RECORD

 sets time before an 

alarm event that video is 
recorded for. 
 
Note that Alarm Files will not be 
overwritten when memory is full  

The 

TIME SLICE

 is the 

time period over which 
a video file is saved if 
the DVR is not turned 
off – we recommend it 
is set at 30 minutes 

The 

SD Function

 is important to understand: 

LOST REC

 configures the DVR so that if the 

HDD does not exist (or is faulty) the video 
will be recorded to the SD Card – so all SD 
Card DVR’s must be configured with this 
setting.  This also allows a HDD DVR to have 
an SD Card back up should the HDD fail. 

NO REC

 only records video to the HDD. 

MIRR REC

 records video to both SD card and 

HDD 


The 

ENCRYPT

 function 

is not currently 
supported 

These settings set up the recording configuration for 
each camera channels individually. 
 
To select the camera to be configured highlight the 

CHANNEL

 number and press 

ENTER 

on the r/c to change 

the channel number. 
 
Always set the 

QUALITY 

setting to 1 (best quality) 

 
We recommend a 

FRAME RATE

 of 15 (15 fps) which 

offers the best compromise of quality and file size. 
 
Turn 

RECORD


ON

 only for those channels that are to be 

recorded (recording channels with no cameras 
connected just wastes storage space). 
 
Turn 

AUDIO 

to record sound – But note that only 

Channel 1 and 4 have audio hardware connected. 

TIME LIST

 is used with the 

TIME

 setting 

(under the 

RECORD MODE

 options) so that 

the DVR only records between pre-set times 

The 

SUB-STREAM

 setting is used with Live-

View systems and use is covered in a 
separate manual. 

Highlight the 

SAVE

 option and press the 

ENTER

 button on the r/c to save the changes. 

Summary of Contents for DVR-800-2015

Page 1: ...s on the r c to highlight the different sub menus To enter a sub menu highlight that menu and press the ENTER button To return back to a higher level menu press the EXIT button Please note to configur...

Page 2: ...a new drive is inserted into a DVR it is recommended that it is reformatted on the DVR before the vehicle enters service To Format the Drive Use the arrow buttons on the r c to highlight the DISK SELE...

Page 3: ...e selected DEF CHANNEL and Delay The Def Channel defines the default AV channel channels that are output to the monitor the options are to show an individual camera a split screen 2 cameras side by si...

Page 4: ...at have occurred CFG MANAGE Allows you to download or upload application specific configuration files PTZ MANAGE This option allows us to set up PTZ Camera Control SERIAL MANAGE This menu option allow...

Page 5: ...e TIMEZONE We recommend that this is set as GMT 0 as otherwise you have to manually change this on every system every time the clocks change In the NUMBER box you can enter the Vehicle Registration nu...

Page 6: ...e recommend it is set at 30 minutes The SD Function is important to understand LOST REC configures the DVR so that if the HDD does not exist or is faulty the video will be recorded to the SD Card so a...

Page 7: ...y start and stop the DVR between pre set times DELAY TIME sets how long after ignition off accessory live see s no voltage the DVR keeps recording for To change the time and date use the numeric butto...

Page 8: ...desired functionality The G SENSOR function is explained on the following page Set ENABLE to ON to enable a specific alarm To record an alarm file when an alarm is activated set RECORD to ON Alarm fil...

Page 9: ...part of a wired Network The use of these functions is covered in a separate Manual To provide an output when a G level alarm has been activated turn the OUTPUT ON Set ALARM SWITCH to ON to turn on the...

Page 10: ...ALL Select Disk type to be searched SD or HDD Select the date to be searched Note that when you change the Month the date table at the top of the screen will show you on which day s video has been re...

Page 11: ...e EXIT button on the r c and press again to exit the playback function If the time period of interest is displayed highlight the first channel for that time period and press ENTER If the time period i...

Page 12: ...ns on the r c to highlight and change the settings unless otherwise described Selecting the SYSTEM INFO displays the firmware version of the DVR and other system information For more information and f...

Reviews: