© 2020 Virginia Diodes, Inc.
—All Rights Reserved
7 October 2020
Front Panel
Range Switch:
Used to select fixed ranges of 200
μ
W, 2 mW, 20 mW and 200 mW. Also enables Auto Scale Mode
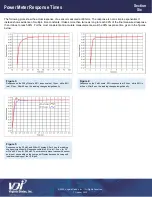
and USB control when “Remote” is selected. The meter requires a relatively long wait for the thermal transients to
settle; it settles more quickly when shifting ranges upward than it does when shifting ranges downward. Avoid going
higher in ranges if you plan to immediately return to a lower range setting. See Section 4. Higher ranges have faster
responses; using the highest range with sufficient resolution is recommended. The maximum
measurable power for all ranges is
limited to the full scale power (with 0 dB cal factor). Exceeding full scale power leads to a large imbalance in the normally closed
loop and lengthy sensor recovery time.
Zero Button:
Is
used to zero the display with no effect on calibration. The meter will drift rapidly after turn-on and range switching;
under some conditions it will drift slowly but steadily for several minutes. See Section 4. When in Auto Scale Mode the Zero Button
has additional functionality: A) Press Zero Button once in any scale >200
μ
W to turn on Range Hold; B) Press Zero Button twice
(within 0.75 seconds) to turn off Range Hold; C) Press Zero Button three times quickly while in Auto Scale Mode in the 200
μ
W
scale and the PM5B will simultaneously zero all four ranges. If the meter is over-ranged, pressing the Zero Button three times
quickly will readjust internal settings for the active range to achieve full scale readings above the zero point, if possible. It is strongly
recommended that the meter be allowed to settle before pressing the Zero Button three times quickly.
Note:
If possible, zero the
power meter when the sensor head is connected to the device under test and the device under test is turned off.
Sensor Head Connector Port:
This is a standard Amphenol connector, Series C091A, Part T3504001. Do not connect or
disconnect the sensor cable if power is
turned “On.” Contact VDI if you have questions about using longer cables.
Cal Factor Switch:
Used for scaling the meter display to correct for input loss or gain; scaling applies only to the Front Panel
Display and the GUI when measurement software is in operation via the USB. Scaling the meter does not affect the raw USB
output or analog output. The switch reads in log (dB) units with 0 corresponding to no correction. Positive values correspond to
correcting for input loss and negative values correspond to correcting for input gain. The maximum correction is ±29.9 dB. The
correction for the internal waveguide loss is only about 0.2 dB at 100 GHz. See Section 5 for details about using tapers and horn
antennas. See Appendix 2 for a detailed description of WR10 SWG and taper frequency dependent insertion loss.
Rear Panel
Power Switch:
The power control is on the back panel since it is not expected that this instrument will be turned
“ON”
or
“OFF” frequently. Do not turn the power switch from “ON” to “OFF” in quick succession because improper start-up
may occur in some of the logic, which can lead to operational problems.
Best Practice:
Wait at least 5 sec with the switch
“OFF” before turning it “ON” again.
Internal Calibration Switch:
The sensor element may be heated with known amounts of DC power for examination of the
thermal response. The Internal Calibration Switch may be used to apply powers of 0.100, 1.00, 10.0 and 100 mW to the sensor.
Under remote control via the USB, calibrat
ion voltages may be turned “ON” and “OFF,” but only if the switch is set to any position
except “OFF.”
Calibration Input via Banana Jacks:
The rear panel banana jacks are buffered and therefore not connected directly to the
sensor calibration heater resistor, which has a value of 1000
Ω. If you wish to check the calibration at other heat values you may
apply any voltage up to 12.7 V to the banana jacks with the Internal Calibration Swi
tch set to the “Off” position.
Analog Output
: A BNC connector is provided to interface the meter to other equipment. It provides a linear output of -10 to +10
VDC, with +10 VDC corresponding to full scale power on each range and 0 VDC corresponding to 0 mW. The analog output data
rate is 1 Hz on the 200 µW scale, 5 Hz on the 2 mW scale, 20 Hz on the 20 mW scale and 35 Hz on the 200 mW scales. Output
impedance is ~0 ohms.
USB Port:
This meter utilizes a USB (Type B port) interface to enable full control of the PM5B via the VDI software or customer-
designed programs. The supplied flash memory stick contains an MS Windows graphical interface with the original Labview 7
code to set the scale, zero the meter, read the data, and write data to a log file at chosen intervals. See Section 7 for a Graphical
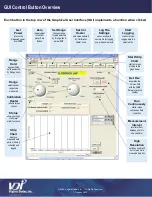
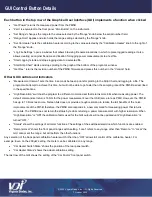
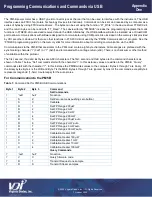
User Interface (GUI) overview. A detailed programming guide is located in Appendix One.
Front and Rear Panel Operational Details


