


22
69AM/T
EN
4.10 - Number of cameras
Press the button to move to the next item, to enable program-
ming of how many CCTV cameras are connected to the base
module or by means of additional modules 69AM/4, 69AM/T4. The
number of cameras must be consistent with the number of addi-
tional modules installed:
So only the base module will be used by default. To change this
number, start typing in the digits, for instance
then .
To cancel, press
. To confirm, press
. Acceptance of the
command, as in all cases, is shown on the first line of the display:
The maximum number of cameras is set at 16. Use the button
to move to the previous item in the programming menu.
4.11 - Self-start sequence
Press the button to move to the next item in which the user
can program the self-start sequence of the cameras in the switch,
monitor by monitor, including any concierge switchboards. There
is no sequence by default and so only the first camera is used.
To change ID of the monitor or entryphone, use the
and
buttons. Alternatively, type in the number of the monitor or entry-
phone, between 1 and 200 for (video)entryphones and between
201 and 204 for concierge switchboards:
In horizontal configuration, type in the code of the indoor units
delimited by the window and valid in relation to the number of
indoor units per router, see table 3 on page 14, or type in the
IDs of switchboards between 40001 and 40008, which by default
correspond to the IDs of the switchboards of router 1 and router
2, otherwise the IDs among those configured in Switchboard
position (see 4.7C).
To cancel, press
. To confirm, press .
To modify the sequence of the selected device, starting from
where the current value is shown, press .
To specify the sequence of cameras, use the
buttons followed
by
for the first 9:
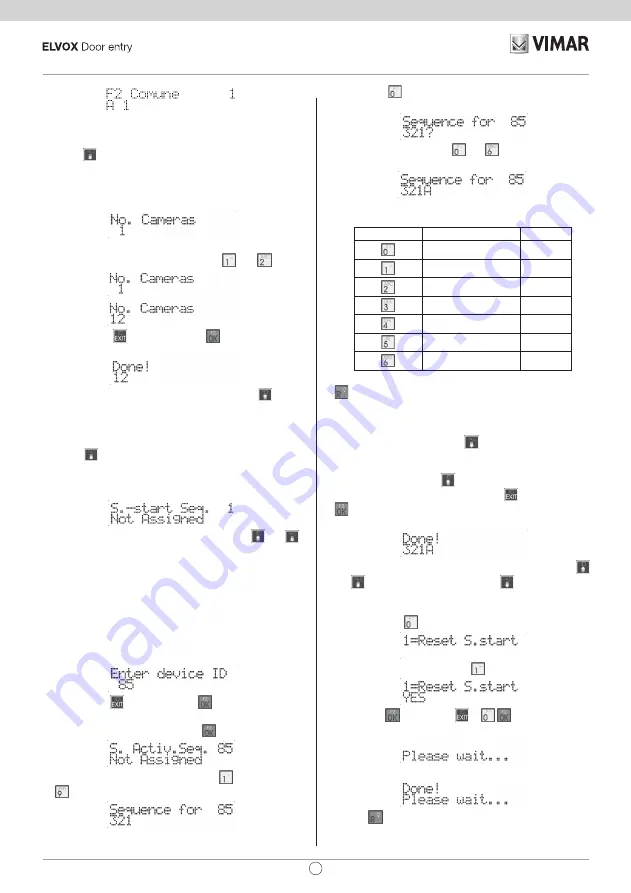
For cameras higher than 9, a pre-fix mechanism is used, by
means of the
button. Press once to enter a ‘?’ symbol instead
of a digit:
Next, press a button between
and to enter the ID from 10
to 16.
Given that only one location is used on the display to show these
values, the letters A..G are used, according to the following table:
Button
Camera Number
Letter
10
A
11
B
12
C
13
D
14
E
15
F
16
G
The last ID present in the sequence can be cancelled using the
button. IDs may be duplicated within a sequence. The maxi-
mum limit is 16 per (video)entryphone. To facilitate the entry of
similar sequences, the programming application has a “clipboard”
option”. During editing mode, and when there is no ‘?’ symbol
displayed, if the user presses the button, the sequence shown
on the display is copied into a temporary memory zone. The user
can terminate the current sequence, by moving to another monitor
/ entryphone and pressing
, thus recalling this memory which
replaces the one present. To cancel, press
. To confirm, press
. Acceptance of the command, as in all cases, is shown on the
first line of the display:
It is also possible to navigate from one ID to another using the
and buttons. From ID position 1, press to move to the next
item in the programming menu.
To cancel all sequences, starting from where the current value is
shown, press the
button:
On request for confirmation, press
:
and then the button. Press
or
to cancel the proce-
dure. If the sequence reset is selected, the following is displayed:
And lastly:
Use the button to skip all intermediate steps and go back to
the previous item in the programming menu.
Summary of Contents for 8013406205636
Page 30: ... 30 69AM T ...
Page 31: ... 31 69AM T ...
Page 32: ...Viale Vicenza 14 36063 Marostica VI Italy www vimar com 49401592A0 00 2007 ...


