background image

VZ-CMK01

Page 6 

Visit the ViewZ website at http://www.viewzusa.com


Installation Instructions

The  VZ-CMK01A  allows tilt and pivot adjustments ±15° from center, 360° side-to-side swivel, and cable access. 
Please read these installation instructions once thoroughly before attempting to install your ViewZ product.


  The VZ-CMK01A may be attached to 1-

½

˝ standard threaded pipe (NPT), or one of ViewZ adjustable-height 

ceiling adapters. Please refer to the installation instructions that come with these adapters.

Please take a minute to familiarize yourself with the contents of the package and make sure you have all the parts and 

tools you need to safely complete the installation.


In addition, some steps of this installation may require two people to prevent personal injury and/or damage to 

your projector.  Please observe all warnings in the following installation procedure and utilize proper safety 

equipment at all times.

Installing the VZ-CMK01A Mount

Introduction

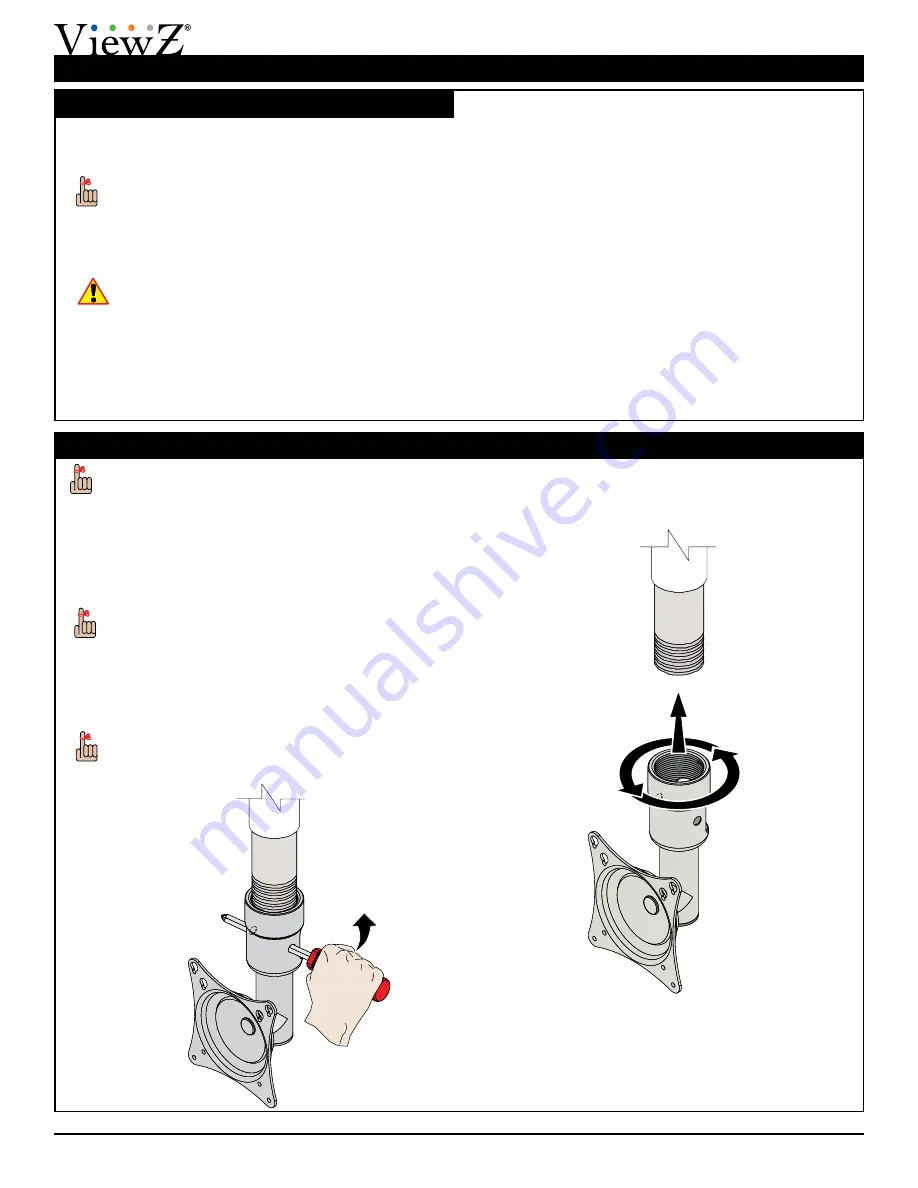
Attaching the VZ-CMK01A


­

Screw the VZ-CMK01A coupling adapter to the 1½˝ 

NPT. 


  The VZ-CMK01A must be threaded four complete 

turns before tightening down the set screw.


  If you are having difficulty achieving four complete 

turns, insert a screwdriver through the access hole 

and apply pressure while turning the VZ-CMK01A 

(see below).

  The desired ceiling attachment must be installed 

prior to peforming the following steps.

Summary of Contents for VZ-CMK01

Page 1: ...NS NORTH AMERICA 177 W Orangethorpe Ave Placentia CA 92870 USA USA and Canada Phone 1 888 99 ViewZ Other Locations Phone 001 714 996 1177 Fax 001 714 996 1138 VZ CMK01 Ceiling Mount Kit for 8 to 32 ViewZ Monitors 853177002861 ...

Page 2: ...NY SUCH USE ATTACHMENTS OR MODIFICATIONS At least two qualified people should perform the assembly procedure Personal injury and or property damage can result from dropping or mishandling the projector If mounting to wall studs or ceiling studs make sure that the mounting screws are anchored into the center of the wall studs or ceiling studs Use of an edge to edge stud finder is recommended Be awa...

Page 3: ...stallation and call ViewZ at 888 99 ViewZ VZ CMK01 Mount Hardware VZ CMK01A Qty 1 VZ CMK01B Qty 1 The following tools may be required depending upon your particular installation They are not included Pencil Protective Eyewear Phillips Tip Screwdriver Power Drill Ladder 2 1 Tape Measure Socket Wrench VZ AP200 Adapter Plate Qty 1 M3 Allen Wrench Supplied Universal Spacers Qty 30 M4 Flat Washers Qty ...

Page 4: ...Head Screw Qty 6 M4 x 20mm Flat Head Screw Qty 6 M4 x 30mm Flat Head Screw Qty 6 M4 x 45mm Flat Head Screw Qty 6 M5 x 10mm Screw Qty 4 M5 x 16mm Screw Qty 4 M5 x 20mm Screw Qty 4 M5 x 30mm Screw Qty 4 M5 x 45mm Screw Qty 4 M6 x 10mm Screw Qty 4 M6 x 16mm Screw Qty 4 M6 x 20mm Screw Qty 4 M6 x 30mm Screw Qty 4 M6 x 45mm Screw Qty 4 M4 x 5mm Screw Qty 4 M4 x 10mm Screw Qty 4 ...

Page 5: ...djustable height ceiling adapters Please refer to the installation instructions that come with these adapters Dynamic Viewing 360 of left or right swivel Radial Glide 360 rotation and 15 of adjustment in any direction Cable Routing Allows for easy routing of power and signal cables VESA Compatible Compatible with 75mm x 75mm 100mm x 100mm 200 mm x 100mm and 200mm x 200mm mounting patterns ...

Page 6: ...sure you have all the parts and tools you need to safely complete the installation In addition some steps of this installation may require two people to prevent personal injury and or damage to your projector Please observe all warnings in the following installation procedure and utilize proper safety equipment at all times Installing the VZ CMK01A Mount Introduction Attaching the VZ CMK01A Screw ...

Page 7: ... straw or toothpick as shown in Figure 2 and Figure 3 do not use this screw The screw length must not bypass the mark Test each size of the screws provided The correct screws should thread easily into the mounting point and not pull out when tension is applied Does your flat panel have Recessed mounting points Uneven mounting points A curved back Any obstruction near the mounting point If Yes you ...

Page 8: ...s Proceed to the VZ AP200 Adapter Plate Installation section VZ AP200 Adapter Plate Installation The VZ AP200 LCD Mount Adapter is used attach flat panels with 100mm x 200mm and 200mm x 200mm mounting points to the VZ CMK01A mount Determine which mounting points will be used Refer to the Technical Specifications section for VZ AP200 Adapter Plate mounting points Place your monitor face down on a s...

Page 9: ...orrect length for your specific installation If you are using the VZ AP200 Adapter Plate use the B mounting points Refer to the Technical Specifications section for VZ AP200 Adapter Plate mounting points 2 Insert the heads of the M4 screws through the keyhole slots 3 Insert two 2 M4 screws of the proper length for your installation into the bottom mounting points 4 Tighten all M4 screws Do not ove...

Page 10: ...m x 100mm mounting points M4 x 10mm Phillips flat head screws only D 200mm x 200mm mounting points If M4 screws are used M5 washers must be used as well Adjusting the Mount Tension Use a socket wrench and the supplied 14mm socket to loosen or tighten the tension nut Turn the tension nut clockwise to increase tension Turn the tension nut counter clockwise to decrease tension Do not overtighten the ...

Page 11: ... reinforced Proper installation procedure by qualified personnel as outlined in the installation instructions must be adhered to Failure to do so could result in serious personal injury Step 1 Install the VZ CMK01B to the ceiling structure using the four corner mounting holes according to commercial standards Figure 1 Step 2 Use commercially available suitable hardware depending on the installatio...

Page 12: ... SOME STATES DO NOT ALLOW THE EXCLUSION OR LIMITATION OF INCIDENTAL OR CONSEQUENTIAL DAMAGES SO THE ABOVE LIMITATION OR EXCLUSION MAY NOT APPLY TO YOU What Customers Must Do for Limited Warranty Service If you discover a problem that you think may be covered by the warranty you MUST REPORT it in writing to the address below within thirty 30 days Proof of purchase an original sales receipt from the...

Reviews: