background image

VG412


11 


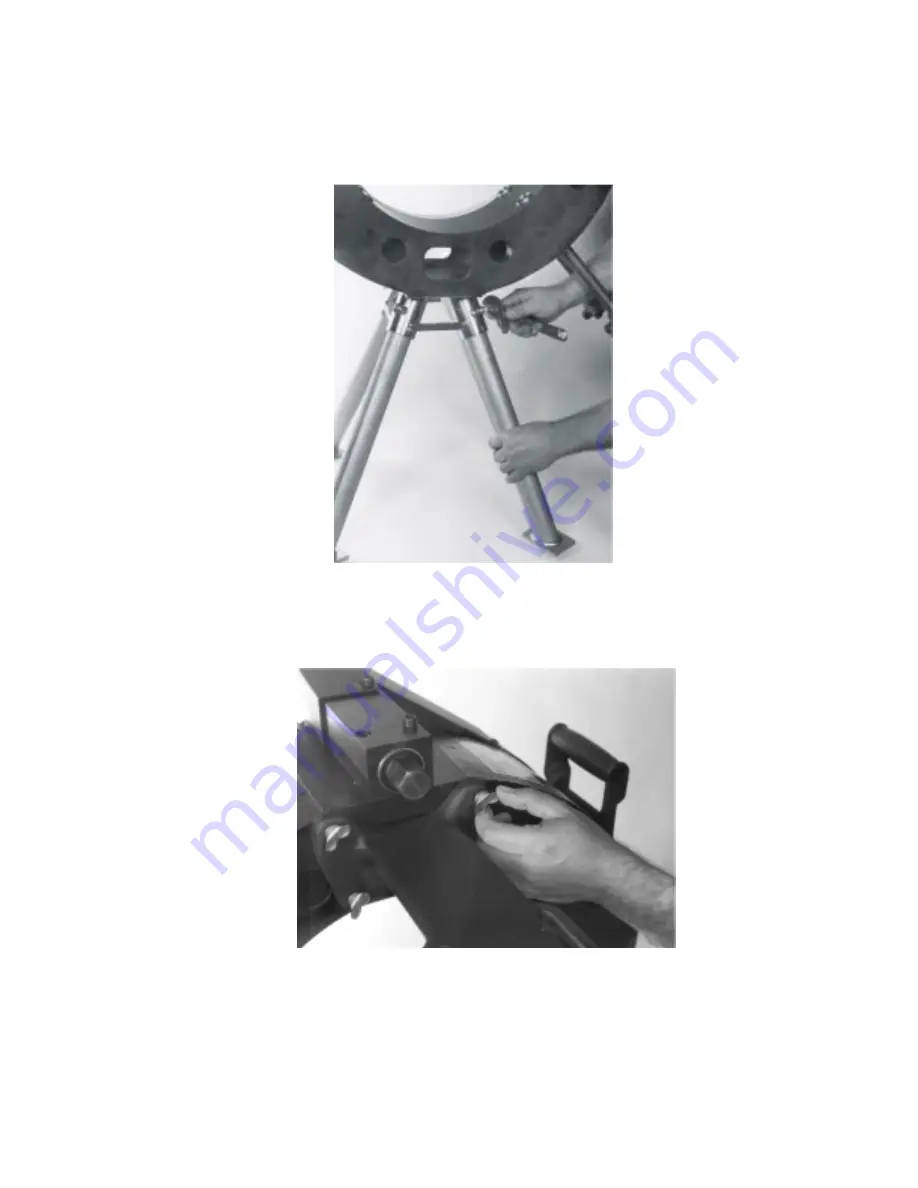
2.  Set tool upright. Adjust legs to achieve a level tool and assure that all four (4) of the legs are resting 

on the floor to prevent the tool from rocking, and tighten with a wrench. 


Figure 4 


3.  Attach the motor mount to the main frame using four (4) wing handle clamp screws. 


Figure 5 


Summary of Contents for VG412

Page 1: ...46046 O...

Page 2: ...IDENTIFICATION 2 OPERATOR SAFETY STRUCTIONS 2 TOOL NOMENCLATURE 6 RECEIVING TOOL 7 TOOL SET UP 9 CUTTING AND GROOVING 24 DISASSEMBLY CLEANING STORING 34 MAINTENANCE 36 TROUBLESHOOTING 39 PARTS ACCESSO...

Page 3: ...ommended for safe operation of the tool The operator is cautioned to always practice Safety First during each phase of use including setup and maintenance of this unit It is the responsibility of the...

Page 4: ...taulic pipe preparation specifications OPERATING TOOL 1 Inspect the equipment Prior to starting the tool check the movable parts for any obstructions Be sure that guards and tool parts are properly in...

Page 5: ...which it was designed 15 Support work Support long pipe with a pipe stand secured to the floor or ground 16 Do not misuse tool Perform only the functions for which the tool is designed Do not overload...

Page 6: ...ize American Wire gauge Cord size selection is based upon tool rating amps and cord length feet Use of a cord size gauge thinner than required will cause a significant voltage drop at the power drive...

Page 7: ...VG412 6 TOOL NOMENCLATURE Figure 1...

Page 8: ...of the rental contract when applicable NOTE Be sure to save original shipping container for return shipment of rental tools Upon receipt of tool make sure all necessary parts are included If any parts...

Page 9: ...utoff blade assembly 9 Two grooving blade assembly 10 One 4 cutoff groove component kit 11 One set D I rigid groove spacer blocks 12 Two tool operating and maintenance manuals TOOL RATING The standard...

Page 10: ...roove 4 through 12 100 300mm pipe from full lengths down to approximately 12 in length Pipe must be adequately supported as the unit is not intended to carry the weight at the pipe Support both ends o...

Page 11: ...ents on page 4 b The space necessary to adequately handle the pipe to be grooved c A level and even surface for tool pipe stand s and footing SET UP TO CUT OFF SHORT PIPES The procedures to set up and...

Page 12: ...achieve a level tool and assure that all four 4 of the legs are resting on the floor to prevent the tool from rocking and tighten with a wrench Figure 4 3 Attach the motor mount to the main frame usin...

Page 13: ...to engage Tighten drive motor chuck with chuck key Tighten wing handle clamp screws to secure motor in place Figure 6 5 Select two 2 riser blocks for the size of pipe to be cut and grooved Attach the...

Page 14: ...ert pipe betweem riser blocks and clamp screws Figure 8 8 Tighten clamp screws on the pipe evenly Pipe must contact both riser blocks squarely and with sufficient force to resist rotation of the pipe...

Page 15: ...f the frame and rotate upward until the gear half is centered on the pinion gear Figure 10 10 Engage the other half of the gear plate over the track rollers and bring the two halves together 11 Engage...

Page 16: ...kwise Tighten screws securely DO NOT have grooving blade assemblies on gear plate while cutting Figure 12 14 Retract motor Rotate gear plate manually completely around the pipe to find the high spot P...

Page 17: ...After two or three revolutions the cutoff blade will contact pipe intermittently and after a few more revolutions will be cutting completely around the O D of the pipe Because the cut started intermit...

Page 18: ...Separate the two halves of the gear plate by loosening the hex nuts at the joint 3 Release the gear plate swing plates and separate the gear halves and remove the lower half from the main frame Then...

Page 19: ...marked on it Figure 17 5 Adjust the clamp screws on the lower half of the frame to at least 1 2 larger than pipe size being cut and grooved 6 Slide the frame over the pipe end near to the point where...

Page 20: ...and grooving operation and retighten if necessary 8 Attach the motor mounting bracket to the rear or the frame Figure 19 9 Attach the motor to the bracket with the wing screws but do not tighten Align...

Page 21: ...cer block that corresponds with size pipe to be cut and grooved 12 Retract cutoff blade for at least 1 2 nominal clearance when attached to the gear plate 13 Attach the cutoff blade assembly on top of...

Page 22: ...pe evenly and with sufficient force to resist rotation of the pipe during cut off and grooving NOTE Check the tightness of the clamp screws throughout the cutting and grooving operation and retighten...

Page 23: ...ng in either direction 21 When the cutoff is complete unplug the power cord to prevent accidental engagement of motor 22 Loosen the wing screws and retract the actuator bar completely 23 With the tool...

Page 24: ...d automatically and will stop grooving when it runs out of preload Stop the tool and add additional preload to complete the groove The groove is finished when the depth stops on groove blade holder co...

Page 25: ...ons 3 cutting and grooving steel pipe CUTTING AND GROOVING 6 12 GRAY DUCTILE PIPE Cutting 1 Use carbide tipped blades for cutting off the pipe to length Use sharp blades as use of dull blades will cut...

Page 26: ...gure 28 5 Proceed with cut off 6 After completing the cut off loosen and move the actuator bar back completely out of the way Do not retract cut off blade 6 12 Grooving 7 For grooving these diameters...

Page 27: ...ter clockwise to retract blade until both set screws are covered 12 Loosen clamp screws C Figure 24 and slide blade holder into the blade block until the blade just clears the high spot on the pipe Ti...

Page 28: ...ary to stop the gear plate and add more preload at the rate of 1 5 to 2 turns of the hand knob clockwise When the groove is complete the depth stops will contact the pipe 360 degrees around the outsid...

Page 29: ...VG412 28 16 Stop the gear plate unplug power drive release the preload on the blades and check groove diameter If groove diameter is not correct repeat steps 8 to 16...

Page 30: ...ND GROOVING GRAY DUCTILE 4 PIPE NOTE When cutting and grooving 4 pipe additional components must be added to the main frame as well as the gear plate Also one grooving head rather than two are used fo...

Page 31: ...from the cutoff assembly by depressing the detent lever and turning crank until holder is completely un threaded Replace standard blade holder with extended blade holder by turning blade holder by han...

Page 32: ...plate with two hex head screws 5 Attach grooving blade holder to extender plate and gear plate using four socket head screws 6 Attach the clamp screw extenders to the end of the clamp screws 7 The 6...

Page 33: ...f chips Figure 38 2 Be sure blade set screws are tight so blades don t slip while under pressure 3 With the tool securely clamped on the pipe rotate the gear plate by hand manually advancing one cutof...

Page 34: ...When cutting ordinarly carbon steel pipe the chip generated by the cutoff blades may occasionally accumulate in the cut and cause the blades to jam stopping the machine If this happens 1 take foot off...

Page 35: ...slide the motor away from pinion block by loosning the wing handle clamp screws beneath motor CAUTION When motor is disengaged the gears may rotate No one should be near the gears when the motor is be...

Page 36: ...ears with a cloth or brush CAUTION Sharp cutting and grooving tool blades could cut fingers Wear gloves 6 Remove tool from pipe Lift it with a hoist if available If a hoist is not available two people...

Page 37: ...CARE After every 8 hours of operation lubricate the machine 1 The eight radial bearings 275727 require periodic attention as follows Check tightness of nut 275789 on shoulder screw 275726 Retighten i...

Page 38: ...d in the tables below The number of cuts possible before sharpening will vary with pipe material condition diameter wall thickness exterior coating and interior lining DO NOT attempt to cut bevel or g...

Page 39: ...VG412 38 GROOVING BLADES Suggested Reshaping Schedule Pipe Size Cast Iron Ductile Steel 12 22 18 10 10 28 24 14 8 40 34 20 6 55 15 28 4 70 60 40 Figure 40...

Page 40: ...bearings Add 1 2 turn to grooving blade preload Continue grooving Chatter will clean up at end of groove Check service bearings Blade breakage Dull blades Improper setting or adjustment Loose or worn...

Page 41: ...4 0 056 1 42 0 031 0 79 0 625 15 88 0 375 9 53 5 830 148 08 0 022 0 56 0 085 2 16 0 219 5 56 61 2 6 500 165 1 0 063 1 60 0 031 0 79 0 625 15 88 0 375 9 53 6 330 160 78 0 022 0 56 0 085 2 16 0 219 5 5...

Page 42: ...for sizes 8 O D and above measured from true square line COLUMN 3 Gasket seat The pipe surface shall be free from indentations roll marks and projections from the end of the pipe to the groove to pro...

Page 43: ...6 169 06 0 020 0 51 0 120 3 05 0 38 9 7 0 34 8 6 8 200 9 05 229 9 0 060 1 52 0 060 1 52 0 950 24 13 0 500 12 70 8 781 223 04 0 025 0 64 0 145 3 68 0 41 10 4 0 36 9 1 10 250 11 10 28 19 0 060 1 52 0 06...

Page 44: ...rm depth for entire pipe circumference Groove must conform to C diameter shown Ovality or out of roundness must lie within specified tolerances Min Standard wall thickness that should be grooved Toler...

Page 45: ...be found stamped on the metal tag riveted to body 4 Where to send the part s Please provide company name and address 5 To whose attention to send the parts s 6 Purchase Order Number for the part Order...

Page 46: ...8 Remington Road Odessa TX 79763 Local Tel 915 332 1489 Local Fax 915 332 4924 ROCKY MOUNTAIN 5045 Paris Street Denver CO 80239 Cust Care 800 742 5842 Cust Fax 888 448 3528 PACIFIC NORTH 22633 83rd Av...

Reviews: