Vertiv
|
NetSure™ 2100 Series -48 VDC Power System Installation Manual (IM582138000)
|
Rev. C
22
Installing a List 93, 94 Battery Tray and Optional Battery Tray Circuit Breaker
Perform the following procedures to install a battery tray and optional battery tray circuit breaker.
DANGER!
The relay rack must be securely anchored to the floor before a battery tray is installed.
Battery Tray Installation
Procedure
1.
To install a battery tray, perform the procedure detailed in
. See also
, and
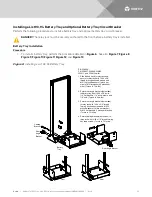
Figure 6:
Installing a List 93, 94 Battery Tray
Battery
Tray
Rear
Angle
Bracket
Rear Angle Bracket
Cabling
Bracket
Front
Rear
1. Slide battery tray into relay rack and
secure to relay rack with 12-24 x 3/4"
thread forming hex head screws and
#10/12 ground washers (1 place per
side) or #12 flat washers (3 places per
side). (Torque to 70 in-lbs).
2. Secure rear angle brackets (both sides)
to battery tray with 1/4-20 x 3/4” bolts,
1/4” flat washers, 1/4” lock washers, and
1/4” nuts. (Torque to 84 in-lbs).
3. Secure rear angle brackets (both sides)
to relay rack with 12-24 x 3/4" thread
forming hex head screws and #10/12
ground washers (1 place per bracket)
or #12 flat washers (1 place per bracket).
(Torque to 70 in-lbs).
4. Secure cabling brackets (both sides) to
relay rack with 12-24 x 1/2" thread forming
hex head screws. (Torque to 70 in-lbs).
P/N 559806:
P/N 559807, 559808, 559810,
559811, and 559812 similar.


