background image

3.5.2 Temperature/Humidity Sensor Installation

Optional Liebert

®

SN temperature/humidity sensors are available to assist in monitoring conditions in the

rack. Liebert SN sensors are designed for installation in Vertiv™ racks without tools, but each may be
placed in any area to monitor temperature and humidity levels. Each connects to the RPC2
communications module, which makes readings available to other monitoring systems.

To install a sensor in a rack:

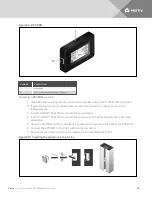
1. Insert the sensor bracket base into one end of the sensor support.
2. Snap the sensor into the other end of the sensor support.
3. Choose where in the rack to install the sensor assembly.

NOTE: Vertiv™ recommends placing the sensor in the area of the rack that is likely to be warmest. That
location helps determine extreme conditions that can cause equipment damage.

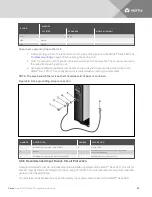
4. Hold the sensor bracket on a T-slot on the Vertiv™ rack frame where the sensor will be placed.
5. Insert the included quarter-turn fastener through the rectangular hole in the sensor bracket

base and into the T-slot.

6. Turn the fastener clockwise 90 degrees, completing a quarter of a turn.
7. Route the sensor cable to the RPC2 communications module and insert it into the card’s

external sensor port.

NOTE: For more information, see the RPC2 user manual, SL-20841, available at

http://www.VertivCo.com

Vertiv

| Vertiv™ MPH2 Rack PDU Installer/User Guide

24

Summary of Contents for MPH2

Page 1: ...Vertiv MPH2 Rack PDU Installer User Guide ...

Page 2: ...r any installation or operational issues with your product check the pertinent section of this manual to see if the issue can be resolved by following outlined procedures Visit https www VertivCo com en us support for additional assistance ...

Page 3: ...ng Input power Cords without Conduit 13 3 1 2 Attaching Input power Cords with Conduit 14 3 2 Tool less Mounting 16 3 3 Installing a MPH2 Rack PDU in a Vertiv Rack 16 3 3 1 Mounting Hardware and Tools Required 16 3 3 2 Mounting the Vertical MPH2 Rack PDU 17 3 3 3 Mounting the Horizontal MPH2 Rack PDU 17 3 3 4 Mounting a Horizontal MPH2 Rack PDU on Vertical Frame Member with Aluminum Extrusions 18 ...

Page 4: ...ation of the On board display 32 4 4 View Active Alarms 32 4 4 1 Silence an Audible Alarm 32 4 5 View Branch level Information 33 4 6 View Receptacle level Information 33 4 7 View Sensor Information 35 4 8 Opening and Closing Circuit Breakers 36 Appendices 39 Appendix A Specifications 39 Appendix B Troubleshooting 41 Appendix C Additional Troubleshooting by Plug Type 43 Vertiv Vertiv MPH2 Rack PDU...

Page 5: ...without case ventilation 32 F to 140 F 0 C to 60 C for 40A and 48A input models with case ventilation Install the MPH2 Rack PDU in a clean environment free of conductive contaminants moisture flammable liquids combustible gases and corrosive substances The MPH2 Rack PDU must be installed in a restricted access location A restricted access location is an area where access is possible only through t...

Page 6: ...t breaker 1 1 Installation Recommendations Elevated Operating Ambient Temperature If installed in a closed or multi unit rack assembly the operating ambient temperature of the rack environment may be greater than room ambient temperature Therefore consideration should be given to installing the equipment in an environment compatible with the maximum ambient temperature Tma specified by the manufac...

Page 7: ...ant to Part 15 of the FCC Rules Operation is subject to the following two conditions This device may not cause harmful interference This device must accept any interference received including interference that may cause undesired operation NOTE This equipment has been tested and found to comply with the limits for a Class A digital device pursuant to Part 15 Subpart B of the FCC Rules These limits...

Page 8: ... the literature accompanying the appliance Dangerous Voltage Warns about the presence of uninsulated dangerous voltage within the product s enclosure that may be of sufficient magnitude to constitute a risk of electric shock to persons Power On Indicates the principal On Off switch is in the On position Power Off Indicates the principal On Off switch is in the Off position Protective Grounding Ter...

Page 9: ...tic breakers For all UL listed models the maximum cord and plug connected loading is limited to 80 of the input current rating as required by UL and in accordance with the National Electric Code Low profile circuit breakers are used on all 0U rack PDUs with two or three branch circuits Standard profile circuit breakers are used on horizontal models and on certain vertical models that have six bran...

Page 10: ...ftware Liebert Nform software which adds group based receptacle management Liebert SiteScan software Vertiv MCT Mass Configuration and Firmware Update software Figure 2 1 Vertical Rack PDU Configuration ITEM DESCRIPTION ITEM DESCRIPTION 1 Vertical rack PDU 6 Serial appliance 2 Connected equipment 7 RPC basic display module BDM 3 Case ventilation both sides Optional 8 Monitoring station 4 Rack PDU ...

Page 11: ...criptions 2 6 General Characteristics The following are general characteristics of the rack PDU Input ampacities include 16A or 32A for CE Marked versions and 12A to 48A for UL Listed versions Single phase and three phase Input voltages include 100 120 VAC 120 208 VAC 200 240 415 VAC Receptacle types include NEMA 5 20 IEC 60320 C13 and IEC 60320 C19 Input power connection supports a highly flexibl...

Page 12: ...nctions and features of the rack PDU For details on operating the rack PDU through the RPC2 communications module refer to the RPC2 Communicatons Module Installer User Guide SL 20841 The document is available at Vertiv s web site www VertivCo com Figure 2 3 Rack PDU Major Monitoring and Management Features ITEM DESCRIPTION ITEM DESCRIPTION 1 Serial port 5 Array link management port 2 USB port 6 Ne...

Page 13: ...additional information about the on board LCD see Operation on page 25 2 8 4 Power components The number of receptacles and circuit breakers depend on the model of the rack PDU For example units with a B as the fourth character in the model name do not have LEDs at their receptacles Figure 2 4 Type B Rack PDU Model Example ITEM DESCRIPTION 1 Branch identification 2 Receptacle identification Table ...

Page 14: ...d Manually tripping a breaker requires a small flat blade such as a screw driver seeOpening and Closing Circuit Breakers on page 36 Low profile circuit breakers are used on all rack PDU with two or three branch circuits less than 240 VAC rating in a line neutral configuration Standard profile circuit breakers are used on rack PDU with six branch circuits or having a 240 VAC rating Each type of cir...

Page 15: ...equipped with either a factory installed input power cord or hard wired connections The hard wired connection will be at one end of the unit A terminal block in the hard wired connection compartment is coded to aid in making the connections A collar secures the input wire providing stain relief for the terminal block connections See Disassembly to install an input power cable on page 14 Vertiv Ver...

Page 16: ...Vertiv Vertiv MPH2 Rack PDU Installer User Guide 12 This page intentionally left blank ...

Page 17: ... are de energized before working with exposed conductors 1 Remove the end cap It is held in place with two T10 Torx screws 2 Remove the terminal block cover 3 Loosen the strain relief collar It is held in place with two Phillips head PH1 screws 4 Remove a section of the outer jacket and strip the insulation from the individual wires as required to fit into the terminal block Recommended stripping ...

Page 18: ...minal block Recommended stripping length for MPH2 Rack PDU units rated less than 32 A is 9 mm for MPH2 Rack PDUs rated at 40 A or higher a strip length of 11 mm is recommended 5 Slip the stripped wire through the conduit connector through the metal end plate through the locknut and into the terminal block cavity 6 Loosen the terminal block screws 7 Insert the wires into the terminal block accordin...

Page 19: ...wer cable in conduit Figure 3 3 NUMBER DESCRIPTION NUMBER DESCRIPTION 1 Terminal block cover 5 Terminal block labels 2 Filler cover 6 Metal end plate attached with 4 screws 3 Terminal block screws 7 Conduit connector field supplied and locknut 4 Terminal block 8 Conduit cable not shown UNITS MPH2 RACK PDU INPUT CURRENT RATING 32 A 32 A Metric 4 mm 10 mm Imperial US Standard 10 AWG 6 AWG Table 3 1 ...

Page 20: ...re Tighten the screw attaching the mounting button to 17 7 lb in 2 Nm NOTE Tool less mounting brackets are not supplied A range of brackets for Vertiv and other manufacturers racks are available as accessories Figure 3 4 Tool less mounting NUMBER DESCRIPTION 1 Torx screw 2 Button mount 3 Insert button mount into keyhole slot 3 3 Installing a MPH2 Rack PDU in a Vertiv Rack 3 3 1 Mounting Hardware a...

Page 21: ...ing nuts into the appropriate T slot on the frame member Position the spring nuts to accommodate screws inserted through slots in the brackets To move the spring nuts press down on each with a small pointed object and slide each into position 5 Hold the PDU in place and attach the top of the unit to the rack with tool less fasteners 6 Tighten the screws using a torque setting of 46 lb in 5 2 Nm 7 ...

Page 22: ...PDU on Vertical Frame Member with Aluminum Extrusions 1 Choose a position in the rack for the PDU and install four spring nuts into the groove 2 Use a level to check if the horizontal plane is maintained 3 Set the distance to match the holes on the PDU and hold the MPH2 Rack PDU over the desired position now with the spring nuts 4 Route the input cable through the rack as desired 5 Insert screws a...

Page 23: ...at have attached input power cords and units that have hard wired input power cords The strap supplements the internal grounding conductor of the attached power supply cord NOTE When connecting multiple Class 1 devices the ground leakage currents may be significant The additional external ground connection helps reduce ground impedance between the MPH2 PDU and the rack enclosure The rack grounding...

Page 24: ...he area beneath the lock washer should be void of paint or corrosion Figure 3 8 Rack grounding strap connection NUMBER DESCRIPTION NUMBER DESCRIPTION 1 Ground wire connection screw M6 x 12 4 Lock washer 2 Washer 5 Ground wire connection on MPH2 Rack PDU location may vary 3 Ground wire connector to MPH2 Rack PDU 6 Ground wire connector to rack 3 3 6 Recommended Input Branch Circuit Protection A fie...

Page 25: ...ment power consumption will not overload the MPH2 Rack PDU To connect equipment to a MPH2 Rack PDU 1 Make sure that input power is installed in accordance with national and local electric codes 2 Verify that all equipment is turned off 3 If the MPH2 Rack PDU will be monitored over a network connect an Ethernet cable to the Network port on the RPC2 4 Route the equipment power cables to the MPH2 Rac...

Page 26: ...w VertivCo com 3 5 Installing Optional Items The following items may be added to an MPH2 Rack PDU system but are not required RPC Basic Display Module Liebert SN temperature humidity sensors 3 5 1 RPC Basic Display Module Installation The RPC Basic Display Module BDM provides local display of parametric data including electrical status temperature and humidity for all connected MPH2 Rack PDUs Disp...

Page 27: ... in the following figure 3 Insert the MPH2 Rack PDU screw into the spacer sleeve 4 Insert the MPH2 Rack PDU screw into the spring nut and tighten securely with a flat head screwdriver 5 Hang the RPC BDM on the screw with the hooded mounting slot on the back of the RPC BDM 6 Connect the RPC BDM to the RPC2 with an Ethernet cable 7 Be certain to connect the cable to the display port on the MPH2 rack...

Page 28: ... 3 Choose where in the rack to install the sensor assembly NOTE Vertiv recommends placing the sensor in the area of the rack that is likely to be warmest That location helps determine extreme conditions that can cause equipment damage 4 Hold the sensor bracket on a T slot on the Vertiv rack frame where the sensor will be placed 5 Insert the included quarter turn fastener through the rectangular ho...

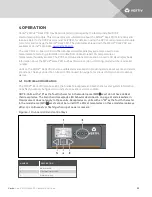
Page 29: ...H2 Rack PDU and an audible alarm also assist in providing alerts about events and alarm conditions The keys under the on board LCD are used to navigate to various information and to silence alarms 4 1 Controls and Indicators The MPH2 Rack PDU also has LEDs that indicate receptacle and branch status and system information LEDs flash pulse or change colors to indicate an event or alarm condition NOT...

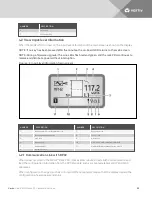
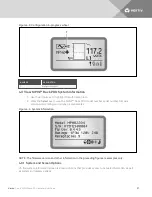
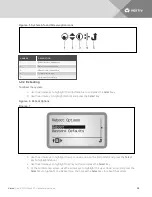
Page 30: ...ER DESCRIPTION 1 Input level metered information icon 7 Receptacle icon 2 Bar graph of input current 8 Sensor icon 3 Link icon 9 Alarm icon 4 Input voltage 10 Amperes used until alarm threshold 5 Voltage phase 11 Unit identification always shows unit 1 6 Information icon 4 2 1 Communication Link with RPC2 When power is cycled to the MPH2 Rack PDU it takes a few minutes to establish communication a...

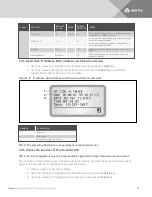
Page 31: ...k PDU model number serial number firmware version power rating and number of receptacles Figure 4 4 System information NOTE The firmware version and other information in the preceding figure are examples only 4 3 1 System and Screen Options On the system information screen is a menu of icons that provides access to network information as well as system and display options Vertiv Vertiv MPH2 Rack P...

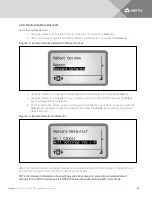
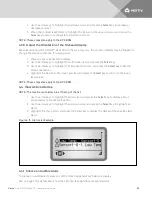
Page 32: ... Use the arrow key to highlight Reboot and press the Select key Figure 4 6 Reboot Options Figure 4 7 3 Use the arrow keys to highlight the up or down arrow on the bottom left and press the Select key to highlight Reboot 4 Use the arrow keys to highlight the Play button and press the Select key 5 At the confirmation screen use the arrow keys to highlight the up or down arrow and press the Select ke...

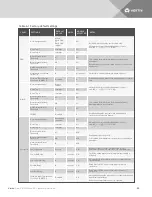
Page 33: ...ey to highlight Restore Defaults 5 At the confirmation screen use the arrow keys to highlight the up or down arrow and press the Select key to highlight Yes Restore Defaults then press the Select key to restore the system default settings Figure 4 9 Restore Defaults Confirmation When the Restore to Factory Defaults command is initiated via the RPC2 module clients the MPH2 rack PDU settings are ret...

Page 34: ... 0 All SWOCP Disabled R Conditionally applies to all unlocked and unloaded receptacles only for this branch Receptacle User Assigned Label Receptacle number All Allowed characters include alphanumeric space and _ Asset Tag 1 empty All Asset Tag 2 empty All Overcurrent Alarm Threshold 95 M R Configurable per receptacle calculated from maximum receptacle current rating on nameplate Overcurrent Warni...

Page 35: ...ey to highlight the Network icon and press the Select key to view the IP address MAC address firmware time and date Figure 4 10 IP address MAC address and Firmware Information Example NUMBER DESCRIPTION 1 IP address 2 MAC address 3 Agent firmware type and version NOTE The preceding illustration is an example of network information 4 3 5 Adjust the Contrast of the On board LCD NOTE Contrast adjustm...

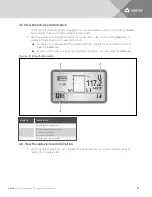
Page 36: ... the Select key to flip the screen orientation 4 Highlight the Return to Previous Level icon and press the Select key to return to the input level screen NOTE These steps also apply to the RPC BDM 4 4 View Active Alarms NOTE The most recent alarms are at the top of the list 1 Use the arrow keys to highlight the Alarm icon and press the Select key to display a list of active alarms on the MPH2 rack...

Page 37: ...elected branch highlight the Information icon and press the Select key To return to the previous level view highlight the Return icon and press the Select key Figure 4 12 Branch information NUMBER DESCRIPTION 1 Branch level information icon 2 Branch circuit breaker status icon I closed circuit breaker O open circuit breaker 3 Branches two shown A and B 4 6 View Receptacle level Information 1 At th...

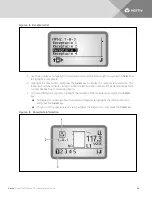
Page 38: ...the bottom left and the number of the selected receptacle number flashes See the following figure 4 To view a different receptacle highlight the number of the receptacle and press the Select key To display more details about the selected receptacle highlight the Information icon and press the Select key To return to the previous level view highlight the Return icon and press the Select key Figure ...

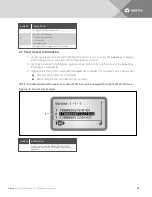
Page 39: ...s to highlight an up down arrow at the bottom left and press the Select key to highlight a receptacle 3 Highlight the Play button and press the Select key to display the humidity sensor information Percentage and severity of humidity Sensor identification and label serial number NOTE The default label is the sensor s serial number but can be changed through the Web interface Figure 4 15 Sensor Lis...

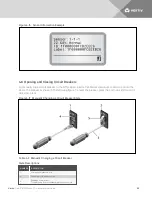
Page 40: ... the following figure To reset the breaker press the end nearest ON until it clicks into place Figure 4 17 Manually Changing a Circuit Breaker State NUMBER DESCRIPTION 1 Low profile breaker switch 2 Standard profile breaker switch 3 Flat blade screw driver To trip breaker low or standard profile press screw Table 4 2 Manually Changing a Circuit Breaker State Descriptions Vertiv Vertiv MPH2 Rack PD...

Page 41: ...NUMBER DESCRIPTION driver into slot 4 Press here to reset low profile breaker 5 Push top of breaker switch in to reset standard profile breaker Vertiv Vertiv MPH2 Rack PDU Installer User Guide 37 ...

Page 42: ...Vertiv Vertiv MPH2 Rack PDU Installer User Guide 38 This page intentionally left blank ...

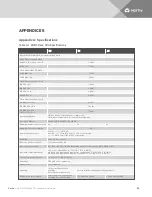
Page 43: ...Current 1 5 0 01 A from 1 to 10 of unit rating 1 0 01 A from 10 to 125 of unit rating Insulation Class I reinforced SELV Dielectric Electric Strength Tested up to 4242 VDC Overcurrent Protection UL489 Listed CSA TUV CCC hydraulic magnetic circuit breaker 20 A 5000 A A I C Operating Temperature Range 32 A or less input models 41 F to 140 F 5 C to 60 C 40 A and 48 A input models without case ventila...

Page 44: ... 2013 EMC Standards vary by region FCC Class A Part 15 Industrial EN55022 2006 A1 2007 Class A Industrial EN55024 1998 A1 2001 A2 2003 Class A Industrial IEC61000 3 2 2014 edition 3 IEC61000 3 3 2013 edition 3 IEC61000 4 2 3 4 5 6 8 11 Note A temporary loss of touch key functionality may occur for sufficiently large radio frequency fields induced through the input power supply cord Agency Approval...

Page 45: ...reshold settings Red Fast ü Overcurrent Alarm Check for changing load conditions Check overcurrent alarm threshold settings Undercurrent Alarm Check for removal of load Check undercurrent alarm threshold settings Red All LEDs Pulse Branch Circuit Breaker Open Check for changing load conditions confirm circuit breaker actuator is closed If open correct loading condition before pressing circuit brea...

Page 46: ...ingle low voltage phase may cause one or more undervoltage alarms The undervoltage alarm is factory set to 10 of the minimum input voltage range on the nameplate it cannot be changed Red Fast ü Overcurrent Alarm Check for changing load conditions Check overcurrent alarm threshold settings Undercurrent Alarm Check for removal of load Check undercurrent alarm threshold settings Green Slow Overcurren...

Page 47: ...ü ü L1 N L1 L2 L1 L2 NEMA L15 20P 3P4W ü ü ü ü L1 L2 L2 L3 L3 L1 NEMA L15 30P 3P4W ü ü ü ü L1 L2 L2 L3 L3 L1 NEMA L21 20P 3P5W ü ü ü ü L1 L2 L2 L3 L3 L1 3P5W ü ü ü ü ü L1 N L1 L2 L2 N L2 L3 L3 N L3 L1 NEMA L21 30P 3P5W ü ü ü ü L1 L2 L2 L3 L3 L1 3P5W ü ü ü L1 N L2 L3 L2 L3 3P5W ü ü ü ü ü L1 N L1 L2 L2 N L2 L3 L3 N L3 L1 NEMA L22 30P 3P5W ü ü ü ü L1 N L2 N L3 N L1 N L2 N L3 N CS8365C 50A 3P4W ü ü ü ...

Page 48: ...Vertiv Vertiv MPH2 Rack PDU Installer User Guide 44 This page intentionally left blank ...

Page 49: ......

Page 50: ...logos referred to are trade names trademarks or registered trademarks of their respective owners While everyprecaution has been taken to ensure accuracyand completeness herein VertivCo assumes no responsibility and disclaims allliability for damages resulting from use of this information or for any errors or omissions Specifications are subject to change without notice SL 20860_REV6_11 17 590 1330...

Reviews: