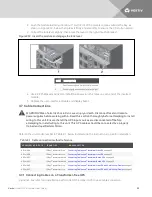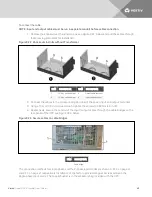
4. Unscrew the 10 screws, 5 each side, on the front of the side panels of the UPS frame, and use
the screws to attach the brackets to each side of the UPS frame, as shown in Figure 3.7 below.
Figure 3.7 Install the brackets
ITEM
DESCRIPTION
1
Brackets (1 each side)
2
Screws (8 places)
5. Push the Liebert APS frame slowly, up the guide rails into the enclosure from the front. The
rear of the UPS goes into the rack first when installing through the front of the rack.
6. Using 8 panel screws, 4 in each bracket, secure the UPS frame to the rack posts.
NOTE: You may need to adjust the leveling feet to align the holes.
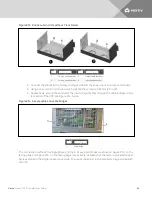
7. Use 4 screws to install the metal plate (accessory in the rack-mount kit) on the corresponding
position on the lower-front part of the UPS frame as shown in Figure 3.8 below.
8. Insert the plastic bezel into the square holes of the metal plate, see Figure 3.8 below.
Figure 3.8 Metal plate and Square holes for bezel
ITEM
DESCRIPTION
1
Square hole (4 places)
2
Metal plate
3
Screw (4 places)
Vertiv
| Liebert® APS™ Installer/User Guide |
28
Summary of Contents for Liebert APS series
Page 1: ...Liebert APS 5 20 kVA Modular UPS Installer User Guide...
Page 6: ...Vertiv Liebert APS Installer User Guide 6...
Page 10: ...Vertiv Liebert APS Installer User Guide 10 This page intentionally left blank...
Page 50: ...Vertiv Liebert APS Installer User Guide 50 This page intentionally left blank...
Page 76: ...Vertiv Liebert APS Installer User Guide 76 This page intentionally left blank...
Page 80: ...Vertiv Liebert APS Installer User Guide 80 This page intentionally left blank...
Page 109: ......


