49
General Sharpening Procedures
Viewed head-on, it would look exactly the same as the
gouge in
Drawing 1
on the previous page, except now
the larger-radius circle, not the smaller-radius circle,
would be the cutting edge (see
Drawing 7
below).
This shows that the need to be able to change direction
while cutting can be maintained only by having a decent
amount of the bevel on the outside of the gouge. But so
far we have been a bit infl exible in the analysis. Why
not change the amount of bevel transfer as we change
position on the gouge? Taking our earlier example where
we transfer 10° of the bevel to the inside so that we could
get a 15° attack angle, we see that we could eliminate
a lot of problems if we progressively transferred bevel
from the outside to the inside until it was totally in-
cannel at the top. Viewed head-on the gouge would look
something like
Drawing 8
on the next page. Raised to a
15° angle it would look something like
Drawing 9
.
This looks fi ne, but there are a couple of cautionary
notes. First, the upper edges are quite weak with only
10° included angles. Second, the gouge would not look
exactly like
Drawing 9
because we have been playing
fast and loose with geometry. In fact, if you had a gouge
ground like one in
Drawing 8
, raised to 15° it would
look more like
Drawing 10
.
There would still be some wedging action, because the
cutting edge of the gouge would still be inside the overall
profi le presented to the wood. The only way to grind the
gouge that would look exactly like
Drawing 9
would be
to have constantly changing bevel angles both inside and
out. The outside bevel would start at 15° and be gradually
reduced until it would reach 0° just as it disappeared. In
the same manner, the inside bevel would start at 10° and
continue to increase until it reached 25° at the top of the
gouge. It is exactly this sort of transitional bevel both
inside and outside that you should strive for when you
sharpen carving gouges.
You do not have to follow the above examples slavishly
when sharpening your carving gouges, but understanding
the principles involved lets you understand what is
happening when you are cutting wood. This prepares you
for the day when you switch from carving basswood to
carving cherry and wonder why your tools are suddenly
not working the way you expect them to. You might fi nd
that you have been depending on wood compression to
make a number of your best moves and that the much
more unforgiving cherry will not let you make those
moves. Just as you might have to increase the bevel
angles to keep edges from crumbling, you might have to
pay a lot more attention to relief angles so that you can
retain some maneuverability in cherry.
At the other end of the scale, if you are always going to be
carving softwoods of consistent density, all of the bevel
angles used in the examples are too great. You will get a
much better fi nish if you lower them to something closer
to 15° in total. The low bevel angles will give you a much
smoother fi nish with less fi ber pulling and crushing.
As a general rule, carving gouges are out-cannel and
pattern-maker’s gouges are in-cannel. Firmer gouges,
which are heavier than carving gouges and shorter than
patternmaker’s gouges, can be either. The primary use
for an in-cannel gouge is to make a straight groove of a
known radius. This is important in patternmaking, where a
shaft or similar machinery feature may have to fit into the
groove of the casting made from the pattern. The same
thing is true for millwrights who may have to make pillow
blocks for shafts and would want in-cannel gouges for
good control and a long straight cut.
The increased popularity of routers and the availability of
low-cost large-diameter bits have virtually elimi nated the
demand for in-cannel gouges. They are so rarely used
today that the term "gouge" is generally understood to
mean an out-cannel gouge. In fact, to many people the
term "cannel" is new to their vocabulary.
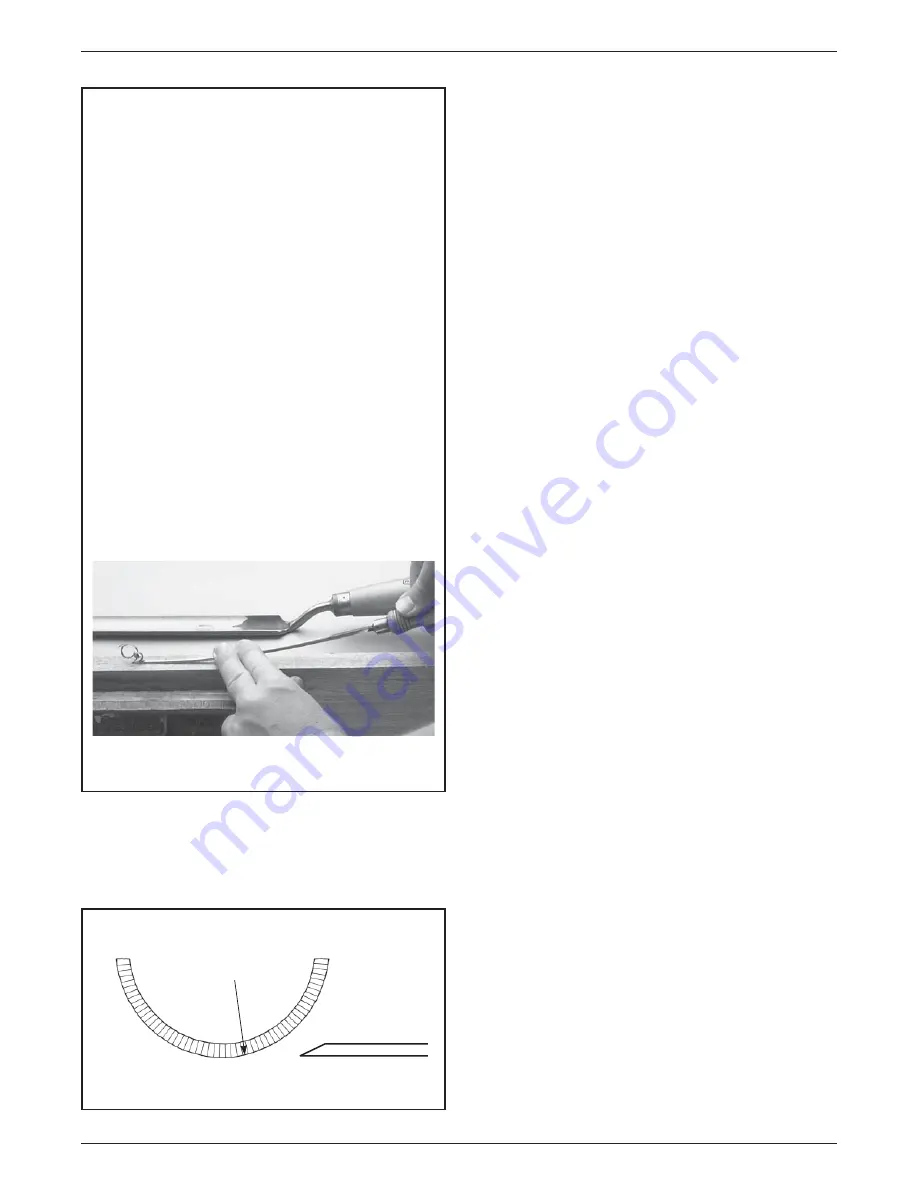
I bought the small in-cannel gouge being used in the
photo below at some long-forgotten tool sale. It is very
flexible and can be used just like a cranked-neck gouge.
With just a breath of back bevel on it (in this case, back
bevel means out-cannel) to compensate for the bend, it
will cut dead true on any flat surface. It would be a fairly
straightforward matter to make small gouges like this out
of drill rod; only the tip would have to be shaped.
In-Cannel and Out-Cannel Gouges
A slim, flexible in-cannel gouge can perform the same
function as a cranked-neck gouge.
7. Gouge viewed head-on (bevel inside)
In-Cannel Gouge
Cutting edge
Summary of Contents for Mk.II
Page 6: ...vi Veritas Mk II Power Sharpening System ...
Page 14: ...8 Veritas Mk II Power Sharpening System ...
Page 20: ...14 Veritas Mk II Power Sharpening System ...
Page 33: ...27 Exploded Assemblies Master Parts List 5 3 13 9 7 2 14 24 21 1 6 22 20 19 18 17 16 15 23 4 ...


