VTSSD4
V. 01
–
15/05/2014
9
©Velleman nv
9.4
Tip Maintenance
The soldering uses extremely high temperatures. Make sure that the unit is switched off and has cooled
down for maintenance purposes.
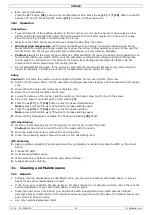
Remove the tip and clean it after heavy or moderate use. We recommend cleaning the tip daily if the
station is used frequently. Remove excess solder in the tip retaining assembly to prevent the tip from
clogging.
The supplied soldering and desoldering tips are made of copper covered with a layer of iron. They will retain
their projected life span if used properly.
Always tin the tip before returning it to the holder, before turning off the station, or before storing it for
long periods. Wipe the tip on a wet sponge or use the included tip cleaner before activating the device.
Using excessive temperatures (more than 400 °C or 750 °F) will shorten the life span of the tip.
Do not exercise excessive pressure on the tip or rub the joint with the tip while soldering or desoldering. It
does not improve the heat transfer and may damage the tip.
Apply solder to the joint, not the tip, when soldering. The flux is caustic by nature and eats away the tip.
Never clean the tip with a file or with abrasive materials.
Do not use flux containing chloride or acid. Use only resinous fluxes.
If an oxide film has formed, you can remove it by buffing carefully with a 600
–
800 grit emery cloth or by
using isopropyl alcohol and then applying a new protective layer of solder.
For new tips: set the temperature to 250 °C (482 °F). When the temperature is reached, tin the tip, and
allow it to idle for three minutes. Then set the desired soldering or desoldering temperature and work
normally.
Important:
Remove and clean the tip daily. Remove excess solder from the barrel nut assembly when
installing a new tip, otherwise the tip may be fused to the heating element or to the retaining assembly.
9.5
Possible Causes of Loss of Suction
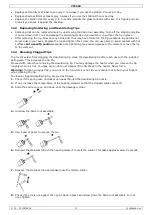
Use the procedure outlined below to determine whether the loss of suction is due to the tip, to the solder
collector, the tube, or the in-line filters.
Warning!
Set the power switch in the off position and allow the iron to cool before executing the procedure
below.
1.
Disconnect the vacuum tube from the fitting on the front panel. Place your finger over the hole and depress
the vacuum switch. You should now have a strong vacuum. If not, return the station to the point of sale to
have the pump repaired.
2.
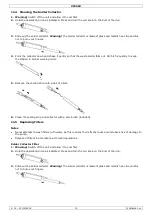
Disconnect the in-line filters from the iron assembly. Depress the vacuum switch. Replace the filling of the
in-line filters if there is little suction, or if the filters are discoloured.
3.
Remove the solder collector from the desoldering iron assembly. Place your finger over the hole of the
collector and depress the vacuum switch. Clean or replace the collector tube in case of insufficient suction.
4.
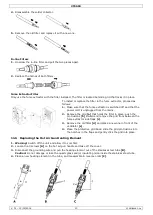
Depress the vacuum switch and clean the tip with the included spring wire if there is no suction. See
Cleaning Clogged Tips
for more information.
10.
Using the Hot Air Gun
10.1
Parameter Settings
1.
Switch on the station
[1]
.
2.
Press and hold the SET button
[21]
for at least 3
seconds until “—
—
—” flashes on the display. Use the
▲
button
[17]
to enter the password “010” (default) and press the SET button
[21]
to enter the setup
menu. An incorrect password will return the station to normal operation mode (temperature indication).
The display shows “F
-
0”.
3.
Press the
▲
[17]
or
▼
[18]
button to select a mode. If you do not press a button within 15 seconds, the
device returns to normal operation mode.
F-0
: exit menu mode
Press the SET button when the display shows F-0 to exit the setup menu and return to normal operation
mode.
F-1
: password mode
If password mode is enabled, you cannot change the temperature and airflow settings on the station unless
you know the password.
Press the SET button once to enter password mode. Press the
▲
[17]
or
▼
[18]
button to switch between
000 (password mode disabled) and 100 (password enabled). Press the SET button
[21]
to return to the
setup menu.


