background image

F7 Rename:

This is used to re-name the file selected or simply identified using the keyboard keys and the 

/-

push but-

tons. The following remain enabled:

F5 Escape:

This cancels the procedure.

F10 Exec:

This confirms the procedure.

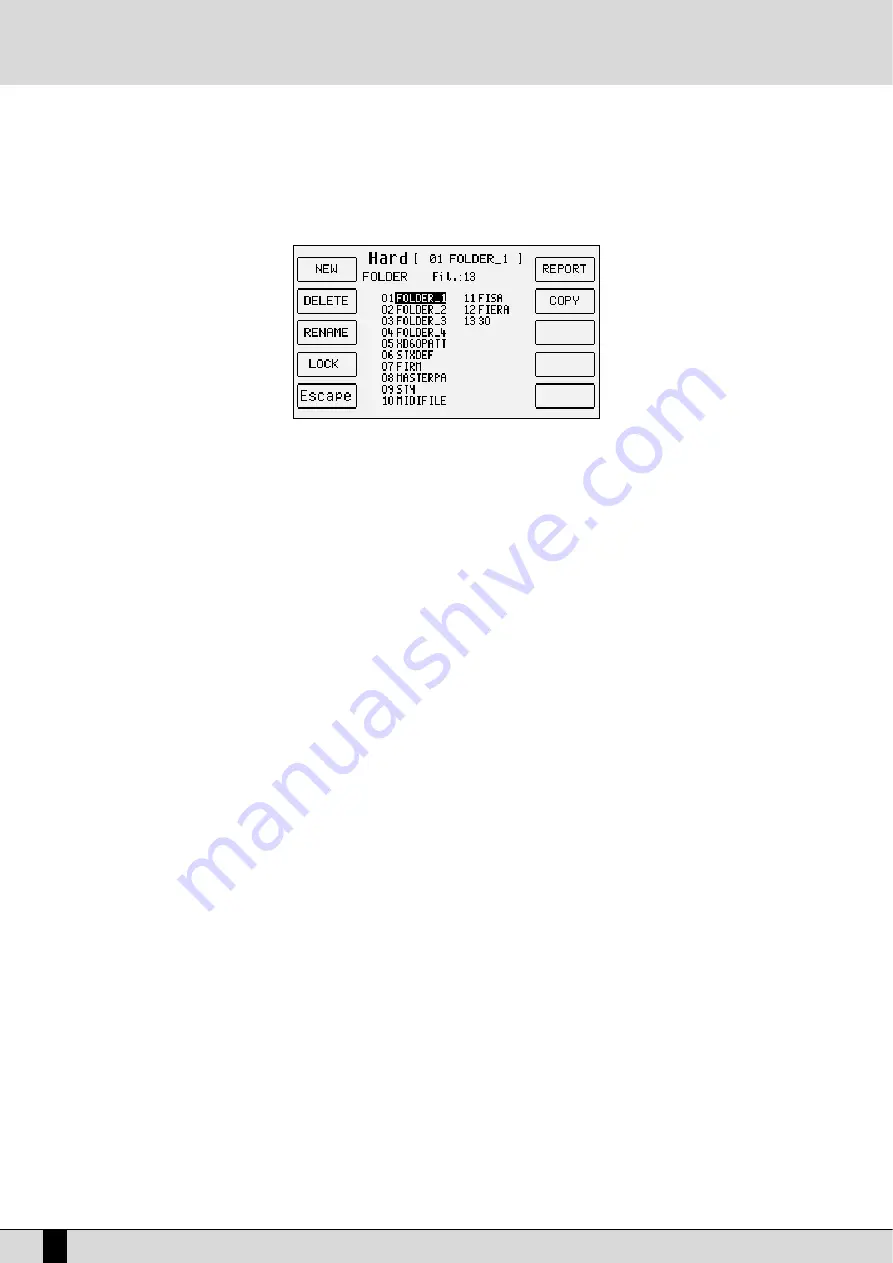
F8 Folder: 

This is used to manage and organise the single Folders, selected by entering the relative number using the numeric
keypad (

STYLES

push buttons), calling up a page with the following options:

F1 New: 

This is used to create a new Folder that will be identified with the number following the last Folder cre-

ated and is used to enter the name using the keyboard keys and the 

/-

push buttons. Once the name

has been entered, confirm the procedure using 

F10 Exec

, or cancel it using 

F5 Escape

.

F2 Delete: 

This is used to cancel the Folder selected using the 

VALUE +/-

push buttons or by typing in the num-

ber and all the files within it. When you confirm the cancelling procedure a warning message will appear with
the 

F5 Escape

or 

F10 Exec

options. If you confirm using 

F10 Exec

. A second message appears requesting fur-

ther confirmation to cancel with 

F10 Exec

, or to cancel the procedure using 

F5 Escape

F3 Rename:

This is used to re-name a Folder, selected using the 

VALUE +/-

push buttons or by typing in the

number, writing the name using the keyboard keys and the 

/-

push buttons. Confirm the procedure

using 

F10 Exec

or cancel it using 

F5 Escape

.

F4 Lock:

This protects the Folder from being Deleted or Re-named. To enable the lock function select the Folder

using the 

VALUE +/-

push buttons or type in its number and then press 

F4 Lock

. The symbol • will appear next

to the Folder. A number of Folders can be locked. To disable the lock function, find the folder protected and then
press 

F4 Lock

again. The degree of protection can be increased using a password to be programmed according

to the instructions given at the end of this chapter. 

F5 Escape:

This is used to return to the previous page of the 

Disk

menu.

F6 Report:

This creates a TXT file on Floppy Disk that shows the whole contents of the Folder currently selected, split-up per
extension and in alphabetical order. The file can be read both from Mac and PC and can prove quite useful to have a
list of files when there are many  files stored.

F7 Copy:

This is used to copy the file, selected using the 

VALUE +/-

/-

and 

F10 Select

push buttons from the Folder

currently selected and a Folder at choice within the Hard Disk. The following options are  possible:

F5 Escape:

This is used to return to the previous page of the 

Disk

menu.

F8 Target Folder:

This displays the list of Folders in the middle of the display amongst which you can choose that

desired using the 

VALUE +/-

push buttons.

F10 Exec:

This confirms that the file selected is to be copied in the chosen Folder using 

F8 Target Folder

.

The complete procedure entails the following steps:

Select the Folder in which the files to be copied are stored.

Press 

F7 Copy

.

Select one or a number of files to be copied using the 

VALUE +/-

/-

and 

F10 Select

push buttons.

Press 

F8 Target Folder

and find the destination Folder using the 

VALUE +/-

push buttons from the list that 

appears.

Confirm the procedure using 

F10 Exec

, or cancel it using 

F5 Escape

.

Press 

F10 Exec

and a new page appears in which the file being copied can be re-named using the keyboard

keys and the 

/-

push buttons. The options possible are the following:

F5 Escape: 

This cancels the procedure and returns to the 

Disk

menu.

F8 Skip:

This skips the copying procedure of the current file.

F9 Copy All:

This copies all the files without re-naming them.

F10 Execute:

This confirms that the single file is to be copied.

VEGA

88

DISK

Summary of Contents for Ketron

Page 1: ...Owner s Manual I n g l e s e VEGA VEGA VEGA...

Page 2: ...s Drum Set Arranger Using a MIDI pedal for the bass Pattern Edit Power On Set Up Song Play Midi file and Karaoke Drum Remix Video Out and Karaoke Recording a Midi file KAR MID Midi files TXT test file...

Page 3: ......

Page 4: ...s Considering the fact that music continuously changes the VEGA keyboard has also been adapted to keep astride with time with innovative Styles and new functions for live music offered for the first t...

Page 5: ...ontrol pedal It is advisable to use pedals produced by Ketron to avoid dangerous short circuits or abnormal conditions in general MIDI In GM Midi Input Port used just to control the General MIDI sound...

Page 6: ...itude LFOs with programmable parameters but with the Rotor effect enabled it can also control the Rotor speed Fast Slow PITCH BEND WHEEL This is used to raise or lower the pitch of the voice ORIENTAL...

Page 7: ...be modified In the Disk environment the CURSOR push buttons are used to select list ed groups of files that are not shown on the display The presence of following or previous pages to that in use is i...

Page 8: ...it point however is used for playing the chords for the arranger and any assigned manual Lower voices Modifications are carried out from the LEFT CONTROL menu called up with the relevant push button T...

Page 9: ...9 To call style 1 he only presses number 1 for number 02 he only presses number 2 etc same procedures for the rest of the styles For the GROUP selection mode ten push buttons are used to call up just...

Page 10: ...D is lit the PAGE and PAGE push buttons can be used to select either the hard disk or the floppy disk SONG PLAY This enables the playback of Midi files It is also used to call up Midi file chains to d...

Page 11: ...ressed it starts to play the automatic accompaniment If START is pressed while the Arranger is already playing then everything is stopped in other words it acts as a Stop push button HOLD When the LED...

Page 12: ...at the side of the display Therefore if the EXIT push button should fail to work look carefully at the display to find the Escape function amongst the com mands or try pressing the key used to access...

Page 13: ...e keys of the KEYBOARD thanks to the automa tic search function that is always enabled F5 DIR To return to the main page of the display press the SONG PLAY push button the LED will be turned off If a...

Page 14: ...the name to be given to the Midi file using the KEYBOARD keys Save the title using the F10 SAVE function Start SONG RECORD using the F10 START function From here you can start playing start the Arrang...

Page 15: ...sh button again to which the groups belong or use the PAGE push buttons The display will show the Styles that follow which can be selected again using the relative push buttons at the side of the dis...

Page 16: ...here the styles to be loaded reside From the folder on the hard disk or from the floppy disk choose one or a number of Patterns to load into the RAM Enable the loading operation by pressing F2 Load an...

Page 17: ...de over the whole keyboard This method of utilising the notes by the Vocalizer is called Automatic Chord and includes the identification of the note sung via the microphone input Using the Keyboard Ha...

Page 18: ...istrations on the other hand are loaded one at a time from hard disk or floppy disk There may be up to 999 Single Registrations for each folder of the disk and are called up by first enabling the REGI...

Page 19: ...LING UP THE VOICES The two rows of six push buttons called VOICES are used to call up the voices according to the family in which they belong When a family is selected using the push button the displa...

Page 20: ...y will be configured as follows THE ELEMENTS USED FOR VOICE PROGRAMMING A voice in the VEGA exploits a sampled wave form stored in a Wavetable as a sound source The wave form can also be created from...

Page 21: ...re used to choose the type of the single effects within the multi effects used by the voice For further information see the Effects section CONTROL WITH MODULATION WHEEL Press F9 Wheel and the display...

Page 22: ...the VEGA is turned off The saving prompt appears automatically after any parameter has been modified and the user attempts to exit the programming menu using EXIT or by pressing the SAVE ENTER push bu...

Page 23: ...or from the main display after having select ed the Program to be modified access menu F8 Edit Program In any event the display shows four columns each of which corresponds to a Voice used in the Pro...

Page 24: ...of the multi effect the Voice should use The choice of the type of multi effect is made using the CURSOR push buttons and the combination of algorithms is shown directly on the display via which the m...

Page 25: ...ified in F10 Threshold to value 127 maximum dynamics Cross This can be enabled only for the first two Voices and it enables a gradual switching from one Voice to another according to the dynamics wher...

Page 26: ...ation folder Repeat the procedure given for saving in RAM up to the SAVE ENTER page Enable saving on disk using F9 Save To Disk Confirm the procedure using F10 Exec or cancel using F5 Escape When the...

Page 27: ...R push button Select F4 One Touch Edit which will display the first page of the list To access the other pages use just the PAGE push buttons Find the location to be replaced with a new Voice selectin...

Page 28: ...described in detail in the following Drawbar use the CURSOR push buttons to select the drawbar and use the VALUE buttons to modify its level F1 Click activates the typical noise when the sound of the...

Page 29: ...ch single key of the keyboard This particular feature on the one hand allows you to use the grooves at dif ferent speeds without changes to the intonation and on the other hand it enables you to arran...

Page 30: ...styles If you wish to access the editing pages press the EXIT button to go to the main page and then press F9 Edit Drum Otherwise you may access the edit page via F10 DRUM MIXER selecting F10 DRUM SET...

Page 31: ...diting modifying and copying accompaniment tracks and sections is achieved with Edit Pattern which is accessed from the Left Control menu on the second page For each Style the VEGA allows you to modif...

Page 32: ...to the current style With the Arranger On pressing this button causes the arranger to immediate return to the beginning of the first bar of the first measure no matter what time it is pressed This may...

Page 33: ...LED lit this push button sets the playback to stand by until the COUNT PAUSE RESTART push button is pressed again used as a PAUSE F5 STYLE SET From the style set you can choose oriental by default or...

Page 34: ...ing the Close option is the most musical and natural one If you wish to modify the Mode parameter select the Style track pressing the CURSOR buttons and modify the parameter pressing F10 Select To go...

Page 35: ...f music keeping unaltered the melodic structure of the bass F10 Key Pattern The key pattern is an Innovative function that makes possible to assign styles to the keys on the keyboards that are not alw...

Page 36: ...one type of harmonisation as each selection deletes the previously select ed one The following parameters are available F1 Full The notes of the chord played on the portion left to the split point ar...

Page 37: ...ned to Second Voice will not be playing The relevant note can be selected using the keyboard F3 Velocity Curve This selects a different reaction curve for the Right voice to be chosen among Normal Har...

Page 38: ...assigned to Lower 1 and 2 will sound if the F1 and F2 Low Hold are acti vated and the LED of the HOLD button is on while the Arranger is in Stop condition The following conditions can be selected pre...

Page 39: ...the chord will remain still the original one Easy 1 performs a chord with a minimum of notes If for example you play only the keynote you obtain a major chord adding the third minor you create a minor...

Page 40: ...or above the box where the title of the Style in use is shown Live Drums are excluded The sound choices made in Global or in Single mode applies also to the two Lower parts and the Drum 1 track In the...

Page 41: ...G AND SAVING THE CUSTOM STYLES All Arrange View parameters of ARRANGE MODE as well as those on the second page of Left Control described must be saved in a Custom Style so you can call them up later o...

Page 42: ...the optional pedal switches FS13 and FS6 or use a pedal with four switches for guitarists Mod 9AC101 that has a special method of adding tonality variations Proceed as follows to enable it From the m...

Page 43: ...a Pattern also corresponds to the creation of a PAT file for which you may name and save on the disk A new Pattern stored on an empty RAM location will be saved with the general name Pattern To modify...

Page 44: ...elect the sound For the User Voices enable the USER VOICE use the PAGE push buttons and select the voice using the relative function push button The Drum 1 and 2 tracks are dedicated to the exclusive...

Page 45: ...usly confirmed using F10 Execute and sends to the previous page F1 Record F10 Clear This is used to cancel the contents of a track in a different manner for the Drum tracks and the lead tracks includi...

Page 46: ...epeated instantly HOW TO RECORD A PATTERN PART After having chosen the Pattern to modify press F1 Record to record a Part Select which section to be record using F1 and the VALUE push buttons Select t...

Page 47: ...or example if the source Part is Arrange A you could choose not only Arrange A as destination but also B C and D The same applies to Intro Ending and Fill In To select a different Part press the func...

Page 48: ...to be transmitted Choose the part to record Arrange A B C D Intro Fill etc Set the Value Quantize function to the desired value In the event of very complex sequences we recommend you select the REAL...

Page 49: ...ion and returns to the main page of the display F8 Disk Save Saves the Power On Set Up to the disk you selected before confirming the saving in Flash RAM To save another Power On Set Up file it is nec...

Page 50: ...by their name or selection but by entering the number assigned to each individual midi file The numbering cannot be changed and is assigned following the temporal order in which the Midi files are ad...

Page 51: ...of all the voices associated with the keyboard is on the other hand controlled by the VALUE push buttons Balance By pressing them together at the same time the whole Midi file is muted compared to the...

Page 52: ...s used to display the list of Midi files stored in the Folder or in the disk in use It s function has already been described in the sections on how to load a Midi file F6 Jukebox The creation of chain...

Page 53: ...e Reverb entity applied to the track The value can be changed using the VALUE push buttons which if pressed together at the same time reset the value F3 Chorus Distorsor Delay This modifies the entity...

Page 54: ...ke the song incompatible with modules using the General MIDI format but it offers the best possible conditions for creating Midi files on the VEGA F9 Mute If this function is enabled the selected trac...

Page 55: ...Edit Find the first Midi file of the chain using the VALUE and CURSOR push buttons Select the Midi file using F10 Select A number will appear at the side of the name that indicates the position within...

Page 56: ...yle can be balanced relative to the Midi file using the VALUE BALANCE buttons once you have selected Style Select using the INTRO END 1 REMIX SELECT button Vice versa you can balance the volume of the...

Page 57: ...ou to define the horizontal and vertical dimensions of the computer monitor connected to obtain optimum synchroniza tion with the monitor frequency The values are modified pressing the VALUE buttons a...

Page 58: ...ecorded on the disk that is currently selected and if the hard disk is selected in the folder that w as previously accessed The page called up is used to enter the name of the Midi file using the keyb...

Page 59: ...ying of the KAR Midi file in Hard Disk and then converting it Conversion can also be carried out on the Floppy Disk Insert the Floppy Disk with the KAR file in the disk drive Enable the DISK menu usin...

Page 60: ...e Midi file and it s associated TXT file the same name so that when loading the Midi file the TXT file is automatical ly found and loaded too In Song Play as well the display of the TXT file is contro...

Page 61: ...are stored in the Micro Edit menu that is called up from the main page of the display by selecting the F2 Effect menu and then F4 Micro The parameters relative to the microphone are correlated to the...

Page 62: ...the microphone input If Dry On Stop is selected the effects will be applied on the microphone signal only when the Arranger or a Midi file is being played After the Arranger and the Midi file have st...

Page 63: ...Effects has been selected Each one of these modes includes different algorithms that will be dis played in the centre of the display Automatic Chord 1 and Automatic Chord 2 produce the additional not...

Page 64: ...ecially if the singer has a powerful and dynamic voice Singer Defines the sounds of the voices generated by the Vocalizer with male and female options F7 Filter Pressing this function push button disp...

Page 65: ...m ilar external unit Inactive deactivates the Vocalizer control via the keyboard but not via MIDI HARMONISATION MODES AND DESCRIPTION OF THE ALGORITHMS After you have selected a harmonisation mode usi...

Page 66: ...io 2 The harmony presents an interval above the note sung Full Trio 3 All the voices are generated above the note sung Jazz Trio 1 The harmonisation follows a complex table according to which a major...

Page 67: ...is generates one voice in the octave below and one voice in unison with the note sung If F9 Vocalize is On the note sung is doubled in unison Lead Octa Up This generates one voice in the octave above...

Page 68: ...n Setup function described in this manual you may load the desired Vocal set on turning on the VEGA For this purpose select the desired Vocal Set from the Vocalizer page and then go back to the main d...

Page 69: ...eyboard that is dedi cated to the lead The value is modified using the VALUE push buttons F3 Reverb Type This is used to choose the Reverb algorithm among Room Studio Club Hall Theatre Stage Arena To...

Page 70: ...meters modified in the memory selected using F9 Destination The single parameters to be modified are shown in the middle of the display that are selected using the CURSOR push buttons and are mod ifie...

Page 71: ...Block Registrations whose registers can only be called up by entering the number using the numeric keypad It takes less time to load a register from a Block Registration than that from a Single Regis...

Page 72: ...using F5 Escape AUTOMATICALLY LOADING THE TEXT FILE AND MIDI FILE USING REGISTRATIONS This function is one of the most powerful and useful functions of the VEGA It is used to avoid lots of procedures...

Page 73: ...oost Bass Octave Pedal Board Bass To Pedal 4Switch Mode F5 Arrange 4 4 This is used to disable the control of the parameters of Bass Lock Lower Lock Step Tempo Sync Time Chord Mode F6 Tabs This is use...

Page 74: ...st one modulation between DCF DCA Cutoff and WhaWha is enabled so that the Modulation Wheel always controls a parameter F2 LFO DCF When On the Modulation Wheel controls the entry of the modulation on...

Page 75: ...ntrol to the Pitch Bend Wheel the intensity of which is established by the value that can be modified using the VALUE push buttons F9 Bend DCA This assigns the timbre amplitude control to the Pitch Be...

Page 76: ...t interruptions F10 Song Expr If set to Yes the volume pedal controls the global Song level UTILITY PAGE 2 2 From the initial page of the Utility menu access is gained to the second page by pressing P...

Page 77: ...called up F6 Video This is used to select the type of video output signal using the VALUE push buttons between PAL European tel evision system NTSC American television system SVHS Pal super VHS Europe...

Page 78: ...e F2 function push button repeatedly you can select the response curve In the case of Fixed curve you can enter the fixed velocity value applied to the notes played using the VALUE push button F3 Righ...

Page 79: ...nnel for the manual bass section Drum Channel This is the setting of the MIDI receiving channel used to play the percussion timbres when the Left Drum mode is enabled To save the settings press the SA...

Page 80: ...ngs of the keyboard are called up from the main page of the display using F6 MIDI USING THE VEGA AS A GENERAL MIDI MODULE To reach the sixteen independent MIDI channels from the keyboard you must use...

Page 81: ...is to be applied has been found select which MIDI message is to be cut out from the reproduction using the VALUE push buttons and enable the filter using the F10 On Off push button The filter is enab...

Page 82: ...d in this way are distributed over seven pages that are called up using push buttons PAGE and include Volume Reverb Effects Pan Shift Channel Rx and Channel Tx already explained in the previous sectio...

Page 83: ...F1 Channel Transmit F3 Transpose Transmit The value for each single section identifies the number of transposition semitones applied to the notes transmitted on the MIDI Out F4 Transpose Receive The v...

Page 84: ...vailable are selected using the CURSOR push buttons and are enabled using F10 Select They are Clock Out When this function is enabled the VEGA sends the MIDI Clock to MIDI Out and therefore it can con...

Page 85: ...are no longer con trolled by the keyboard but only by the MIDI In input CALLING UP THE PROGRAMS THE ONE TOUCH MEMORIES AND THE REGISTRATIONS VIA MIDI Program Send the relative Program Change to the MI...

Page 86: ...lements whether they be files or folders HOW TO MOVE AROUND AMONG FILES The files within a folder are to be managed as follows The files are put in alphabetical order in the middle of the display To s...

Page 87: ...s one of the Patterns loaded in Flash RAM To select the Pattern to save use the VALUE push buttons F5 Midifile When a Midi file has been loaded or recorded calling up F5 Midifile from function F3 Save...

Page 88: ...the Disk menu using the dedicated push button Select the Folder by typing in its number using the numeric keypad STYLES push buttons If you do not know the number associated with the Folder press F8 F...

Page 89: ...ress F4 Lock again The degree of protection can be increased using a password to be programmed according to the instructions given at the end of this chapter F5 Escape This is used to return to the pr...

Page 90: ...o abandon using F5 Escape Once the protection function has been disabled you can format the Hard Disk by pressing F4 Format You will be requested twice to confirm using F10 Exec Press F5 Escape to can...

Page 91: ...tegrity of the Folders and the files When the test ends press F10 Escape to return to the previous page If errors are found the VEGA automatically moves onto the Repair function F3 Repair This repairs...

Page 92: ...Escape F4 Format This is used to format the Floppy Disk and can be done only by disabling the default protection func tion using the F6 Lock Format push button You will be requested to confirm using F...

Page 93: ...by assigning a password that will be requested when disabling the lock function The password is modified in the following manner From the main page of the display press F3 Utility Press the PAGE push...

Page 94: ...Technical Tables...

Page 95: ......

Page 96: ...s Presets GM Voices Drum Sets Live Drums DRUMS 2 Midi Banks Prog Change Styles Midi implementation Vocalizer control list System exclusive Ketron VEGA Vocalizer System exclusive list PAGE 97 98 100 10...

Page 97: ......

Page 98: ...s per note Mode International Belgique Velocity control to Left Right Bass Lower octave Left Drum to Bass Chord Multieffect DSP 60 different effects Reverberation Chorus Flanger Delay Wha Wha Distorti...

Page 99: ...27 Jazzguitar Bebop Chorus gtr Pop Guitar 28 Clean Electric Tremolo Rock Roll 29 Muted 60 Stopped Chop Guitar 30 Carlos Rocklead Distorted Overdrive 31 Blueslead Power Heavy Metal Valve 32 Texas Peda...

Page 100: ...ave Solo Crystal Breaths 86 Calliope FM Lead Acidsolo Taurus 87 Plate Sequence Sawmix 88 Sawlead Oldmatrix Tekno 89 Galaxy Progressive 90 Technopad Tinklepad 91 Magicpad Softpad 92 Icerain Sweep 93 Gl...

Page 101: ...che Valse Cromatica Classica Paris Diatonic Cassotto Octafisa Fisa Bandoneon G GU UI IT TA AR R Brazilian Country Texas Clean 12 Strings Spanish Folk Distorted Hawaiian Rocklead Overdrive Fingpick Beb...

Page 102: ...40 Synbass 2 41 Violin 42 Viola 43 Cello 44 Contrabass 45 Tremolos 46 Pizzicato 47 Harp 48 Timpani 49 Strings 50 Slow Strings 51 Synstrgs1 52 Synstrgs 2 53 Choir 1 54 Choir 2 55 Synvoice 56 Hits 57 Tr...

Page 103: ...118 Rave 3 119 Rave 4 120 Rave 5 121 Mute 122 Mute 123 Mute 124 Mute 125 Mute 126 Mute 127 Mute 128 Mute PROGRAM CHANGE NAME BANK C CONTROL CHANGE 00 VALUE 10 01 Piano 1 02 Piano 2 03 Piano 3 04 Honk...

Page 104: ...a 4 2 Bolero 4 3 Chacha 4 4 Cumbia 4 5 Guajra 4 6 Mambo 4 7 Salsa 1 4 8 Rhumba 4 9 Merengue 1 4 10 Merengue 2 4 11 Congas 1 4 12 Congas 2 4 13 Gipsy 4 14 Maracas 4 15 Tambourine 4 16 Brush 4 17 House...

Page 105: ...UM 2 74 96 USER DRUM 97 120 DRUM 2 Internal 4 1 50 VOCALIZE 1 16 REGISTRATION 0 Bank A 1 99 1 Bank B 1 99 VOICES DRUMS CONTROL CHANGE 0 VOICE BANK PROGRAM CHANGE 1 The program changes from 121 to 128...

Page 106: ...wn 166 Hip hop 167 Acid Funk 168 Sweet Down 169 R B 170 City Rap 171 Fusion 172 Street 173 Pop Mix 174 Lounge 175 Get Down 176 Slap Funk 177 Folk Pop 178 Swing Funk 179 Guitar Club 180 Bass Drum C CO...

Page 107: ...on RPN 0000H BnH 65H 00H 64H 00H 06H vv Pitch Bend sensivity in semitones default vv 02H RPN 0001H BnH 65H 00H 64H 01H 06H vv Fine tuning in cents vv 00H 100 vv 40h 0 vv 7FH 100 RPN 0002H BnH 65H 00H...

Page 108: ...ce 2 vv 00H 26H NRPN 630CH BnH 63H 63H 62H 0CH 06H vv Frequency voice 3 vv 00H 26H NRPN 630DH BnH 63H 63H 62H 0DH 06H vv Resonance voice 1 vv 00H 07H NRPN 630EH BnH 63H 63H 62H 0EH 06H vv Resonance vo...

Page 109: ...mb 6 76H F7 Edit Voice 47H 57H 67H Numb 7 77H F8 Program 48H 58H 68H Numb 8 78H F9 edit Drum 49H 59H Cursor 69H Numb 9 79H F10 Edit Microphone 4AH Pause etc 5AH Cursor 6AH Enter 7AH 4BH Tempo 5BH 6BH...

Page 110: ...F7H Rev_type 00H Box_1 10H USER_REV1 01H Box_2 11H USER_REV2 12H USER_REV3 13H USER_REV4 0FH Galaxy 7FH OFF R RE EV VE ER RB B1 1 L LE EV VE EL L D DR RU UM MS S F0H 26H 7BH 02H 00H Level F7H Level 0...

Page 111: ...ON Micro_par 55H Micro Right Echo Value 00H 7FH 51H Micro Right Volume Value 00H 7FH 56H Micro Left Echo Value 00H 7FH 52H Micro Left Volume Value 00H 7FH 57H Micro Right Reverb Value 00H 7FH 53H Micr...

Page 112: ...R RD D R RX X C CH HA AN NN NE EL L A AS SS SI IG GN N F0H 26H 7BH 13H 00H KeyPart Chan F7H Chan 00H 10H 00H OFF KeyPart 0 19 0 user ram drawbars 10 chord 4 orchestra 1 2nd voice 11 chord 5 orchestra...

Page 113: ...CI IT TY Y O OF FF FS SE ET T F0H 26H 7BH 3FH 00H Part Value F7H Part 01H 20H 01H 10H Keyboard Part 11H 20H GM Part Song Play Value 00H 7fH F FI IL LT TE ER R V VE EL LO OC CI IT TY Y S SL LO OP PE E...

Page 114: ...D D M MU UL LT TI IP PL LE E E EF FF FE EC CT TS S F0H 26H 7BH 32H 00H Value F7H Value 00h Unlock 7fh Lock P PI IT TC CH H S SH HI IF FT T O OF FF F F0H 26H 7BH 27H 00 Part_Off F7H Part_Off 00h 0fh 0...

Page 115: ...azz Trio 2 2 Full Trio 3 5 Jazz Trio 3 HARMONY Value 0 Harmony Right 5 Jazz 1 1 Harmony Left 6 Jazz 2 2 Full 1 7 Jazz 3 3 Full 2 8 Midi Mode 4 Full 3 FIXED INTERVAL Value 0 Unison 6 5th Down 1 Octave...

Page 116: ...Pi it tc ch h B Be en nd d o on n o of ff f F0H 26H 7BH 6DH 00H Value F7H Value 00H Off 7fH On V Vo oc ca al li iz ze er r L Le ea ad d o on n o of ff f F0H 26H 7BH 6EH 00H Value F7H Value 00H Off 7fH...

Page 117: ...VEGA 116...

Page 118: ...VEGA 117 Notes...

Page 119: ...VEGA 118 Notes...

Page 120: ...VEGA 119 Notes...

Page 121: ...VEGA 120 Stampa FLAMINI srl Osimo AN 12 2002...

Page 122: ...KETRON s r l 60020 Ancona ITALY Via Giuseppe Taliercio 7 Ph 39 0 71 285771 Fax 39 0 71 2857748 www ketron it...

Reviews: