background image

62

Getting started

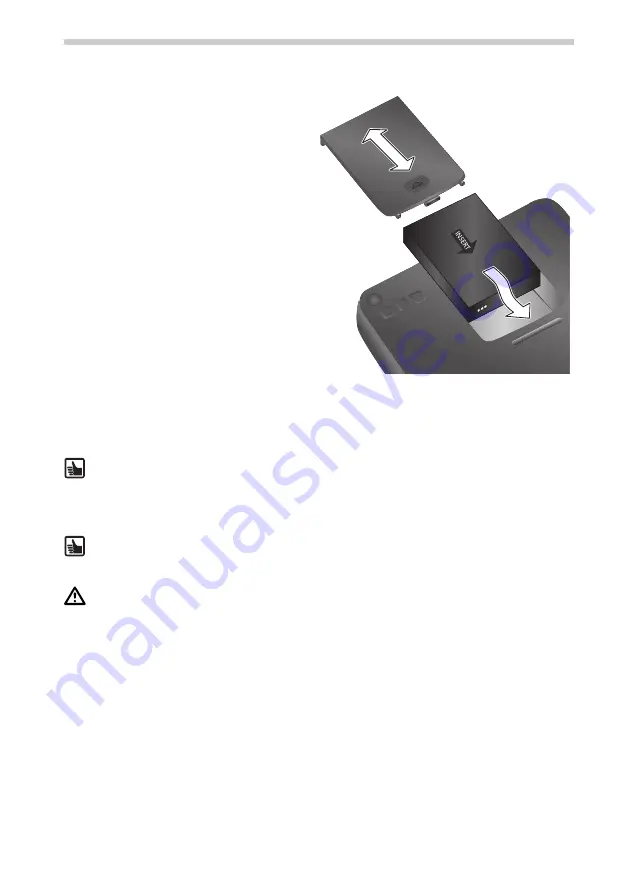
Before you can switch on the navigation
system for the first time, you must insert
the battery. This is carried out with the fol-
lowing steps:

Open the battery compartment. 

Push the battery into the battery com-
partment with the contacts facing 
downwards. You can now close the bat-
tery compartment.

Connect the navigation system to the 
12 V power supply in your vehicle. The 
battery will now start to charge. It takes 
approx. 8 hours to fully charge the bat-
tery. 
The battery life without external power 
supply is approx. 5 hours for navigation 
and approx. 2 hours for DVB-T with the 
PN 4000 (approx. 6 hours for navigation 
and approx. 4 hours for DVB-T with the 
PN 6000). The battery life also depends 
on the display brightness you have se-
lected.

Insert the supplied SD card containing 
the maps into the SD card slot.

With an active cradle you can use the 
car battery/keyswitch connection in combination with the optional car connectivity 
cable. The navigation device will automatically switch on or off by turning the car key 
in the ignition. Once the navigation device is inserted in the active cradle and the 
ignition is switched on, the battery is automatically charged.

When using a passive cradle:

You must turn the device on and off using the power button.

You can charge the battery by using the cigarette lighter cable

The battery must only be charged if someone is monitoring the device. Do not open 
the battery by force as this may release corrosive acid. Damaged batteries or batteries 
that are past their expiry date must no longer be used and should be disposed of in a 
safe and suitable way.

Setup and installation

Summary of Contents for PN 4000

Page 1: ...PN 4000 PN 6000 User Manual...

Page 2: ...ams 72 Simulation 73 TMC Traffic Message Channel 74 Alert points displayed on the map 74 Position speed Select location 74 Select map 74 System ID 74 Default settings 75 Bluetooth settings 76 Toolbar...

Page 3: ...mount Position the screen so that you are able to glance at the display quickly and easily The device should also be positioned in a way that prevents reflections and glare from the screen The screen...

Page 4: ...he dealer you purchased the product from CE quality mark This product satisfies the requirements for the CE quality mark for use in a home office or commercial environment R TTE directive We Siemens V...

Page 5: ...You must not use any cables other than the supplied AC adapter and DC cable to power the device and to charge the battery 6 Quick Start guide 7 SD card with map data 8 DVB T aerial with cable 9 DVB T...

Page 6: ...ng to the surrounding light This function can be activated deactivated in the Settings menu Front 3 Display touchscreen 4 Charging symbol This status LED displays the following Green The device is bei...

Page 7: ...B T aerial port cover 11 Foot extractable 12 Slot for SD card 13 Earphone socket Earphones volume control High volumes can damage or decrease the sensitivity of your hearing 14 100 V 240 V power adapt...

Page 8: ...you can reset the system by pressing this button e g with a straightened out paper clip or a pencil The data you have saved will NOT be lost Restart the navigation system by pressing the power button...

Page 9: ...only active if you have purchased a TMC active cradle and the navigation device is mounted in this cradle BT active cradle Features marked with this symbol are only active if you have purchased a BT...

Page 10: ...rough the menus In Map display cursor left right will zoom the map 3 Mode switch Navigation N Audio A 4 Confirm selections by pressing this button 5 Press this button briefly to see the Map display Pr...

Page 11: ...display brightness you have se lected Insert the supplied SD card containing the maps into the SD card slot With an active cradle you can use the car battery keyswitch connection in combination with...

Page 12: ...ce should not obscure the driver s view Press the suction cup against the windscreen and push the lever towards the windscreen until it locks into place Attach the navigation system to the cradle Dism...

Page 13: ...ination button to have the navigation system to guide you from your present location to a specific desti nation A submenu opens with further guidance functions and an address in put field For further...

Page 14: ...ings This takes you back to the previous menu If you tap OK the selection you have made is saved and you return to the previous menu What you select here can be changed at any time Software updates ma...

Page 15: ...will turn onto next at the top of the screen Lane guidance This function advises on lane selection for motorways and rural roads based on the next direction change Tap this button to use this function...

Page 16: ...ge and con firm with OK Automatic brightness If you activate this button the brightness of the screen is automatically adjusted using the navigation system s light sensors Manual Night Day switching i...

Page 17: ...the guidance information Units You can switch between kilometres and miles Select the preferred unit House number position Locate this at the start or at the end of the address You can define whether...

Page 18: ...under this button is displayed in small digits Switch between alphabetical numerical and accented characters special characters by using the keyboard toggle You can delete incorrect entries by using t...

Page 19: ...You can export your address book to an SD card and import an SD card into your address book This means you can easily transfer an address book to a different PN 4000 PN 6000 The export function also...

Page 20: ...utton to activate or deactivate the mute option for the navi gation voice The green tick indicates that mute is active If you want to hear the navigation voice again simply deactivate mute Volume Tap...

Page 21: ...t detour This calculates a detour for the next 2 kilometre stretch of the route Medium detour This calculates a detour for the next 7 kilometre stretch of the route Long detour This calculates a detou...

Page 22: ...The destination for the simulation can always be selected in Main menu via the Desti nation The destination address can be selected as the first or last step of simulation Start location Tap this butt...

Page 23: ...countries where this information can be accessed You also receive an alert if your actual speed exceeds the prescribed speed limit Tap this button to make your selection on the next screen Tap this bu...

Page 24: ...on screen appears for security purposes so you can either confirm or delete the procedure Delete all pairings Tap this button to delete the list of paired Bluetooth devic es Before the list is deleted...

Page 25: ...to the most recently connected Bluetooth phone When this phone is in close range the Bluetooth cradle will set up a connection to the phone Handsfree calling is available when the connec tion has bee...

Page 26: ...ne is deleted and replaced with the pairing data of the new Bluetooth device Ringtone volume When an incoming call is received a ringtone is played until the call is accepted Tap this button to open t...

Page 27: ...lculate route function See Change route avoid traffic jams on page 72 The Set route profile function with route profile settings and route planning options is opened directly See Set route criteria ro...

Page 28: ...dependently of the selected route criteria in order to set the route calculations for your particular needs A suitable route is calculated based on your preferences You can choose from the following m...

Page 29: ...n you can Enter any address directly Select a saved address from your address book Select one of your last destinations Select a special destination POI e g a restau rant or a garage You can also add...

Page 30: ...ries that exist under this button is displayed in small digits Switch between alphabetical numerical and accented characters special charac ters by using the keyboard toggle You can delete incorrect e...

Page 31: ...define where you require this destination near the current position or near the destination Near position Tap this button to search for a POI near your current position Example You want to find a hot...

Page 32: ...ccess Route criteria Tap this button to select certain profiles and options in the fol lowing screen The available profiles and options are explained under Set route criteria route profile on page 79...

Page 33: ...wish to zoom in on the map tap the button until you reach the desired zoom level Compass By repeatedly tapping on the compass you can either orientate the map northwards have the display follow the d...

Page 34: ...dividual Playlist of favourite tracks The MP3 player supports this categorisation and enables an easy selection of tracks Please note that the My_playlist wpl must be saved in the same directory as th...

Page 35: ...ing will stop Tap the Navigation button bottom right to return to the navigation application Route Sound Playback will not be stopped When you tap on the desired track the following is displayed Title...

Page 36: ...off Repeat off repeat the last title Repeat track repeat all titles Repeat all This function refers to the current setting of the list Album Artist Genre or Playlist During the Song setting the list...

Page 37: ...mode You will return to the small picture by tapping the large picture In full screen mode you can carry out the following functions by tapping the corresponding arrows 1 Jump to next picture 2 Jump t...

Page 38: ...Bluetooth phone the Connection is in progress icon is displayed in the Bluetooth status bar As soon as the first connection is established the cradle will automatically establish a call to this phone...

Page 39: ...ll To reject the call tap the Decline button in the dialogue box During a phone call a dialog box with the following buttons is displayed End call Toggle between Handsfree calling and Private mode In...

Page 40: ...mmend that you power the Bluetooth cradle with an external power supply Microphone position The microphone should be positioned as closely as possible to the user but the user should not speak directl...

Page 41: ...B T reception connect at least one for a better reception connect both of the DVB T aerials supplied with the PN 4000 6000 Remove the rubber cover on the rear of the device at the top right and plug i...

Page 42: ...the Channels bar to open the relevant sub menu Tap the Scanning channels button to start scanning Once the search has ended the list of channels found will be displayed Tap the required channel to vie...

Page 43: ...he current programme and the start and end times start of the next program The Back left and Forward right buttons allow you to scroll backwards and forwards through the programme listings for the cho...

Page 44: ...glish language channels Tap the Back button in the top left of the screen to return to the Settings menu Tapping the Video button takes you to the picture settings First you can select the desired scr...

Page 45: ...e button to watch television while travelling tap Stationary to only watch television when stopped Auto Scan Delay allows you to state after how many seconds a new search should be run after the curre...

Page 46: ...d channel name and then tap Remove If you want to delete a channel from the full channel list tap on the channel you want to delete and then on the Delete button Tapping the Forward and Back buttons t...

Page 47: ...As long as the programme is currently being broadcast you can watch it By making the programme overview smaller you can view the descriptions of several programmes Tap on the Reduce button By making...

Page 48: ...ad Enter the required page number on the screen to bring up the page The numbers keypad contains the following buttons Enlarge font Display background as cover for easy reading or transparent to conti...

Page 49: ...ds and additional information e g hotels restaurants as well as the high density of buildings Further more it may take longer to establish the GPS reception if you have just driven out of an undergrou...

Page 50: ...e has no influence over the available data If the TMC is switched on but there is no reception a yellow tick is displayed During TMC reception the name of the provider or a green tick is displayed in...

Page 51: ...attery is fully charged and or that the device is connected to a power source If you are using the DC cable check that the plug is securely and correctly connected to the cigarette lighter The system...

Page 52: ...t approx 425 g Operating temperature 20 C to 60 C Charging temperature for lithium ion battery 0 C to 45 C Supports SD cards up to 2 GB Legal notice 2007 Siemens VDO Trading GmbH All rights reserved T...

Page 53: ...PN 4000 PN 6000 Bedienungsanleitung PN 4000 6000 11 2007 Siemens VDO Trading GmbH...

Reviews: