background image

Technical data

283

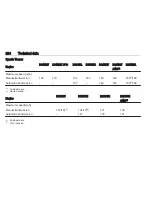
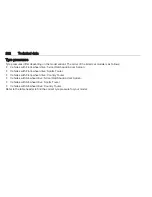
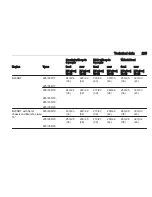
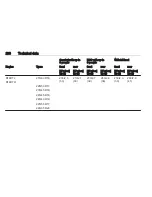
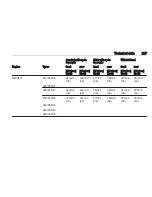
Performance

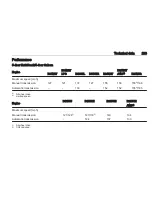
5-door Hatchback/4-door Saloon

Engine

B14NET

B14NET
LPG

B16SHL

B18XER

B20NHT

B20NHT
AWD

3)

B28NER

Maximum speed [mph]
Manual transmission

127

121

137

127

155

155

155

4)

/168

Automatic transmission

130

152

152

155

4)

/165

3)

All wheel drive.

4)

Limited speed.

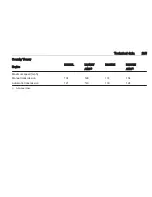
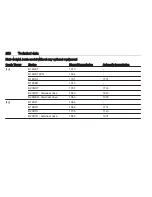
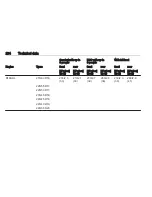
Engine

B16DTJ

B16DTH

B20DTH

B20DTH
AWD

3)

Maximum speed [mph]
Manual transmission

121/124

5)

127/130

5)

140

134

Automatic transmission

124

137

130

3)

All wheel drive.

5)

CO2 reduced.

Summary of Contents for Insignia

Page 1: ...Vauxhall Insignia Owner s Manual ...

Page 2: ......

Page 3: ...nd windows 20 Seats restraints 45 Storage 69 Instruments and controls 84 Lighting 128 Climate control 140 Driving and operating 154 Vehicle care 224 Service and maintenance 273 Technical data 276 Customer information 311 Index 318 Contents ...

Page 4: ...2 Introduction Introduction ...

Page 5: ...ervice gas vehicles All Vauxhall Authorised Repairers provide first class service at reasonable prices Experienced mechanics trained by Vauxhall work according to specific Vauxhall instructions The customer literature pack should always be kept ready to hand in the vehicle Using this manual This manual describes all options and features available for this model Certain descriptions including those...

Page 6: ...y Caution Text marked Caution provides information on possible damage to the vehicle Disregarding this information may lead to vehicle damage Symbols Page references are indicated with 3 3 means see page Chronological order to select menu entries in the vehicle personalisation is indicated with I Page references and index entries refer to the indented headings given in the section table of content...

Page 7: ...Introduction 5 ...

Page 8: ...gate moulding Press x only the load compartment is unlocked and opens Radio remote control 3 21 Central locking system 3 24 Electronic key system 3 22 Load compartment 3 29 Seat adjustment Longitudinal adjustment Pull handle slide seat release handle Try to move the seat back and forth to ensure that the seat is locked in place Seat position 3 47 Manual seat adjustment 3 48 Power seat adjustment 3...

Page 9: ...ual seat adjustment 3 48 Power seat adjustment 3 50 Seat height Press switch top seat higher bottom seat lower Seat position 3 47 Manual seat adjustment 3 48 Power seat adjustment 3 50 Seat inclination Lever pumping motion up front end higher down front end lower Seat position 3 47 Manual seat adjustment 3 48 Power seat adjustment 3 50 ...

Page 10: ...ted and must fit close against the body The backrest must not be tilted back too far maximum approx 25 To release belt press red button on belt buckle Seat position 3 47 Seat belts 3 54 Airbag system 3 57 Mirror adjustment Interior mirror To adjust the mirror move the mirror housing in the desired direction Manual anti dazzle interior mirror 3 39 Automatic anti dazzle interior mirror 3 39 ...

Page 11: ...r mirrors 3 37 Electric adjustment 3 37 Folding exterior mirrors 3 37 Heated exterior mirrors 3 38 Steering wheel adjustment Unlock lever adjust steering wheel then engage lever and ensure it is fully locked Do not adjust steering wheel unless vehicle is stationary and steering wheel lock has been released Airbag system 3 57 Ignition positions 3 155 ...

Page 12: ...10 In brief Instrument panel overview ...

Page 13: ...iper and washer 86 11 Centre air vents 151 12 Sport Tour mode 177 Traction Control system 175 Electronic Stability Control 176 Hazard warning flashers 134 Parking assist Advanced parking aid 196 Lane departure warning 211 13 Anti theft alarm system status LED 34 14 Colour Info Display 117 15 Glovebox 69 Fuse box 248 16 Control indicator for airbag activation deactivation 104 Control indicator for ...

Page 14: ...ghts front fog lights r rear fog light Lighting 3 128 Headlight flash high beam and low beam headlight flash pull lever high beam push lever low beam push or pull lever Automatic light control 3 129 High beam 3 129 High beam assist 3 130 Headlight flash 3 130 Adaptive forward lighting 3 132 Turn and lane change signals lever up right turn signal lever down left turn signal Turn and lane change sig...

Page 15: ... 3 134 Horn Press j Washer and wiper systems Windscreen wiper HI fast LO slow INT interval wiping or automatic wiping with rain sensor OFF off For a single wipe when the windscreen wiper is off press the lever down to position 1x Windscreen wiper 3 86 Wiper blade replacement 3 233 ...

Page 16: ...uid 3 230 Rear window wiper Press the rocker switch to activate the rear window wiper upper switch continuous operation lower switch intermittent operation middle position off Rear window washer Push lever Washer fluid is sprayed on the rear window and the wiper wipes a few times Rear window wiper washer 3 88 ...

Page 17: ...dows air conditioning system Press V Set temperature control to warmest level Switch on heated rear window Ü Air conditioning system 3 140 Demisting and defrosting the windows automatic climate control Press V Temperature and air distribution are set automatically and the fan runs at high speed Switch on heated rear window Ü Dual automatic climate control 3 147 ...

Page 18: ...selector lever from D to the left manual mode upshifting manual mode downshifting The selector lever can only be moved out of P when the ignition is on and the brake pedal is applied To engage P or R press the release button Automatic transmission 3 167 Starting off Check before starting off Tyre pressure and condition 3 252 3 292 Engine oil level and fluid levels 3 227 All windows mirrors exterio...

Page 19: ...l Ignition switch turn key to position 3 and release Power button press Engine Start Stop and release The engine starts after a short delay Starting the engine 3 158 Stop start system If the vehicle is at a low speed or at a standstill and certain conditions are fulfilled activate an Autostop as follows Depress the clutch pedal Set the lever to neutral Release the clutch pedal An Autostop is indic...

Page 20: ...ch off the engine If the vehicle is on a level surface or uphill slope engage first gear or set the selector lever to position P before removing the ignition key or switching off ignition on vehicles with power button On an uphill slope turn the front wheels away from the kerb If the vehicle is on a downhill slope engage reverse gear or set the selector lever to position P before removing the igni...

Page 21: ...ans may run after the engine has been switched off 3 226 Caution After running at high engine speeds or with high engine loads operate the engine briefly at a low load or run in neutral for approx 30 seconds before switching off in order to protect the turbocharger Keys locks 3 20 Laying the vehicle up for a long period of time 3 225 ...

Page 22: ...ti dazzle 39 Automatic anti dazzle 39 Windows 39 Windscreen 39 Manual windows 40 Power windows 40 Heated rear window 42 Sun visors 42 Roller blinds 42 Roof 43 Sunroof 43 Keys locks Keys Caution Do not attach heavy or bulky items to the ignition key Replacement keys The key number is specified in the Car Pass or on a detachable tag The key number must be quoted when ordering replacement keys as it ...

Page 23: ... workshop this vehicle data is needed in order to perform certain operations Radio remote control Enables operation of the following functions via the use of the remote control buttons central locking system 3 24 anti theft locking system 3 33 anti theft alarm system 3 34 tailgate 3 29 power windows 3 40 sunroof 3 43 mirror folding 3 37 The remote control has a range of approx 50 metres It can be ...

Page 24: ...ery voltage is too low Frequent repeated operation of the radio remote control while not in range which will require re synchronisation Overload of the central locking system by operating at frequent intervals the power supply is interrupted for a short time Interference from higher power radio waves from other sources Manual unlocking 3 24 Electronic key system Enables a keyless operation of the ...

Page 25: ...s from other sources To rectify the cause of the fault change the position of the electronic key Manual unlocking 3 24 Memorised settings Whenever the ignition is switched off the following settings are automatically memorised by the remote control unit or the electronic key automatic climate control lighting Infotainment system central locking system Sport mode settings comfort settings The saved...

Page 26: ... Press c Unlocking mode can be set in the vehicle personalisation menu in the Colour Info Display Two settings are selectable All doors load compartment and fuel filler flap are unlocked by pressing c once Only the driver s door load compartment and fuel filler flap are unlocked by pressing c once To unlock all doors press c twice Select the relevant setting in Settings I Vehicle in the Colour Inf...

Page 27: ...Press the button on any exterior door handle and pull the handle Unlocking mode can be set in the vehicle personalisation menu in the Colour Info Display Two settings are selectable All doors load compartment and fuel filler flap are unlocked by pressing a button on any exterior handle once Only the driver s door load compartment and fuel filler flap are unlocked by pressing the button on driver s...

Page 28: ...ted and a warning tone sounds three times If there have been two or more electronic keys in the vehicle and the ignition was on once the doors will be locked even if just one electronic key is taken out of the vehicle Unlocking and opening the tailgate The tailgate and the doors can be unlocked by pressing the button under the tailgate moulding when electronic key is in range Passive Locking See A...

Page 29: ...y The fuel filler flap and tailgate cannot be locked Automatic locking Automatic locking after driving off This security feature can be configured to automatically lock all doors load compartment and fuel filler flap after driving off and exceeding a certain speed When at a standstill after driving the vehicle will be unlocked automatically as soon as the key is removed from the ignition switch or...

Page 30: ...ehicle and the ignition was on once the feature locks the vehicle if just one electronic key is taken out of the vehicle Passive locking can be disabled by pressing c for a few seconds while one door is open It remains disabled until e is pressed or the ignition is switched on Activation or deactivation of passive locking can be set in the menu Settings I Vehicle in the Colour Info Display Colour ...

Page 31: ...ing and open the tailgate manually 4 door Saloon Press x on radio remote control until the tailgate is opened automatically or press the button under the tailgate moulding after unlocking Central locking system 3 24 Closing Use the interior handle Do not pull the button under the moulding whilst closing as this will unlock the tailgate again Central locking system 3 24 ...

Page 32: ...ilgate can only be operated when the vehicle is stationary and automatic transmission in P The tail lights flash and a chime sounds when the power tailgate is operating Notice Operating the power tailgate does not operate the central locking system To open the tailgate with the remote control it is not necessary to unlock the vehicle Unlock the vehicle first when operating with the touchpad switch...

Page 33: ... on the tailgate or press on the touchpad switch whilst the tailgate is moving will stop the tailgate in the current position Pressing x or G again will reverse the direction of movement Operation modes The power tailgate has three modes of operation which are controlled by the switch in the driver s door To change the mode turn the switch Normal mode MAX Power tailgate opens to full height Interm...

Page 34: ...ot be programmed below that height Safety function If the power tailgate encounters an obstacle during opening or closing the direction of movement will automatically be reversed slightly Multiple obstacles in one power cycle will deactivate the function In this case close or open the tailgate manually The power tailgate has pinch sensors on the side edges If the sensors detect obstacles between t...

Page 35: ...ower tailgate disabled and all doors unlocked the tailgate can only be operated manually In this event manually closing the tailgate requires significantly greater force Notice At low outside temperatures the tailgate may not open fully by itself In this case lift the tailgate manually to its normal end position Notice The installation of certain heavy accessories onto the tailgate may affect its ...

Page 36: ...not remain in the vehicle Otherwise the system cannot be activated Radio remote control self activated 30 seconds after locking the vehicle by pressing e once Electronic key system self activated 30 seconds after locking the vehicle by pressing the button on any exterior door handle Radio remote control or electronic key directly by pressing e twice within 5 seconds Electronic key system with pass...

Page 37: ...theft alarm system Status message is displayed in the Driver Information Centre Status LED Status LED is integrated in the sensor on top of the instrument panel Status during the first 30 seconds of anti theft alarm system activation LED illuminates test arming delay LED flashes quickly doors tailgate or bonnet not completely closed or system fault Status after system is armed LED flashes slowly s...

Page 38: ...rmation Centre after switching on the ignition Vehicle messages 3 119 If the vehicle s battery is to be disconnected e g for maintenance work the alarm siren must be deactivated as follows switch the ignition on then off then disconnect the vehicle s battery within 15 seconds Immobiliser The system is part of the ignition switch and checks whether the vehicle is allowed to be started with the key ...

Page 39: ...ust the mirror In position o no mirror is selected Folding mirrors For pedestrian safety the exterior mirrors will swing out of their normal mounting position if they are struck with sufficient force Reposition the mirror by applying slight pressure to the mirror housing Electric folding Switch control to o then push the control button c down Both exterior mirrors will fold Push the control down a...

Page 40: ...lour Info Display Colour Info Display 3 117 Vehicle personalisation 3 121 The settings are automatically stored for the key being used 3 23 Heated mirrors Operated by pressing Ü The LED in the button indicates activation Heating works with the engine running and is switched off automatically after a short time Automatic dimming Dazzling by following vehicles at night is automatically reduced by di...

Page 41: ...uced by dimming the interior mirror Windows Windscreen Heat reflecting windscreen The heat reflecting windscreen has a coating which reflects solar radiation Also data signals e g from toll stations might be reflected The marked areas on the windscreen are not covered with the coating Devices for electronic data recording and fee payment must be attached in these areas Otherwise data recording mal...

Page 42: ...dows 9 Warning Take care when operating the power windows Risk of injury particularly to children If there are children on the rear seats switch on the child safety system for the power windows Keep a close watch on the windows when closing them Ensure that nothing becomes trapped in them as they move Operable with ignition in position Accessory power mode or Ignition on power mode 3 155 3 156 Ret...

Page 43: ...p movement release the switch Child safety system for rear windows Press z to deactivate rear door power windows the LED illuminates To activate press z again Comfort operating with the remote control Front windows or all windows can be operated remotely from outside the vehicle Press c again for three seconds after unlocking windows will be opened Press e again for three seconds after locking win...

Page 44: ...nd detent until the window starts to close and hold pulled for additional 4 seconds 4 Push switch to the second detent until the window starts to open automatically 5 Repeat for each window Heated rear window Operated by pressing Ü The LED in the button indicates activation Heating works with the engine running and is switched off automatically after a short time Sun visors The sun visors can be f...

Page 45: ...y to the first detent sunroof is opened or closed with safety function enabled as long as the switch is operated Press p or r firmly to the second detent and then release the sunroof is opened or closed automatically with safety function enabled To stop movement operate the switch once more Raise or close Press q or r sunroof is raised or closed automatically with safety function enabled If the su...

Page 46: ...once more Sunblind The sunblind is power operated Close or open the sunblind by pressing H or G General hints Safety function If the sunroof or sunblind encounters resistance during automatic closing it is immediately stopped and opened again Override safety function In the event of closing difficulties due to frost or the like hold r pressed to the second detent The sunroof closes without safety ...

Page 47: ...rbag deactivation 62 Child restraints 63 Child restraint systems 63 Child restraint installation locations 65 ISOFIX child restraint systems 68 Top tether fastening eyes 68 Head restraints Position 9 Warning Only drive with the head restraint set to the proper position The upper edge of the head restraint should be at upper head level If this is not possible for extremely tall people set to highes...

Page 48: ...ht adjustment Pull the head restraint upwards and let engage To move downwards press the catch to release and push the head restraint downwards Active head restraints In the event of a rear end impact the front parts of the active head restraints are moved slightly forwards Thus the head is supported so that the risk of whiplash injury is reduced Notice Approved accessories may only be attached if...

Page 49: ...earance between head and the roof frame Your thighs should rest lightly on the seat without pressing into it Sit with shoulders as far back against the backrest as possible Set the backrest rake so that it is possible to easily reach the steering wheel with arms slightly bent Maintain contact between shoulders and the backrest when turning the steering wheel Do not angle the backrest too far back ...

Page 50: ...inal adjustment Pull handle slide seat release handle Try to move the seat back and forth to ensure that the seat is locked in place Backrest inclination Pull lever adjust inclination and release lever Allow the backrest to engage audibly Seat height Press switch top seat higher bottom seat lower ...

Page 51: ... end lower Lumbar support Adjust lumbar support using the four way switch to suit personal requirements Moving support up and down push switch up or down Increasing and decreasing support push switch forwards or backwards Adjustable thigh support Pull the lever and slide the thigh support ...

Page 52: ... children Objects could become trapped Keep a close watch on the seats when adjusting them Vehicle passengers should be informed accordingly Longitudinal adjustment Move switch forwards backwards Seat height Move switch upwards downwards Seat inclination Tilt front of switch upwards downwards Backrest inclination Tilt switch forwards backwards ...

Page 53: ... power seat adjustment and exterior mirrors Two different driver s seat and exterior mirror settings can be stored Memorised settings 3 23 Vehicle personalisation 3 121 Storing memory position Adjust driver s seat and then adjust exterior mirrors to desired positions Press and hold MEM and 1 or 2 simultaneously until a chime sounds Recall of memory positions Press and hold button 1 or 2 until the ...

Page 54: ...ower driver seat moves rearwards when vehicle is stationary To activate switch off ignition remove key from the ignition switch and open the driver s door If the door is already open switch off ignition to activate the recall To stop recall movement press one of the memory or power seat controls This function can be activated or deactivated in the vehicle personalisation Select the relevant settin...

Page 55: ... the highest setting for people with sensitive skin is not recommended Seat heating is operational when engine is running and during an Autostop Stop start system 3 159 Ventilating Adjust ventilation to the desired setting by pressing A for the respective seat one or more times The control indicator in the button indicates the setting Ventilated seats are operational when engine is running and dur...

Page 56: ...dirt from getting into the belt retractors Seat belt reminder Each seat is equipped with a seat belt reminder indicated for front seats by control indicators X and k or for rear seats by the symbol X in the Driver Information Centre 3 103 Depending on version the passenger s seat may not be equipped with a seat belt reminder Belt force limiters Stress on the body is reduced by the gradual release ...

Page 57: ...e latch plate into the buckle Tighten the lap belt regularly whilst driving by pulling the shoulder belt Loose or bulky clothing prevents the belt from fitting snugly Do not place objects such as handbags or mobile phones between the belt and your body 9 Warning The belt must not rest against hard or fragile objects in the pockets of your clothing Seat belt reminder X k 3 103 Insignia VXR Feed sea...

Page 58: ...at the belt lies across the shoulder It must not lie across the throat or upper arm Do not adjust while driving Unfasten To release belt press red button on belt buckle Insignia VXR Feed seat belt through belt mount on backrest after releasing Seat belts on the rear seats The seat belt for the rear centre seat can only be withdrawn from the retractor if the backrest is in the rear position ...

Page 59: ...t pretensioner control electronics are located in the centre console area Do not put any magnetic objects in this area Do not stick anything on the airbag covers and do not cover them with other materials Each airbag is triggered only once Have deployed airbags replaced by a workshop Furthermore it might be necessary to have the steering wheel the instrument panel parts of the panelling the door s...

Page 60: ...en ACTIEVE AIRBAG ervoor om DODELIJK of ERNSTIG LETSEL van het KIND te voorkomen DA Brug ALDRIG en bagudvendt autostol på et forsæde med AKTIV AIRBAG BARNET kan komme i LIVSFARE eller komme ALVORLIGT TIL SKADE SV Använd ALDRIG en bakåtvänd barnstol på ett säte som skyddas med en framförvarande AKTIV AIRBAG DÖDSFALL eller ALLVARLIGA SKADOR kan drabba BARNET FI ÄLÄ KOSKAAN sijoita taaksepäin suunnat...

Page 61: ... tem obstaja nevarnost RESNIH ali SMRTNIH POŠKODB za OTROKA SR NIKADA ne koristiti bezbednosni sistem za decu u kome su deca okrenuta unazad na sedištu sa AKTIVNIM VAZDUŠNIM JASTUKOM ispred sedišta zato što DETE može da NASTRADA ili da se TEŠKO POVREDI MK НИКОГАШ не користете детско седиште свртено наназад на седиште заштитено со АКТИВНО ВОЗДУШНО ПЕРНИЧЕ пред него затоа што детето може ДА ЗАГИНЕ и...

Page 62: ...9 Danger Do not use a child restraint system on the passenger seat with active front airbag The airbag label is located on both sides of the front passenger sun visor Airbag deactivation 3 62 Front airbag system The front airbag system consists of one airbag in the steering wheel and one in the instrument panel on the front passenger side These can be identified by the word AIRBAG The front airbag...

Page 63: ...de on collision considerably 9 Warning Keep the area in which the airbag inflates clear of obstructions Notice Only use protective seat covers that have been approved for the vehicle Be careful not to cover the airbags Curtain airbag system The curtain airbag system consists of an airbag in the roof frame on each side This can be identified by the word AIRBAG on the roof pillars The curtain airbag...

Page 64: ...vated via a key operated switch on the right side of the instrument panel Use the ignition key to choose the position front passenger airbags are deactivated and will not inflate in the event of a collision Control indicator illuminates continuously A child restraint system can be installed in accordance with the chart Child restraint installation locations 3 65 No adult person is allowed to occup...

Page 65: ...ag deactivation 3 104 Child restraints Child restraint systems We recommend the Vauxhall child restraint system which is tailored specifically to the vehicle When a child restraint system is being used pay attention to the following usage and installation instructions and also those supplied with the child restraint system Always comply with local or national regulations In some countries the use ...

Page 66: ...egulations for mandatory use of child restraint systems Ensure that the child restraint system to be installed is compatible with the vehicle type Ensure that the mounting location of the child restraint system within the vehicle is correct see following tables Allow children to enter and exit the vehicle only on the side facing away from the traffic When the child restraint system is not in use s...

Page 67: ...ears X U1 U U Group II 15 to 25 kg or approx 3 to 7 years X X U U Group III 22 to 36 kg or approx 6 to 12 years X X U U 1 if the child restraint system is being secured using a three point seat belt move seat height adjustment to uppermost position and ensure that vehicle safety belt runs forwards from the upper anchorage point Adjust seat backrest inclination as far as necessary to a vertical pos...

Page 68: ...F2 X IL IUF IL IUF B1 ISO F2X X IL IUF IL IUF A ISO F3 X IL IUF IL IUF Group II 15 to 25 kg or approx 3 to 7 years X IL X Group III 22 to 36 kg or approx 6 to 12 years X IL X IL suitable for particular ISOFIX restraint systems of the specific vehicle restricted or semi universal categories The ISOFIX restraint system must be approved for the specific vehicle type IUF suitable for ISOFIX forward fa...

Page 69: ... in the weight class 9 to 18 kg B1 ISO F2X forward facing child restraint system for smaller children in the weight class 9 to 18 kg C ISO R3 rear facing child restraint system for children of maximum size in the weight class up to 18 kg D ISO R2 rear facing child restraint system for smaller children in the weight class up to 18 kg E ISO R1 rear facing child restraint system for young children in...

Page 70: ... indicated by a logo ISOFIX on the backrest Top tether fastening eyes The vehicle has three fastening eyes on the backside of the rear backrests or in the area behind the head restraints Top Tether fastening eyes are marked with the symbol for a child seat Open the flap of the required fastening eye marked by the child seat symbol In addition to the ISOFIX mounting fasten the Top Tether strap to t...

Page 71: ...oading information 82 Storage compartments 9 Warning Do not store heavy or sharp objects in the storage compartments Otherwise the storage compartment lid could open and vehicle occupants could be injured by objects being thrown around in the event of hard braking a sudden change in direction or an accident Glovebox The glovebox features a pen holder a coin holder and an adapter for the locking wh...

Page 72: ... Fold down armrest Front storage A storage box is located behind a cover below the climate controls Press cover to open Another storage compartment is located next to the steering wheel Armrest storage Storage in the front armrest Push button to fold up the armrest ...

Page 73: ...d compartment cover if necessary Press and hold the catch then push the head restraints down Fold up the rear armrest Put the seat belts of the outboard seats into the belt guides Pull the release lever on one or both sides and fold down the backrests onto the seat cushion To fold up raise backrests and guide them into an upright position until they engage audibly Ensure that the seat belts of the...

Page 74: ...y or damage to the load or vehicle in the event of hard braking or a collision The seat belt of the centre seat could be blocked when the backrest is folded up too quickly To unlock the retractor push in the seat belt or pull it out by approx 20 mm and then release Opening the pass through in the rear centre backrest Fold down rear armrest Pull grip and open the cover Suitable for loading long nar...

Page 75: ...ent cover Load compartment cover Do not place any objects on the cover 5 door Hatchback Removing cover Unhook retaining straps from tailgate Pull cover from the side guides Fitting cover Engage cover in side guides and fold downwards Attach the retaining straps to the tailgate Sports Tourer Country Tourer Closing cover Pull the cover towards the rear using the handle until it engages in the sidewa...

Page 76: ... the load compartment completely mount the blind at four fixing points on the inside of the tailgate Rear floor storage cover Sliding floor cover FlexFloor For a convenient setting of the load compartment the floor cover can be pulled out Pulling out the floor cover Raise the floor at the handle slightly until the spring rolls pop up on each side Press the button under the handle and pull out the ...

Page 77: ...ad the compartment by using the sliding floor cover when the vehicle is parked on a slope as the floor cover could run uncontrolled into the end positions Lift the floor cover up or down only when unloaded Danger of injury For access to the spare wheel or tyre repair kit lift up the floor cover and attach the retaining strap at the upper edge of the tailgate recess Lift up and attach the cover onl...

Page 78: ...te upwards to lock the adapter To remove turn the handle plate downwards and move out of the rail Variable partition net Insert adapters into the required position in the rails Stick together the halves of the net rods To install push rods together a little and insert into the relevant openings in the adapters To remove press the net rods together and remove from the adapters Net pocket Insert ada...

Page 79: ... upper rail Insert the upper brackets of the box from above into the hooks Alternatively install both hooks in the lower rail Plug in the lower brackets of the box from above into the lower hooks Strap set Insert the adapters of the strap set into a rail Make sure that the belt is not twisted The strap set has two locks to open The belt can be tightened Safety net Two different safety nets can be ...

Page 80: ...side Fit the hooks of the small belts into the Top Tether mounting loops on the back side of the folded rear seat backrests Fit the hooks of the wider belts into the locking devices of the rear seat backrests Safety net cassette behind the rear seats Pull out the net from the cassette and latch the rod of the net at one side into the rear installation opening in the roof frame Compress the rod and...

Page 81: ... Note the signs L left side and R right side on the cassette as an installation hint Turn cassette slightly forwards to lock Stowage of safety nets and load compartment cover Rear safety net cassette can be placed together with the load compartment cover and the coiled up safety net under the load compartment floor Open the load compartment floor by pulling the handle Fold and place the floor behi...

Page 82: ...ck 4 door Saloon Stow the warning triangle in the space behind the strap on the right side of the load compartment Sports Tourer Country Tourer Stow the warning triangle in the space behind the straps on the inside of the tailgate First aid kit 5 door Hatchback 4 door Saloon Stow the first aid kit in the space behind the mesh net on the left side of the load compartment ...

Page 83: ...ommended Follow the installation instructions and remove the roof rack when not in use Mounting roof rack 5 door Hatchback 4 door Saloon Open all doors Mounting points are located in each door frame of the vehicle body Detach the cover from each mounting point and fasten the roof rack with the attached screws Sports Tourer Country Tourer with roof railing To fasten the roof rack insert the mountin...

Page 84: ...on top of the instrument panel The load must not obstruct the operation of the pedals parking brake and gear selector or hinder the freedom of movement of the driver Do not place any unsecured objects in the interior Do not drive with an open load compartment 9 Warning Always make sure that the load in the vehicle is securely stowed Otherwise objects can be thrown around inside the vehicle and cau...

Page 85: ...e load evenly and secure it properly with retaining straps Adjust the tyre pressure and vehicle speed according to the load conditions Check and retighten the straps frequently Do not drive faster than 75 mph The permissible roof load is 100 kg The roof load is the combined weight of the roof rack and the load ...

Page 86: ...ng brake fault 105 Antilock brake system ABS 106 Upshift 106 Variable effort steering 106 Following distance 106 Lane departure warning 106 Ultrasonic parking assist 106 Electronic Stability Control off 107 Electronic Stability Control and Traction Control system 107 Traction Control system off 107 Engine coolant temperature 107 Preheating 107 Diesel particle filter 107 AdBlue 107 Tyre pressure mo...

Page 87: ...k has been released Steering wheel controls Driver Information Centre some driver assistance systems Infotainment system and a connected mobile phone can be operated via the controls on the steering wheel Driver Information Centre 3 110 Driver assistance systems 3 180 Further information is available in the Infotainment manual Heated steering wheel Activate heating by pressing Activation is indica...

Page 88: ...en wiper washer Windscreen wiper HI fast LO slow INT interval wiping or automatic wiping with rain sensor OFF off For a single wipe when the windscreen wiper is off press the lever down to position 1x Do not use if the windscreen is frozen Switch off in car washes Adjustable wiper interval Wiper lever in position INT Turn the adjuster wheel to adjust the desired wipe interval short interval turn a...

Page 89: ...ble sensitivity of the rain sensor Turn the adjuster wheel to adjust the sensitivity low sensitivity turn adjuster wheel downwards high sensitivity turn adjuster wheel upwards Keep the sensor free from dust dirt and ice Rain sensor function can be activated or deactivated in the Vehicle personalisation Select the relevant setting in Settings I Vehicle in the Colour Info Display Colour Info Display...

Page 90: ... on again Washer fluid 3 230 Rear window wiper washer Push the rocker switch to activate the rear window wiper upper position continuous operation lower position intermittent operation middle position off Push lever Washer fluid is sprayed onto the rear window and the wiper wipes a few times Do not use if the rear window is frozen Switch off in car washes The rear window wiper comes on automatical...

Page 91: ...ime are shown in the 8 Colour Info Display Colour Info Display operation 3 117 4 2 Display Operate the display by the buttons below the display Press and then select the SETTINGS icon by turning and pressing MENU Select Time menu page Set time Select the Set Time menu item to enter the respective submenu Select the AUTO SET screen button at the bottom of the screen Activate either On RDS mode or O...

Page 92: ... Manual mode is selected adjust hours and minutes using hg screen buttons Tap on the 12 24 Hr screen button on the right side of the screen to select a time mode If 12 hour mode is selected a third column for AM and PM setting is displayed Select the desired option In On RDS Mode the RDS signal of most VHF transmitters automatically sets the time RDS time synchronisation can take a few minutes Som...

Page 93: ...imum power consumption of 120 watts A 230 Volt power outlet is located in the rear centre console If ignition is on and a device is plugged in an LED in the outlet illuminates green Do not exceed the maximum power consumption of 150 watts 9 Danger Power outlet works under high electrical voltage With ignition off the power outlets are deactivated Additionally the power outlets are deactivated in t...

Page 94: ...ements laid down in DIN VDE 40 839 Do not connect any current delivering accessories e g electrical charging devices or batteries Do not damage the outlets by using unsuitable plugs Stop start system 3 159 Ashtrays Caution To be used only for ash and not for combustible rubbish A portable ashtray can be placed in the cupholders ...

Page 95: ...ls 93 Warning lights gauges and indicators Instrument cluster Depending on the version three instrument clusters are available Baselevel Midlevel Uplevel Uplevel instrument cluster can be displayed as Sport mode or Tour mode ...

Page 96: ...94 Instruments and controls Baselevel instrument cluster ...

Page 97: ...Instruments and controls 95 Midlevel instrument cluster ...

Page 98: ...96 Instruments and controls Uplevel instrument cluster Sport mode ...

Page 99: ...Instruments and controls 97 Uplevel instrument cluster Tour mode ...

Page 100: ...ing 3 106 r Ultrasonic parking assist 3 106 n Electronic Stability Control off 3 107 b Electronic Stability Control and Traction Control system 3 107 k Traction Control system off 3 107 W Engine coolant temperature 3 107 Preheating 3 107 Diesel particle filter 3 107 Y AdBlue 3 107 w Tyre pressure monitoring system 3 108 I Engine oil pressure 3 108 i or Y Low fuel 3 108 d Immobiliser 3 108 D Autost...

Page 101: ...nce since the last reset is displayed on the trip computer page Two trip odometer are selectable for different trips Baselevel instrument cluster Select between page W1 and pageW2 by turning the adjuster wheel on turn signal lever Each trip odometer can be reset separately when ignition is on select respective page hold the reset knob depressed for a few seconds or press SET CLR on the turn signal...

Page 102: ...the engine speed Drive in a low engine speed range for each gear as much as possible Caution If the needle is in the red warning zone the maximum permitted engine speed is exceeded Engine at risk Fuel gauge Displays the level in the fuel or gas tank depending on the operation mode The arrow indicates the vehicle side where the fuel filler flap is located Control indicator i or Y illuminates if the...

Page 103: ...A message is displayed in the Driver Information Centre As soon as the liquid gas tank is empty petrol operation is automatically engaged until the ignition is switched off Fuel for liquid gas operation 3 213 Engine coolant temperature gauge Displays the coolant temperature 50 engine operating temperature not yet reached 90 central area normal operating temperature 130 temperature too high Caution...

Page 104: ...rn signal lever for several seconds to reset The ignition must be switched on but engine not running On Midlevel or Uplevel display press on steering wheel to open the subfolder Select Reset and confirm by pressing 9 for several seconds The ignition must be switched on but engine not running The system must be reset every time the engine oil is changed to allow proper functionality Seek the assist...

Page 105: ...use failure of turn signal light on trailer Bulb replacement 3 234 Fuses 3 244 Turn signals 3 134 Seat belt reminder Seat belt reminder on front seats X for driver s seat illuminates or flashes red in the instrument cluster k for front passenger seat illuminates or flashes red in the centre console when seat is occupied Illuminates After the ignition has been switched on until the seat belt has be...

Page 106: ...lumination of v 9 Warning Have the cause of the fault remedied immediately by a workshop Belt pretensioners airbag system 3 54 3 57 Airbag deactivation V illuminates yellow The front passenger airbag is activated illuminates yellow The front passenger airbag is deactivated 3 62 9 Danger Risk of fatal injury for a child using a child restraint system together with activated front passenger airbag R...

Page 107: ...orkshop Illuminates when the manual parking brake is applied and ignition is switched on 3 173 Operate pedal illuminates or flashes yellow Illuminates Brake pedal needs to be depressed to release the electric parking brake 3 173 Clutch pedal needs to be depressed to start the engine in Autostop mode Stop start system 3 159 Flashes Clutch pedal needs to be depressed for a main start of the engine 3...

Page 108: ...l page in the Driver Information Centre 3 110 Variable effort steering c illuminates yellow Fault in variable effort steering system This may lead to a higher or lower steering effort Consult a workshop Following distance E indicates the following distance setting of adaptive cruise control or the alert timing sensitivity of forward collision alert by filled distance bars Adaptive cruise control 3...

Page 109: ...rature W illuminates red Illuminates when the engine is running Stop switch off engine Caution Coolant temperature too high Check coolant level immediately 3 229 If there is sufficient coolant consult a workshop Preheating illuminates yellow Preheating of diesel engine is activated Only activates when outside temperature is low Diesel particle filter illuminates or flashes yellow The diesel partic...

Page 110: ...e wheels 1 Depress clutch 2 Select neutral gear set selector lever to N 3 Move out of the flow of traffic as quickly as possible without impeding other vehicles 4 Switch off ignition 9 Warning When the engine is off considerably more force is needed to brake and steer During an Autostop the brake servo unit will still be operational Do not remove key until vehicle is stationary otherwise the steer...

Page 111: ...es for approx 4 seconds after the ignition is switched on as a reminder for symmetrical headlight 3 131 Fog light illuminates green The front fog lights are on 3 135 Rear fog light r illuminates yellow The rear fog light is on 3 135 Cruise control m illuminates white or green Illuminates white The system is on Illuminates green Cruise control is active Set speed is indicated on midlevel or uplevel...

Page 112: ...indicator Traffic sign assistant 3 208 Door open h illuminates red A door or the tailgate is open Information displays Driver Information Centre The Driver Information Centre is located in the instrument cluster Depending on the version and the instrument cluster the Driver Information Centre is available as Baselevel display Midlevel display or Uplevel display Driver Information Centre indicates ...

Page 113: ...enus and functions The menus and functions can be selected via the buttons on the turn signal lever Press MENU to switch between the main menus or to return from a submenu to the next higher menu level Turn the adjuster wheel to select a subpage of the main menu or to set a numeric value Press SET CLR to select and confirm a function Vehicle and service messages are popped up in the Driver Informa...

Page 114: ...folder of the selected subpage Press Q or P to select functions or to set a numeric value if required Press 9 to select and confirm a function If the Driver Information Centre requests the driver to confirm a function or message by pressing H Select confirm by pressing 9 Once a main menu page is selected this selection remains stored until another main menu page is selected This means once the Inf...

Page 115: ...ess SET CLR for a few seconds on Midlevel and Uplevel display press and confirm with 9 The information of trip odometer page 1 A and 2 B can be reset separately for odometer average consumption and average speed while the respective display is active Average fuel consumption Display of average consumption The measurement can be reset at any time and starts with a default value To reset on Baseleve...

Page 116: ...is indicated for the currently selected mode LPG or Petrol Remaining oil life Indicates an estimate of the oil s useful life The number in means the remaining of current oil life 3 101 Tire pressure Checks tyre pressure of all wheels during driving 3 254 Timer To start and stop press 9 To reset press and confirm Reset Traffic sign assistant Displays the detected traffic signs for the current route...

Page 117: ...oil temperature oil pressure battery voltage g force indication lap timer Depending on settings of the Uplevel display gauges for Oil temperature Oil pressure or Battery voltage are also displayed on the left and right of the speedometer Oil temperature Indicates oil temperature in degrees Celsius Oil pressure Indicates the oil pressure in kPa Battery voltage Displays the vehicle battery voltage G...

Page 118: ...ic units by pressing 9 Display themes Press while display themes is displayed Select Sport or Touring mode by pressing 9 Sport mode includes more vehicle information Tour mode includes more media information This setting is only available with Uplevel display Info pages Press while Info pages is displayed A list of all items in the Info Menu is displayed Select the functions to be displayed in the...

Page 119: ...guration the vehicle has a 4 2 colour display or 8 colour display with Touch Screen functionality The Info displays indicate time 3 89 outside temperature 3 89 date 3 89 Infotainment system see description in the Infotainment manual navigation see description in the Infotainment manual system messages vehicle messages 3 119 settings for vehicle personalisation 3 121 4 2 Colour display Selecting me...

Page 120: ...essing Tap required menu display icon or a function with the finger Scroll a longer submenu list with the finger up or down Confirm a required function or selection by tapping Tap q on the display to exit a menu without changing a setting Press to return to the homepage For further information see Infotainment manual Speech recognition Description see Infotainment manual Vehicle personalisation 3 ...

Page 121: ...em displays messages regarding the following topics service messages fluid levels anti theft alarm system brakes drive systems ride control systems driver assistance systems cruise control speed limiter adaptive cruise control forward collision alert collision imminent braking system parking assist systems lighting bulb replacement adaptive forward lighting wiper washer system doors windows side b...

Page 122: ... If a warning message appears in the Driver Information Centre If the electronic key is not in the passenger compartment If the parking assist detects an object If an unintended lane change occurs If the diesel particle filter has reached the maximum filling level If AdBlue needs to be refilled When the vehicle is parked and or the driver s door is opened With exterior lights on If the trailer hit...

Page 123: ...onally the 8 display is operable as a touchscreen See description Colour Info Display 3 117 and the Infotainment manual With active display press Turn MENU to select SETTINGS display icon Press MENU to confirm The following settings can be selected by turning and pressing the multifunction knob Time and Date Sport Mode Language Language Valet Mode Radio Vehicle Bluetooth Voice Display Rear Camera ...

Page 124: ...ivates or deactivates the ultrasonic parking assist Auto Collision Preparation Activates or deactivates the automatic brake functionality of the vehicle in the event of imminent collision danger The following is selectable the system will take over brake control warn by chimes only or is deactivated completely Go Notifier Activates or deactivates the reminder function of the adaptive cruise contro...

Page 125: ...nition Delayed Door Lock Activates or deactivates the delayed door locking function This feature delays the actual locking of the doors until all doors are closed Remote Lock Unlock Start Remote Unlock Light Feedback Activates or deactivates the hazard warning flasher feedback whilst unlocking Remote Lock Feedback Changes what kind of feedback is given when locking the vehicle Remote Door Unlock C...

Page 126: ...nformation contact your workshop Notice In order to be available and operational OnStar needs a valid OnStar subscription functioning vehicle electrics mobile service and GPS satellite link To activate the OnStar services and set up an account press Z and speak with an advisor Depending on the equipment of the vehicle the following services are available Emergency services and support in the case ...

Page 127: ... support e g in the case of a vehicle breakdown a flat tyre and empty fuel tank press Z to establish a connection to an advisor Emergency services In the case of an emergency situation press and talk to an advisor The advisor then contacts emergency or assistance service providers and directs them to your vehicle In the case of an accident with activation of airbags or belt tensioners an automatic...

Page 128: ...ehicle assistance If the vehicle is stolen report the theft to the authorities and request OnStar stolen vehicle assistance Use any phone to call an advisor Find the respective OnStar phone number on our country specific website OnStar can provide support in locating and recovering the vehicle Theft alert When the anti theft alarm system is triggered a notification is sent to OnStar You are then i...

Page 129: ...nd request that the account be transferred to the new vehicle Notice In any case if the vehicle is disposed of sold or otherwise transferred immediately inform OnStar about the changes and terminate the OnStar service on this vehicle Vehicle location The vehicle location is transmitted to OnStar when service is requested or triggered A message on the Info Display informs about this transmission To...

Page 130: ... warning flashers 134 Turn and lane change signals 134 Front fog lights 135 Rear fog lights 135 Parking lights 135 Reversing lights 136 Misted light covers 136 Interior lighting 136 Instrument panel illumination control 136 Interior lights 136 Reading lights 137 Sunvisor lights 137 Lighting features 138 Centre console lighting 138 Entry lighting 138 Exit lighting 138 Battery discharge protection 1...

Page 131: ...ing flasher lights are located in the tailgate frame They are illuminated when the tailgate is open Additional tail lights are only intended as position lights when the tailgate is open and are not to be used when driving Automatic light control When the automatic light control function is switched on and the engine is running the system switches between daytime running light and low high beam aut...

Page 132: ...ches back to high beam Activation The high beam assist is activated by pushing the indicator lever twice with a speed above 25 mph The green control indicator l illuminates continuously when the assist is activated the blue one 7 illuminates when high beam is on Control indicator l 3 109 Deactivation Push indicator lever once It is also deactivated when front fog lights are switched on If a headli...

Page 133: ...hts can be set to right hand or left hand drive traffic mode in the vehicle personalisation menu in the Colour Info Display Select the relevant setting in Settings I Vehicle in the Colour Info Display Colour Info Display 3 117 Vehicle personalisation 3 121 Every time the ignition is switched on control indicator f flashes for approx 4 seconds as a reminder that right hand drive traffic mode is sel...

Page 134: ...le of 8 to the roadside Town lighting Activated automatically at a speed range between approx 25 and 34 mph and when street lights are detected by the light sensor The light range is reduced by an extended light distribution Country lighting Activated automatically at a speed range between approx 34 and 70 mph The beam of light and the brightness is different between the left and the right side Mo...

Page 135: ...hen The camera in the windscreen detects the lights of oncoming or preceding vehicles The vehicle speed is slower than 12 mph It is foggy or snowy Driving in urban areas If there are no restrictions detected the system switches back to high beam Activation The high beam assist is activated by pushing the indicator lever twice with a speed above 25 mph The green control indicator l illuminates cont...

Page 136: ...ble the affected headlight will be automatically switched off In any case one headlight will stay on A warning is displayed in the Driver Information Centre Hazard warning flashers Operated by pressing In the event of an accident with airbag deployment the hazard warning flashers are activated automatically Turn and lane change signals lever up right turn signal lever down left turn signal If the ...

Page 137: ...og lights will switch headlights on automatically Rear fog lights Operated by pressing r Light switch in position AUTO switching on rear fog light will switch headlights on automatically Light switch in position 8 rear fog light can only be switched on with front fog lights The vehicle rear fog light is deactivated when towing Parking lights When the vehicle is parked the parking lights on one sid...

Page 138: ... be adjusted when the exterior lights are on instrument panel illumination Info Display dome light illuminated switches and operation elements Turn thumb wheel A and hold until the desired brightness is obtained On vehicles with light sensor the brightness can only be adjusted when the exterior lights are on and the light sensor detects night conditions Interior lights During entry and exit of the...

Page 139: ...ion with the front courtesy light depending on rocker switch position Reading lights Operated by pressing s and t in front and rear courtesy lights On vehicles with panoramaroof rear interior lights are located near the rear handles Switch on reading lights by pressing on the cover Sunvisor lights Illuminates when the cover is opened ...

Page 140: ...wing lights will additionally switch on when the driver s door is opened illumination of all switches Driver Information Centre door pocket lights Exit lighting The following lights switch on if the key is removed from the ignition switch interior lights instrument panel light puddle lights They will switch off automatically after a delay This function works only in the dark Theatre lighting is ac...

Page 141: ...and optimised power distribution To prevent discharge of the vehicle battery when driving the following systems are reduced automatically in two stages and finally switched off auxiliary heater heated rear window and mirrors heated seats fan In the second stage a message which confirms the activation of the vehicle battery discharge protection will be displayed in the Driver Information Centre Swi...

Page 142: ...ir conditioning regular operation 153 Service 153 Climate control systems Air conditioning system Controller and buttons for the following functions temperature TEMP air distribution l M K fan speed Z cooling A C air recirculation 4 demisting and defrosting V Heated rear window Ü 3 42 Heated seats ß 3 53 Ventilated seats A 3 53 Heated steering wheel 3 85 Temperature TEMP Turn controller red warm b...

Page 143: ... means fan off Cooling A C Press A C to switch on cooling Activation is indicated by the LED in the button Cooling is only functional when the engine is running and climate control fan is switched on Press A C again to switch off cooling The air conditioning system cools and dehumidifies dries cabin air as required Therefore condensation may form and is drained under the vehicle If no cooling or d...

Page 144: ... air distribution Set temperature controller TEMP to coldest level Set fan speed controller Z to highest level Open all vents Air recirculation system 4 Press 4 to activate air recirculation mode Activation is indicated by the LED in the button Select air recirculation to assist in cooling the interior or in blocking outside odors or exhaust When recirculation is selected a partial ventilation to ...

Page 145: ...n speed are indicated in the climate display Each change of settings is shown briefly in the Info Display The electronic climate control system is only fully operational when the engine is running Climate control system settings are saved in the key used to lock the vehicle Automatic mode AUTO Basic setting for maximum comfort Press AUTO the air distribution and fan speed are regulated automatical...

Page 146: ...ay If the minimum temperature Lo is set the climate control system runs at maximum cooling if cooling A C is switched on If the maximum temperature Hi is set the climate control system runs at maximum heating Notice If AC is switched on reducing the set cabin temperature can cause the engine to restart from an Autostop or inhibit an Autostop Stop start system 3 159 Demisting and defrosting the win...

Page 147: ... air distribution buttons and the fan speed controller as follows Manual changing of settings will deactivate automatic mode Fan speed Z Turn controller Z The selected fan speed is indicated by the number of segments in the climate display If the fan is switched off the air conditioning is also deactivated To return to automatic mode Press AUTO Air distribution l M K Press appropriate button for d...

Page 148: ...ton AUTO The LED in the button illuminates to indicate activation Manual air recirculation 4 Press 4 to activate air recirculation mode The LED in the button illuminates to indicate activation Select air recirculation to assist in cooling the interior or in blocking outside odours or exhaust When recirculation is selected a partial ventilation to refresh the interior air will occur every 10 minute...

Page 149: ...ing A C air recirculation 4 demisting and defrosting V system ON OFF X dual zone temperature synchronisation SYNC Heated rear window Ü 3 42 Heated front seats ß 3 53 Ventilated front seats A 3 53 Heated steering wheel 3 85 Indication Temperature settings are indicated separately on the panels for driver and passenger side Each change of settings is shown in the Info Display for a few seconds The d...

Page 150: ... 3 117 Vehicle personalisation 3 121 Temperature preselection SR Set desired temperature by touching R for higher temperatures or S for lower temperatures Selected temperature is indicated in the panels Using driver s side panel changes temperatures for both sides when SYNC is selected while using the passenger side panel changes only the passenger side temperature and turns off SYNC if previously...

Page 151: ...cle in the Colour Info Display Colour Info Display 3 117 Vehicle personalisation 3 121 Notice If V is pressed while the engine is running an Autostop will be inhibited until V is pressed again If V is pressed while the engine is in an Autostop the engine will restart automatically Stop start system 3 159 Manual settings Climate control system settings can be manually adapted by using the air distr...

Page 152: ...ntrol fan is switched on Press A C again to switch off cooling The air conditioning system cools and dehumidifies dries cabin air as required Therefore condensation may form and is drained under the vehicle If no cooling or drying is required switch off the cooling system for fuel saving reasons System ON OFF X Cooling fan and automatic mode can be switched off by pressing X When the system is dea...

Page 153: ...atic air recirculation An air humidity sensor automatically switches the system to external air if internal air humidity is too high Basic settings Some basic settings can be changed in the vehicle personalisation menu in the Colour Info Display Select the relevant settings in Settings I Vehicle in the Colour Info Display Colour Info Display 3 117 Vehicle personalisation 3 121 Auxiliary heater Air...

Page 154: ...to the slats of the air vents Risk of damage and injury in case of an accident Fixed air vents Additional air vents are located beneath the windscreen and door windows and in the foot wells Maintenance Air intake The air intake in front of the windscreen in the engine compartment must be kept clear to allow air intake Remove any leaves dirt or snow Pollen filter Cabin air filtration A particle fil...

Page 155: ...r conditioning should be operated for a few minutes once a month irrespective of the weather and time of year Service For optimal cooling performance it is recommended to annually check the climate control system starting three years after initial vehicle registration including functionality and pressure test heating functionality leakage check check of drive belts cleaning of condenser and evapor...

Page 156: ...ystem 172 Parking brake 173 Brake assist 175 Hill start assist 175 Ride control systems 175 Traction Control system 175 Electronic Stability Control 176 Interactive driving system 177 Driver assistance systems 180 Cruise control 180 Speed limiter 182 Adaptive cruise control 183 Forward collision alert 190 Following distance indication 194 Active emergency braking 194 Parking assist 196 Side blind ...

Page 157: ...ystem malfunction the vehicle can be steered but may require increased effort Control indicator c 3 106 Caution Vehicles equipped with hydraulic power steering If the steering wheel is turned until it reaches the end of its travel and is held in that position for more than 15 seconds damage may occur to the power steering system and there may be loss of power steering assist Starting and operating...

Page 158: ...key must be inside the vehicle Accessory power mode Press Engine Start Stop once without operating clutch or brake pedal The yellow LED in the button illuminates Steering wheel lock is released and some electrical functions are operable ignition is off Ignition on power mode Press and hold Engine Start Stop for 6 seconds without operating clutch or brake pedal The green LED in the button illuminat...

Page 159: ...Driver Information Centre may display No Remote Detected or Replace Battery in Remote Key when you try to start the vehicle Open the centre console storage area by lifting up the armrest Place the electronic key in the transmitter pocket Other objects e g other keys transponder tags coins etc must be removed from the pocket Depress the clutch pedal manual transmission or the brake pedal automatic ...

Page 160: ...Automatic transmission operate brake pedal and move selector lever to P or N Do not operate accelerator pedal Press and release Engine Start Stop an automatic procedure operates the starter with a short delay until the engine is running see Automatic Starter Control Before restarting or to switch off the engine when vehicle is stationary press Engine Start Stop once more briefly During an Autostop...

Page 161: ...starting engine Clutch pedal not operated manual transmission Brake pedal not operated or selector lever not in P or N automatic transmission Timeout occurred Turbo engine warm up Upon start up engine available torque may be limited for a short time especially when the engine temperature is cold The limitation is to allow the lubrication system to fully protect the engine Overrun cut off The fuel ...

Page 162: ...icator in the instrument cluster illuminates when engine is in Autostop During an Autostop the heating and brake performance will be maintained Caution The steering assist can be reduced during an Autostop Conditions for an Autostop The stop start system checks if each of the following conditions is fulfilled The stop start system is not manually deactivated The bonnet is fully closed The driver s...

Page 163: ...ne The engine start is indicated by the needle at the idle speed position in the tachometer If the selector lever is shifted out of neutral before depressing the clutch first control indicator illuminates or is shown as a symbol in the Driver Information Centre Control indicator 3 105 Restart of the engine by the stop start system The selector lever must be in neutral to enable an automatic restar...

Page 164: ...wnhill slope engage reverse gear or set the selector lever to position P before removing the ignition key or switching off ignition on vehicles with power button Turn the front wheels towards the kerb Close the windows and the sunroof Remove the ignition key from the ignition switch or switch off ignition on vehicles with power button Turn the steering wheel until the steering wheel lock is felt t...

Page 165: ...e g short distances the system cannot clean itself automatically If cleaning of the filter is required and if previous driving conditions did not enable automatic cleaning it will be indicated by and a warning message in the Driver Information Centre with a warning message illuminates when diesel particle filter is full Start cleaning process as soon as possible with a warning message flashes when...

Page 166: ... exhaust emission This is achieved by injecting a Diesel Exhaust Fluid DEF into the exhaust system The designation of this fluid is AdBlue Ⓡ1 It is a non toxic non flammable colourless and odourless fluid which consists of 32 urea and 68 water 9 Warning Avoid contact of your eyes or skin with AdBlue In case of eye or skin contact rinse off with water Caution Avoid contact of the paintwork with AdB...

Page 167: ...warning chime sounds four times every three minutes After the prevention of an engine start the following message Refill AdBlue To Start Vehicle will be displayed To restart the engine the tank must be filled with AdBlue first High emission warnings If the exhaust emission rises above a certain value warnings similar to the range warnings as described above will be displayed in the Driver Informat...

Page 168: ...otective cap from the filler neck ammonia fumes may emerge Do not inhale as the fumes have a pungent smell The fumes are not harmful by inhalation The vehicle must be parked on a level surface The filler neck for AdBlue is located behind the fuel filler flap The fuel filler flap is located at right rear side of the vehicle The fuel filler flap can only be opened if the vehicle is unlocked 1 Remove...

Page 169: ... automatic transmission permits automatic gearshifting automatic mode or manual gearshifting manual mode Manual shifting is possible in manual mode by tapping the selector lever or pulling the steering wheel paddles 3 169 Transmission display The mode or selected gear is shown in the transmission display In automatic mode the driving programme is indicated by D in the Driver Information Centre In ...

Page 170: ...ctor lever is not in P when the ignition is switched off control indicator j and P will flash To engage P or R press the release button The engine can only be started with lever in position P or N When position N is selected press brake pedal or apply parking brake before starting Do not accelerate while engaging a gear Never depress the accelerator pedal and brake pedal at the same time When a ge...

Page 171: ...ulls allows gears to be skipped The selected gear is indicated in the instrument cluster Temporary manual mode in drive mode D Manual paddle shifting is also possible in automatic mode D Upon completion of manual shifting operation transmission changes to automatic mode D after a defined time To interrupt manual mode do one of the following Press paddle for 1 second Move selector lever towards the...

Page 172: ...faces the electronic transmission control selects a higher gear automatically Kickdown If the accelerator pedal is pressed down completely in automatic mode the transmission shifts to a lower gear depending on engine speed Overheat protection In the event of transmission overheating due to high outside temperatures or sporty driving style the torque and the maximum speed of the engine can be tempo...

Page 173: ... the cause of the power supply interruption remedied by a workshop 4 Mount the selector lever trim on the centre console and refit Manual transmission To engage reverse with the vehicle stationary press the release button on the selector lever and engage the gear If the gear does not engage set the lever to neutral release the clutch pedal and depress again then repeat gear selection Do not slip t...

Page 174: ...tre the system may have limited functionality or be completely disabled in some cases i e the vehicle switches to Front wheel drive Seek the assistance of a workshop Towing the vehicle 3 266 Brakes The brake system comprises two independent brake circuits If a brake circuit fails the vehicle can still be braked using the other brake circuit However braking effect is achieved only when the brake pe...

Page 175: ...ible Control indicator u 3 106 Adaptive brake light During full braking all three brake lights flash for the duration of ABS control Fault 9 Warning If there is a fault in the ABS the wheels may be liable to lock due to braking that is heavier than normal The advantages of ABS are no longer available During hard braking the vehicle can no longer be steered and may swerve Have the cause of the faul...

Page 176: ...unction Vehicles with manual transmission Depressing the clutch pedal and then slightly releasing the clutch pedal and slightly depressing the accelerator pedal releases the electric parking brake automatically This is not possible when switch m is pulled at the same time Vehicles with automatic transmission Engaging D and then depressing the accelerator pedal releases the electric parking brake a...

Page 177: ...nt by a pulse in the brake pedal and a greater resistance when depressing the brake pedal Maintain steady pressure on the brake pedal as long as full braking is required Maximum brake force is automatically reduced when brake pedal is released Hill start assist The system helps prevent unintended movement when driving away on inclines When releasing the foot brake after stopping on an incline brak...

Page 178: ...next time the ignition is switched on Electronic Stability Control Electronic Stability Control ESC improves driving stability when necessary regardless of the type of road surface or tyre grip As soon as the vehicle starts to swerve understeer oversteer engine output is reduced and the wheels are braked individually ESC operates in combination with the Traction Control system TC 3 175 It also pre...

Page 179: ...tivated k and n extinguishes when TC and ESC are reactivated ESC is also reactivated the next time the ignition is switched on Fault If there is a fault in the system the control indicator b illuminates continuously and a message appears in the Driver Information Centre The system is not operational Have the cause of the fault remedied by a workshop Interactive driving system Flex Ride Flex Ride d...

Page 180: ...apted to a comfort driving style Damping of shock absorbers reacts more softly Accelerator pedal reacts with standard settings Steering support is in standard mode Engine torque of All wheel drive is distributed mainly to the front axle Shift points of automatic transmission occur in a comfort mode NORMAL mode All settings of the systems are adapted to standard values Drive mode control Within eac...

Page 181: ...RT mode when SPORT is pressed Select the relevant settings in Settings I Sport Mode in the Colour Info Display Colour Info Display 3 117 Vehicle personalisation 3 121 Flex Ride VXR Version The VXR Version of Flex Ride system works in the same way as the standard Flex Ride system with the difference that the modes have a more sporty characteristic VXR Flex Ride driving system allows the driver to s...

Page 182: ...r assistance systems 9 Warning Driver assistance systems are developed to support the driver and not to replace the driver s attention The driver accepts full responsibility when driving the vehicle When using driver assistance systems always take care regarding the current traffic situation Cruise control The cruise control can store and maintain speeds of approx 20 to 120 mph Deviations from the...

Page 183: ...efly turn to RES repeatedly speed increases continuously or in small increments Alternatively accelerate to the desired speed and store by turning to SET Reduce speed With cruise control active hold thumb wheel turned to SET or briefly turn to SET repeatedly speed decreases continuously or in small increments Deactivation Press y control indicator m in instrument cluster illuminates white Cruise c...

Page 184: ...t speed limit is displayed in the Driver Information Centre when the system is active Activation Press L The control indicator L in the instrument cluster illuminates white If cruise control or adaptive cruise control has been activated before it is switched off when speed limiter is activated and control indicator m extinguishes Set speed limit Accelerate to the desired speed and briefly turn thu...

Page 185: ...ching off Press L the speed limit indication in the Driver Information Centre extinguishes The stored speed is deleted By pressing m to activate cruise control or adaptive cruise control speed limiter is also deactivated and the stored speed is deleted By switching off the ignition speed limiter is also deactivated but the speed limit will be stored for next speed limiter activation Adaptive cruis...

Page 186: ...required while driving with adaptive cruise control The driver stays fully in control of the vehicle because the brake pedal the accelerator pedal and the cancel switch have priority over any adaptive cruise control operation Switching on Press C to switch on adaptive cruise control The control indicator m or C in the instrument cluster illuminates white Activation by setting the speed Adaptive cr...

Page 187: ...o SET Reduce speed With adaptive cruise control active hold thumb wheel turned to SET speed decreases continuously in large increments or activate repeatedly SET speed decreases in small increments If the vehicle is driven with adaptive cruise control active much slower than the desired speed e g because of a slower vehicle ahead then the current speed can be stored and maintained by turning the t...

Page 188: ...Always move selector lever to park position P and switch off the ignition before leaving the vehicle Setting the following distance When adaptive cruise control detects a slower moving vehicle in the driving path it will adjust the vehicle speed to maintain the following distance selected by the driver The following distance can be set to near medium or far Press E the current setting is shown in ...

Page 189: ...below 9 mph on vehicles with automatic transmission it slows down to a stop without deactivating within two minutes The Traction Control system is operating The Electronic Stability Control is operating There is no traffic and nothing detected on the road sides for several minutes In this case there are no radar echoes and the sensor may report that it is blocked The collision imminent braking sys...

Page 190: ...In case of sensor blockage clean the sensor cover System limits The system s automatic brake force does not permit hard braking and the braking level may not be sufficient to avoid a collision After a sudden lane change the system needs a certain time to detect the next preceding vehicle So if a new vehicle is detected the system may accelerate instead of braking Adaptive cruise control does ignor...

Page 191: ... or if the visibility is reduced due to weather conditions While entering or exiting a motorway adaptive cruise control may lose the vehicle ahead and accelerate up to the set speed For this reason decrease the set speed before the exit or before the entry Vehicle path changes If another vehicle enters your driving path adaptive cruise control will first consider the vehicle when it is completely ...

Page 192: ...ensor position Settings Settings can be changed in the vehicle personalisation menu in the Colour Info Display Select the relevant setting in Settings I Vehicle in the Colour Info Display Colour Info Display 3 117 Vehicle personalisation 3 121 Fault If the adaptive cruise control does not work due to temporary conditions e g blockage by ice or if there is a permanent system error then a message is...

Page 193: ...alert based on front camera system on vehicles with no cruise control or traditional cruise control only 3 180 Forward collision alert based on radar system The system uses the radar sensor behind the radiator grille to detect a vehicle directly ahead in your path within a distance of max 150 metres Activation Forward collision alert operates automatically above walking speed provided that Auto Co...

Page 194: ...maintaining safe following distance according to applicable traffic rules weather and road conditions etc at all times If a collision is imminent the collision alert symbol pops up in the Driver Information Centre and a warning chime sounds Depress the brake pedal if it is required by the situation Settings Settings can be changed in the vehicle personalisation menu in the Colour Info Display Sele...

Page 195: ...quired by the situation Deactivation The system can be deactivated Press V repeatedly until Forward Collision Alert Off appears in the Driver Information Centre General information for both variants of forward collision alert 9 Warning Forward collision alert is just a warning system and does not apply the brakes When approaching a vehicle ahead too rapidly it may not provide you enough time to av...

Page 196: ... turn signal lever 3 110 On Midlevel or Uplevel display select Info menu and press o to select Following distance indication 3 110 The minimum indicated distance is 0 5 seconds If there is no vehicle ahead or the vehicle ahead is out of range two dashes will be displayed s If Adaptive cruise control is active this page shows the following distance setting instead 3 183 Active emergency braking Act...

Page 197: ... in immediate hard braking This function helps the driver brake quicker and harder before the imminent collision 9 Warning Active emergency braking is not designed to apply hard autonomous braking or to automatically avoid a collision It is designed to reduce the vehicle speed before a collision It may not react for stopped vehicles pedestrians or animals After a sudden lane change the system need...

Page 198: ...er Information Centre Vehicle messages 3 119 Parking assist 9 Warning The driver bears full responsibility for the parking manoeuvre Always check the surrounding area when driving backwards or forwards while using parking assist system Front rear parking assist The front rear parking assist measures the distance between the vehicle and obstacles in front and behind the vehicle The system gives aco...

Page 199: ...on which side of the vehicle is closer to an obstacle you will hear acoustic warning signals on the respective side of the vehicle The interval between the sounds becomes shorter as the vehicle gets closer to that obstacle When the distance is less than approx 30 cm the sound is continuous Additionally the distance to obstacles is shown in the Driver Information Centre 3 110 The distance to a fron...

Page 200: ...In the event of a fault in the system or if the system does not work due to temporary conditions e g ice covered sensors a message is displayed in the Driver Information Centre Vehicle messages 3 119 Advanced parking assist 9 Warning The driver bears full responsibility for accepting the parking slot suggested by the system and the parking manoeuvre Always check the surrounding area in all directi...

Page 201: ...e advanced parking assist system begins looking for a suitable parking slot When a suitable slot is detected a visual feedback and acoustic signals are given in the Driver Information Centre If the driver does not stop the vehicle within 10 metres after a parking slot is proposed the system starts to search for another suitable parking slot The parking slot suggestion of the system is accepted whe...

Page 202: ...side To detect parking slots on the driver side press for approx 2 seconds Display priorities After activating the advanced parking assist a message appears in the Driver Information Centre Advanced parking assist indication in the Driver Information Centre can be inhibited by vehicle messages with a higher priority After approving the message by pressing SET CLR on the turn signal lever or the 9 ...

Page 203: ...bject will resume the parking manoeuvre If the object is not removed the system will be deactivated Press to activate the system and search for a new parking slot Basic notes on using parking assist systems 9 Warning Under certain circumstances various reflective surfaces on objects or clothing as well as external noise sources may cause the system to fail to detect obstacles Special attention mus...

Page 204: ...ibration For optimal parking guidance a driving distance of at least 22 miles including a number of bends is required Side blind spot alert The side blind spot alert system detects and reports objects on either side of the vehicle within a specified blind spot zone The system alerts visually in each exterior mirror when detecting objects that may not be visible in the interior and exterior mirrors...

Page 205: ...tem sensor covers a zone of approx 3 5 metres on both sides of the vehicle This zone starts at each exterior mirror and extends rearwards by approx 3 metres The height of the zone is between approx 0 5 metres and 2 metres off the ground The system is deactivated if the vehicle is towing a trailer Side blind spot alert is designed to ignore stationary objects such as guardrails posts curbs walls an...

Page 206: ...icle from behind which drives considerably faster the amber warning symbol F will illuminate in the relevant exterior mirror If the driver then activates the turn signal the warning symbol F starts flashing amber as a warning not to change lanes When the vehicle is started both exterior mirror displays will briefly come on to indicate that the system is operating Detection zones The system sensors...

Page 207: ...signs trees shrubs or other immobile objects This is normal operation and the system does not need to be serviced Lane change alert may not operate when the left or right corners of the rear bumper are covered with mud dirt snow ice or slush Cleaning instructions 3 270 In the event of a fault in the system or if the system does not work due to temporary conditions a message is displayed in the Dri...

Page 208: ...steering angle The function can be deactivated in the vehicle personalisation menu in the Colour Info Display Select the relevant setting in Settings I Vehicle in the Colour Info Display Colour Info Display 3 117 Vehicle personalisation 3 121 Warning symbols Warning symbols are indicated as triangles 9 on the picture which show obstacles detected by the rear sensors of the advanced parking assist ...

Page 209: ...5 rear cross traffic alert warns of cross traffic from left or right side when driving rearwards When cross traffic is recognized and the rear view camera is activated a warning triangle with a direction arrow K appears on the Colour Info Display showing the direction of the traffic Furthermore three beeps will sound from the speaker on the respective side The radar distance sensors are located si...

Page 210: ...Display 3 117 Vehicle personalisation 3 121 Fault The system may not operate properly when Ice snow mud or anything else covers the sensors The vehicle is towing a trailer The vehicle had a rear end accident There are extreme temperature changes Traffic sign assistant Functionality The traffic sign assistant system detects designated traffic signs via a front camera and displays them in the Driver...

Page 211: ...Traffic sign detection page in the Driver Information Centre see Display indication below The system is active up to a speed of 125 mph depending on the lighting conditions At night the system is active up to a speed of 100 mph As soon as the speed becomes slower than 34 mph the display will be reset and the content of the traffic sign page will be cleared e g when entering a city zone The next re...

Page 212: ...pop up alerts in the Driver Information Centre The alert function can be activated or deactivated in the setting menu of the traffic sign assistant page by pressing SET CLR on the turn signal lever or 9 on the steering wheel Illustration shows baselevel Driver Information Centre Illustration shows midlevel or uplevel Driver Information Centre When the setting page is displayed select Off or set al...

Page 213: ...eavy rain snow direct sunlight or shadows In this event No Traffic Sign Detection due to Weather is indicated on the display Traffic signs are incorrectly mounted or damaged Traffic signs do not comply with the Vienna Convention on traffic signs Wiener Übereinkommen über Straßenverkehrszeichen Caution The system is intended to help the driver within a defined speed range to recognise certain traff...

Page 214: ...the instrument cluster illuminates green the system is ready to operate The system is only operable at vehicle speeds above 35 mph and if lane markings are available When the system recognises an unintended lane change the control indicator changes to yellow and flashes Simultaneously a chime sound is activated Deactivation The system is deactivated by pressing the LED in the button extinguishes A...

Page 215: ...olled combustion and engine damage Fuel for diesel engines Only use diesel fuel that complies with EN 590 In countries outside the European Union use Euro Diesel fuel with a sulfur concentration below 50 ppm Caution Use of fuel that does not comply to EN 590 or similar can lead to engine powerloss increased wear or engine damage Do not use marine diesel oils heating oils Aquazole and similar diese...

Page 216: ...mi nates liquid gas operation 1 flashes five times and extin guishes liquid gas tank is empty or failure in liquid gas system A message is displayed in the Driver Information Centre If the fuel tank is empty the engine will not start The selected fuel mode is stored and reactivated at the next ignition cycle if conditions allow As soon as the liquid gas tank is empty petrol operation is automatica...

Page 217: ...ed easily 9 Warning If you smell gas in the vehicle or in the immediate vicinity switch to petrol mode immediately No smoking No naked flames or ignition sources If the gas odour persists do not start the engine If possible close the manual shut off valve on the multivalve The multivalve is located on the liquid gas tank in the load compartment underneath the rear floor storage cover 3 74 Turn the...

Page 218: ...ot switch on ignition Fuel filler flap is located at right rear side of vehicle The fuel filler flap can only be opened if the vehicle is unlocked Release the fuel filler flap by pushing the flap Petrol and Diesel refuelling To open turn the cap slowly anticlockwise The fuel filler cap can be retained in the bracket on the fuel filler flap To refuel fully insert the pump nozzle and switch it on Af...

Page 219: ... can be retained in the bracket on the fuel filler flap Place the nozzle in straight position to the filler neck and press with slight force to insert In case of an emergency refil with a canister A funnel must be used to open the cap of the filler neck The funnel is located in the load compartment Place the funnel in straight position to the filler neck and press with slight force to insert Use t...

Page 220: ...ess the filler nozzle onto the adapter until it engages Press the button at the liquid gas supply point The filling system stops or begins to run slowly when 80 of the tank volume is reached maximum fill level Release button on filling system and the filling process stops Release the locking lever and remove the filler nozzle A small quantity of liquid gas may escape Remove adapter and stow in veh...

Page 221: ...hall Distributors and from Vauxhall Authorised Repairers ACME adapter Belgium Germany Ireland Luxembourg Switzerland Bayonet adapter Netherlands Norway Spain United Kingdom EURO adapter Spain DISH adapter Austria Bosnia Herzegovina Bulgaria Croatia Czech Republic Denmark Estonia France Greece Hungary Italy Latvia Lithuania Macedonia Poland Portugal Romania Serbia Slovakia Slovenia Sweden Switzerla...

Page 222: ...he actual fuel consumption of a particular vehicle Additional equipment may result in slightly higher results than the stated consumption and CO2 figures Furthermore fuel consumption is dependent on personal driving style as well as road and traffic conditions Trailer hitch General information The factory fitted towing equipment is folded up under the rear bumper fascia Entrust retrofitting of tow...

Page 223: ... socket load with the trailer coupled The permissible trailer loads are specified in the vehicle documents In general they are valid for gradients up to max 12 The permitted trailer load applies up to the specified incline and up to an altitude of 1000 metres above sea level Since engine power decreases as altitude increases due to the air becoming thinner therefore reducing climbing ability the p...

Page 224: ...all bar cannot be removed from the vehicle When driving without a trailer fold in the coupling ball bar 9 Warning Make sure that no one is in the pivot zone of the coupling ball bar Risk of body injury When releasing the stowed coupling ball bar make sure to stand left of the grip Release stowed coupling ball bar Pull the grip located left to the number plate under the rear bumper fascia at an ang...

Page 225: ... a trailer is permitted only when the coupling ball bar is fitted correctly If the coupling ball bar does not engage correctly or if the release handle is impossible to guide to its hidden initial position in the housing or if the buzzing tone sounds after engaging the coupling ball bar seek the assistance of a workshop Eye for break away stopping cable Attach break away stopping cable to eye Trai...

Page 226: ...237 Fog lights 239 Tail lights 240 Side turn signal lights 242 Number plate light 243 Interior lights 244 Instrument panel illumination 244 Electrical system 244 Fuses 244 Engine compartment fuse box 246 Instrument panel fuse box 248 Load compartment fuse box 249 Vehicle tools 251 Tools 251 Wheels and tyres 252 Winter tyres 252 Tyre designations 252 Tyre pressure 252 Tyre pressure monitoring syste...

Page 227: ... engine oil Drain washer fluid reservoir Check coolant antifreeze and corrosion protection Adjust tyre pressure to the value specified for full load Park vehicle in dry well ventilated place Engage first or reverse gear or set selector lever to P Prevent the vehicle from rolling Do not apply parking brake Open bonnet close all doors and lock the vehicle Disconnect the clamp from the negative termi...

Page 228: ...horised for gas vehicles Vehicle checks Performing work 9 Warning Only perform engine compartment checks when the ignition is off The cooling fan may start operating even if the ignition is off 9 Danger The ignition system and Xenon headlights use extremely high voltage Do not touch Bonnet Opening Pull the release lever and return it to its original position ...

Page 229: ...e oil manually on a regular basis to prevent damage to the engine Ensure that the correct specification of oil is used Recommended fluids and lubricants 3 274 The maximum engine oil consumption is 0 6 l per 1000 km Check with the vehicle on a level surface The engine must be at operating temperature and switched off for at least five minutes Pull out the dipstick wipe it clean insert it to the sto...

Page 230: ...ctioned out Capacities 3 291 Engine oil quality viscosity 3 274 Fit the cap on straight and tighten it Automatic transmission fluid Caution Extremely small amounts of contamination can cause automatic transmission damage and cause it to not work properly Do not allow contaminates to contact the fluid side of the reservoir cap or from entering the reservoir Automatic transmission fluid level normal...

Page 231: ...tion Too low a coolant level can cause engine damage If the cooling system is cold the coolant level should be above the filling line mark Top up if the level is low On another version the filling line mark is inside the filler opening To check open the cap Additional cooling circuit for Turbo engine Coolant container is fixed at the air cleaner housing If the cooling system is cold the coolant le...

Page 232: ...steering system damage and cause it to not work properly Do not allow contaminates to contact the fluid side of the reservoir cap dipstick or from entering the reservoir Power steering fluid level normally does not have to be checked If an unusual noise sounds during steering or the power steering reacts conspicuous seek the assistance of a workshop Washer fluid Fill with clean water mixed with a ...

Page 233: ...attery The vehicle battery is maintenance free provided that the driving profile allows sufficient charging of the battery Short distance driving and frequent engine starts can discharge the battery Avoid the use of unnecessary electrical consumers Batteries do not belong in household waste They must be disposed of at an appropriate recycling collection point Laying up the vehicle for more than fo...

Page 234: ...l must be opened Only use vehicle batteries that allow the fuse box to be mounted above the battery In vehicles with an AGM Absorptive Glass Mat battery make sure to have the battery replaced with another AGM battery An AGM battery can be identified by the label on the battery We recommend the use of an original Vauxhall battery Notice Using an AGM vehicle battery different from the original Vauxh...

Page 235: ...anual for further information Explosive gas may be present in the vicinity of the vehicle battery Diesel fuel system bleeding If the tank has been run dry the diesel fuel system must be bled Switch on the ignition three times for 15 seconds at a time Then crank the engine for a maximum of 40 seconds Repeat this process after no less than 5 seconds If the engine fails to start seek the assistance o...

Page 236: ...remove Attach the wiper blade slightly angled to the wiper arm and push until it engages Lower wiper arm carefully Bulb replacement Switch off the ignition and switch off the relevant switch or close the doors Only hold a new bulb at the base Do not touch the bulb glass with bare hands Use only the same bulb type for replacement Replace headlight bulbs from within the engine compartment Bulb check...

Page 237: ...ight Daytime running light 2 Front turn signal light 3 Bi Halogen Headlight 1 On left vehicle side pull filling pipe out of the windscreen washer fluid container 1 Rotate the cap anticlockwise and remove it 2 Rotate the bulb holder anticlockwise to disengage Withdraw the bulb holder from the reflector ...

Page 238: ...reflector and rotate clockwise to secure 6 Fit the cap and rotate clockwise Sidelight Daytime running light 2 1 Rotate cap anticlockwise and withdraw from the reflector 2 Press snap in tongues together and move socket out of the housing 3 Remove the bulb from the socket by pulling 4 Replace and insert new bulb into socket 5 Insert the bulb socket into the housing and let engage 6 Fit the cap and r...

Page 239: ...t slightly rotate anti clockwise and remove 3 Replace and insert new bulb into socket by rotating clockwise 4 Insert bulb socket in reflector rotate clockwise to engage Xenon headlights 9 Danger Adaptive forward lighting system uses Xenon headlights Xenon headlights work under extremely high electrical voltage Do not touch Have bulbs replaced by a workshop Bulbs for front turn signal and corner li...

Page 240: ...er from the reflector 3 Disengage the bulb from the plug connector by unlatching and pulling 4 Replace the bulb and connect bulb holder with the plug connector 5 Insert the bulb holder engaging the two lugs into the reflector and rotate clockwise to secure 6 Fit the cap and rotate clockwise Front turn signal 1 Rotate the cap anticlockwise and remove it ...

Page 241: ...ckwise to secure Sidelight Daytime running light Sidelight and daytime running lights are designed as LEDs In case of failure have LEDs replaced by a workshop Fog lights The bulbs are accessible from the underside of the vehicle 1 Turn the bulb holder anticlockwise and remove it from the reflector 2 Disengage the bulb socket from the plug connector by pressing the retaining lug 3 Remove and replac...

Page 242: ...lockwise and remove Replace bulb by withdrawing or turning Turn signal light 1 Rear fog light 2 only on driver side Reverse light 3 Tail light and brake light are designed as LEDs In case of failure have LEDs replaced by a workshop 5 Insert bulb holder into the tail light assembly and turn clockwise Fit light assembly with the retaining pins into the recesses of the vehicle body and tighten the pl...

Page 243: ...bulb by withdrawing Reverse light 1 Turn signal light 2 Tail light brake light and rear fog light are designed as LEDs In case of failure have LEDs replaced by a workshop 5 Insert bulb holder into the tail light assembly and turn clockwise Fit light assembly with the retaining pins into the recesses of the tailgate and tighten the plastic securing nuts from the inside of the tailgate Close cover A...

Page 244: ...he bulb holder 5 Push bulb into socket slightly rotate anticlockwise remove and renew bulb Insert plastic nut into bulb holder by rotating clockwise Tail light 1 Turn signal light 2 6 Insert bulb holder into the tailgate frame Close cover in the side trim panel Side turn signal lights To replace bulb remove lamp housing 1 Slide lamp to its left side and remove with its right end ...

Page 245: ...nsert bulb holder and turn clockwise 5 Insert left end of the lamp slide to the left and insert right end Number plate light 1 Insert screwdriver in bulb housing press to the side and release spring 2 Remove lamp downwards taking care not to pull on the cable 3 Remove bulb holder from lamp housing by turning anticlockwise ...

Page 246: ...ta on the replacement fuse must match the data on the defective fuse There may be up to three fuse boxes in the vehicle in the front left of the engine compartment on the left side of the instrument panel behind a cover on the left side of the load compartment Depending on the vehicle equipment the configuration of fuses in the fuse boxes are different indicated by type A and type B in the tables ...

Page 247: ...e recognized by its melted wire Do not replace the fuse until the cause of the fault has been remedied Some functions are protected by several fuses Fuses may also be inserted without existence of a function Fuse extractor A fuse extractor may be located in the fuse box in the engine compartment Place the fuse extractor on the various types of fuse from the top or side and withdraw fuse ...

Page 248: ...s and remove No Circuit 1 Transmission control module 2 Engine control module 3 4 5 Ignition Transmission control module Engine control module 6 Windscreen wiper 7 8 Fuel injection Ignition system 9 Fuel injection Ignition system 10 Engine control module 11 Lambda probe 12 Starter 13 Sensor throttle heating 14 Lighting 15 Rear window wiper ...

Page 249: ...oning system 32 Body control module 33 Heated front seats 34 Sunroof type A Tailgate locking type B 35 Infotainment system type A Tailgate locking type B 36 37 Right high beam 38 Left high beam 39 40 41 Vacuum pump 42 Radiator fan 43 Vehicle battery DC transformer only on vehicles with stop start system 44 Headlamp washer system No Circuit 45 Radiator fan 46 Terminal 87 Main relay 47 Lambda probe ...

Page 250: ...ensor 71 Vehicle battery sensor After changing of defective fuses close the fuse box cover and press until it engages If the fuse box cover is not closed correctly malfunctions may occur Instrument panel fuse box In left hand drive vehicles the fuse box is behind the storage compartment in the instrument panel Open compartment compress the locking tabs fold compartment down and remove In right han...

Page 251: ...4 Diagnostic connector 15 Airbag No Circuit 16 Central locking system Tailgate 17 Air conditioning system 18 Transportation fuse 19 Memory 20 21 Instrument 22 Ignition Central locking system Electronic key system 23 Body control unit 24 Body control unit 25 Steering wheel control 26 Power outlet load compartment Power seats No s 12 and 13 have an overload protection The circuit will be closed agai...

Page 252: ...roof 10 Central locking system Tailgate type A Sunroof type B 11 12 Selective catalytic reduction system No Circuit 13 14 15 Power tailgate lock 16 Air conditioning system 17 Selective catalytic reduction system 18 Selective catalytic reduction system 19 Side obstacle detector 20 Side obstacle detector Venti lated front seats 21 Active damping system Cruise control Traffic sign assistant Lane depa...

Page 253: ... tyre repair kit The tools and the towing eye are located together with the tyre repair kit in a tool box below the floor cover in the load compartment Vehicles with spare wheel The jack with wheel wrench the tools an extension bolt for securing a damaged wheel and the towing eye are placed in the tool box below the spare wheel in the load compartment Spare wheel 3 262 ...

Page 254: ...tyre width R belt type Radial RF type RunFlat 16 wheel diameter inches 95 load index e g 95 is equivalent to 690 kg H speed code letter Speed code letter Q up to 100 mph S up to 112 mph T up to 118 mph H up to 130 mph V up to 150 mph W up to 168 mph Choose a tyre appropiate for the maximum speed of your verhicle The maximum speed is achievable at kerb weight with driver 75 kg plus 125 kg payload O...

Page 255: ...ure 9 Warning If the pressure is too low this can result in considerable tyre warm up and internal damage leading to tread separation and even to tyre blow out at high speeds 9 Warning For specific tyres the recommended tyre pressure as shown in the tyre pressure table may exceed the maximum tyre pressure as indicated on the tyre Never exceed the maximum tyre pressure as indicated on the tyre If t...

Page 256: ...e system considers the tyre temperature for the warnings Temperature dependency 3 252 A detected low tyre pressure condition is indicated by the control indicator w 3 108 If w illuminates stop as soon as possible and inflate the tyres as recommended 3 292 After inflating some driving may be required to update the tyre pressure values in the Driver Information Centre During this time w may illumina...

Page 257: ...e tyre pressure warnings The menu Tyre loading only appears if the vehicle is in a standstill and the parking brake is applied On vehicles with automatic transmission the selector lever has to be in P Select Light for comfort pressure up to 3 people Eco for Eco pressure up to 3 people Max for full loading Auto learn function After changing wheels the vehicle must be stationary for approx 20 minute...

Page 258: ... tyre pressures replaced 9 Warning Use of unsuitable tyres or wheels may lead to accidents and will invalidate the vehicle type approval Wheel covers Wheel covers and tyres that are factory approved for the respective vehicle and comply with all of the relevant wheel and tyre combination requirements must be used If the wheel covers and tyres used are not factory approved the tyres must not have a...

Page 259: ...el The use of tyre chains is not permitted on the temporary spare wheel Tyre repair kit Minor damage to the tyre tread can be repaired with the tyre repair kit Do not remove foreign bodies from the tyres Tyre damage exceeding 4 mm or that is at tyre s side wall cannot be repaired with the tyre repair kit 9 Warning Do not drive faster than 50 mph Do not use for a lengthy period Steering and handlin...

Page 260: ...lve cap from defective tyre 7 Screw the filler hose to the tyre valve 8 The switch on the compressor must be set to J 9 Connect the compressor plug to the power outlet or cigarette lighter socket To avoid discharging the battery we recommend running the engine 10 Set the rocker switch on the compressor to I The tyre is filled with sealant 11 The compressor pressure gauge briefly indicates up to 6 ...

Page 261: ...emove sealant bottle from bracket Screw tyre inflation hose to the free connection of sealant bottle This prevents sealant from escaping Stow tyre repair kit in load compartment 15 Remove any excess sealant using a cloth 16 Take the label indicating maximum permitted speed from the sealant bottle and affix in the driver s field of view 17 Continue driving immediately so that sealant is evenly dist...

Page 262: ...observe the following information Park the vehicle on a level firm and non skid surface The front wheels must be in the straight ahead position Apply the parking brake and engage first gear reverse gear or P Remove the spare wheel 3 262 Never change more than one wheel at once Use the jack only to change wheels in case of puncture not for seasonal winter or summer tyre change The jack is maintenan...

Page 263: ... adapter for the locking wheel nuts onto the head of the nut before installing the wheel wrench The adapter is located in the glovebox 3 Some versions may have covered the vehicle jacking point Pull out the cover sideways 4 Ensure the jack is correctly positioned under the relevant vehicle jacking point 5 Set the jack to the necessary height Position it directly below the jacking point in a manner...

Page 264: ...g point cover 13 Stow and secure the replaced wheel 3 262 the vehicle tools 3 251 and the adapter for the locking wheel nuts 3 69 14 Check the tyre pressure of the installed tyre and the wheel nut torque as soon as possible Have the defective tyre renewed or repaired as soon as possible Jacking position for lifting platform Rear arm position of the lifting platform at the underbody Front arm posit...

Page 265: ...e tools 3 When after a wheel change no wheel is placed in the spare wheel well secure the tool box by turning right back the wing nut and close the floor cover Stowing the replaced full size wheel in the spare wheel well The spare wheel well is not designed for all permitted tyre sizes If a wheel wider than the spare must be stowed in the spare wheel well the thread bolt for mounting the wheel mus...

Page 266: ... that is smaller than the other wheels or in combination with winter tyres could affect driveability Have the defective tyre replaced as soon as possible Only mount one temporary spare wheel Do not drive faster than 50 mph Take curves slowly Do not use for a long period of time If your vehicle gets a flat tyre on the rear while towing another vehicle mount the temporary spare wheel in the front an...

Page 267: ...ting jump leads Wear eye protection and protective clothing when handling a battery Use a booster battery with the same voltage 12 Volts Its capacity Ah must not be much less than that of the discharged vehicle battery Use jump leads with insulated terminals and a cross section of at least 16 mm2 25 mm2 for diesel engines Do not disconnect the discharged vehicle battery from the vehicle Switch off...

Page 268: ...owever at least 60 cm Route the leads so that they cannot catch on rotating parts in the engine compartment To start the engine 1 Start the engine of the vehicle providing the jump 2 After 5 minutes start the other engine Start attempts should be made for no longer than 15 seconds at an interval of 1 minute 3 Allow both engines to idle for approx 3 minutes with the leads connected 4 Switch on elec...

Page 269: ...oving the screwdriver downwards To prevent damage it is recommended to place a cloth between the screwdriver and the frame The towing eye is stowed with the vehicle tools 3 251 Screw in the towing eye as far as it will go until it stops in a horizontal position Attach a tow rope or better still a tow rod to the towing eye The towing eye must only be used for towing and not for recovering the vehic...

Page 270: ...nor further than 60 miles In all other cases and when the transmission is defective the front axle must be raised off the ground Vehicles with automatic transmission and All wheel drive The vehicle must be towed facing forwards If the vehicle is towed with all four wheels on the ground the maximum speed is 30 mph and for a maximum of 30 miles If the front axle has been raised the maximum speed is ...

Page 271: ...orizontal position The lashing eye at the rear underneath the vehicle must never be used as a towing eye Attach a tow rope or better still a tow rod to the towing eye The towing eye must only be used for towing and not for recovering a vehicle Caution Drive slowly Do not drive jerkily Excessive tractive force can damage the vehicle After towing unscrew the towing eye 5 door Hatchback 4 door Saloon...

Page 272: ... are also thoroughly rinsed out Wax painted parts of the vehicle regularly Clean edges and folds on opened doors and the bonnet as well as the areas they cover Clean bright metal mouldings with a cleaning solution approved for aluminium to avoid damages Caution Always use a cleaning agent with a pH value of four to nine Do not use cleaning agents on hot surfaces Do not clean the engine compartment...

Page 273: ...solutions etc acidic or highly alkaline media or abrasive pads Do not apply wax or polishing agents to the sunroof Wheels and tyres Do not use high pressure jet cleaners Clean rims with a pH neutral wheel cleaner Rims are painted and can be treated with the same agents as the body Paintwork damage Rectify minor paintwork damage with a touch up pen before rust forms Have more extensive damage or ru...

Page 274: ...aner and brush Remove stains with an upholstery cleaner Clothing fabrics may not be colourfast This could cause visible discolourations especially on light coloured upholstery Removable stains and discolourations should be cleaned as soon as possible Clean seat belts with lukewarm water or interior cleaner Caution Close Velcro fasteners as open Velcro fasteners on clothing could damage seat uphols...

Page 275: ... service display A shorter service interval can be valid for severe driving behaviour e g for taxis and police vehicles The European service intervals are valid for the following countries Andorra Austria Belgium Bosnia Herzegovina Bulgaria Croatia Cyprus Czech Republic Denmark Estonia Finland France Germany Greece Greenland Hungary Iceland Ireland Italy Latvia Liechtenstein Lithuania Luxembourg M...

Page 276: ...tified by its quality and its viscosity Quality is more important than viscosity when selecting which engine oil to use The oil quality ensures e g engine cleanliness wear protection and oil aging control whereas viscosity grade gives information on the oil s thickness over a temperature range Dexos is the newest engine oil quality that provides optimum protection for gasoline and diesel engines I...

Page 277: ...ant LLC antifreeze approved for the vehicle Consult a workshop The system is factory filled with coolant designed for excellent corrosion protection and frost protection down to approx 28 C In northern countries with very low temperatures the factory filled coolant provides frost protection down to approx 37 C This concentration should be maintained all year round The use of additional coolant add...

Page 278: ...dimensions 289 Capacities 291 Tyre pressures 292 Vehicle identification Vehicle Identification Number The Vehicle Identification Number is visible through the windscreen The Vehicle Identification Number may be stamped on the identification plate and on the floor pan under the floor covering visible under a cover or in the engine compartment on the right body panel Identification plate The identif...

Page 279: ...qual to the gross vehicle weight minus the front axle load The technical data is determined in accordance with European Community standards We reserve the right to make modifications Specifications in the vehicle documents always have priority over those given in this manual Engine identification The technical data tables use the engine identifier code The engine data table additionally shows the ...

Page 280: ...ality Petrol engines including CNG LPG E85 Diesel engines dexos 1 dexos 2 In case dexos quality is unavailable you may use max 1 litre engine oil quality ACEA C3 once between each oil change Engine oil viscosity grades All European countries with European service interval 3 273 Ambient temperature Petrol and diesel engines down to 25 C SAE 5W 30 or SAE 5W 40 below 25 C SAE 0W 30 or SAE 0W 40 ...

Page 281: ...exos 1 if available dexos 2 In case dexos quality is unavailable you may use the oil qualities listed below All countries with international service interval 3 273 Engine oil quality Petrol engines including CNG LPG E85 Diesel engines GM LL A 025 GM LL B 025 All countries with international service interval 3 273 Engine oil quality Petrol engines including CNG LPG E85 Diesel engines ACEA A3 B3 ACE...

Page 282: ...ngine oil viscosity grades All countries with international service interval 3 273 Ambient temperature Petrol and diesel engines down to 25 C SAE 5W 30 or SAE 5W 40 below 25 C SAE 0W 30 or SAE 0W 40 down to 20 C SAE 10W 301 or SAE 10W 401 1 Permitted but usage of SAE 5W 30 or SAE 5W 40 with dexos quality is recommended ...

Page 283: ...03 184 239 at rpm 4900 6000 4900 6000 4750 6000 6300 5300 5250 Torque Nm 200 200 260 175 400 435 at rpm 1850 4900 1850 4900 1650 4500 3800 2500 4000 5250 Fuel type Petrol Petrol Liquid gas Petrol Petrol Petrol Petrol Octane rating RON recommended 95 95 98 95 95 98 possible 98 98 95 98 98 95 possible 91 91 91 91 91 912 Additional fuel type Liquid gas LPG 2 Possible only if high engine load full loa...

Page 284: ...H Sales designation 1 6 CDTI 1 6 CDTI 2 0 CDTI Engineering code B16DTH B16DTH B20DTH Piston displacement cm3 1598 1598 1956 Engine power kW 88 100 125 at rpm 4000 3500 4000 3750 Torque Nm 320 320 400 at rpm 2000 2000 2250 1750 2500 Fuel type Diesel Diesel Diesel ...

Page 285: ...8NER Maximum speed mph Manual transmission 127 121 137 127 155 155 1554 168 Automatic transmission 130 152 152 1554 165 3 All wheel drive 4 Limited speed Engine B16DTJ B16DTH B20DTH B20DTH AWD3 Maximum speed mph Manual transmission 121 1245 127 1305 140 134 Automatic transmission 124 137 130 3 All wheel drive 5 CO2 reduced ...

Page 286: ...eed mph Manual transmission 124 118 134 124 152 149 1554 168 Automatic transmission 127 149 146 1554 168 3 All wheel drive 4 Limited speed Engine B16DTJ B16DTH B20DTH B20DTH AWD3 Maximum speed mph Manual transmission 118 1216 124 1276 137 130 Automatic transmission 121 133 127 3 All wheel drive 6 CO2 reduced ...

Page 287: ...Technical data 285 Country Tourer Engine B16SHL B20NHT B20DTH B20DTH AWD3 AWD3 Maximum speed mph Manual transmission 134 146 137 134 Automatic transmission 127 143 133 124 3 All wheel drive ...

Page 288: ... 4 door Saloon Engine Manual transmission Automatic transmission kg B14NET 1513 B14NET LPG 1581 B16SHL 1571 1613 B18XER 1513 B20NHT 1614 1613 B20NHT All wheel drive 1733 1788 B28NER All wheel drive 1810 1835 kg B16DTJ 1571 B16DTH 1571 1623 B20DTH 1613 1664 B20DTH All wheel drive 1788 1788 ...

Page 289: ...atchback Engine Manual transmission Automatic transmission kg B14NET 1553 B14NET LPG 1581 B16SHL 1613 1613 B18XER 1503 B20NHT 1613 1664 B20NHT All wheel drive 1788 1788 B28NER All wheel drive 1825 1843 kg B16DTJ 1613 B16DTH 1613 1623 B20DTH 1613 1664 B20DTH All wheel drive 1788 1816 ...

Page 290: ... Tourer Engine Manual transmission Automatic transmission kg B14NET 1613 B14NET LPG 1664 B16SHL 1701 1701 B18XER 1613 B20NHT 1701 1733 B20NHT All wheel drive 1843 1843 B28NER All wheel drive 1940 1953 kg B16DTJ 1664 B16DTH 1664 1701 B20DTH 1733 1743 B20DTH All wheel drive 1865 1901 ...

Page 291: ...ssories increase the kerb weight Loading information 3 82 Vehicle dimensions 4 door Saloon 5 door Hatchback Sports Tourer Country Tourer Length mm 4842 4842 4920 4920 Width without exterior mirrors mm 1856 1856 1856 1856 Width with two exterior mirrors mm 2084 2084 2084 2084 Height without antenna mm 1498 1498 1520 1530 Vehicle height Rear compartment open mm 1830 2175 2184 2195 Length of load com...

Page 292: ... door Hatchback Sports Tourer Country Tourer Load compartment width mm 1027 1027 1030 1030 Load compartment height mm 356 436 677 677 Wheelbase mm 2737 2737 2737 2737 Turning circle diameter m 11 3 12 05 11 3 12 05 11 3 12 05 11 3 12 05 ...

Page 293: ... 4 0 4 0 5 5 4 5 4 7 5 7 6 3 between MIN and MAX l 1 0 1 0 1 0 1 0 1 0 1 0 1 0 7 Front wheel drive 8 All wheel drive Engine B16DTJ B16DTH B20DTH including Filter l 5 0 5 0 5 25 between MIN and MAX l 1 0 1 0 1 0 Fuel tank Petrol diesel refilling quantity l 70 LPG refilling quantity l 41 AdBlue tank AdBlue refilling quantity l 7 5 ...

Page 294: ...heel drive 5 door Hatchback 4 door Saloon Vehicles with Front wheel drive Sports Tourer Vehicles with Front wheel drive Country Tourer Vehicles with All wheel drive 5 door Hatchback 4 door Saloon Vehicles with All wheel drive Sports Tourer Vehicles with All wheel drive Country Tourer Refer to the table header to find the correct tyre pressure for your model ...

Page 295: ...ull load Engine Tyres front rear front rear front rear kPa bar psi kPa bar psi kPa bar psi kPa bar psi kPa bar psi kPa bar psi B14NET B14NET LPG B18XER 215 60 R16 220 2 2 32 200 2 0 29 270 2 7 39 260 2 6 38 220 2 2 32 270 2 7 39 225 50 R17 235 45 R18 245 45 R18 245 40 R19 245 35 R20 225 55 R17 220 2 2 32 200 2 0 29 300 3 0 43 300 3 0 43 220 2 2 32 270 2 7 39 ...

Page 296: ...full load Engine Tyres front rear front rear front rear kPa bar psi kPa bar psi kPa bar psi kPa bar psi kPa bar psi kPa bar psi B16SHL 215 60 R16 230 2 3 33 210 2 1 30 270 2 7 39 260 2 6 38 230 2 3 33 280 2 8 41 225 55 R17 225 50 R17 235 45 R18 245 45 R18 245 40 R19 245 35 R20 ...

Page 297: ...T 225 50 R17 240 2 4 35 220 2 2 32 300 3 0 43 300 3 0 43 250 2 5 36 300 3 0 43 225 55 R17 235 45 R18 240 2 4 35 220 2 2 32 270 2 7 39 260 2 6 38 250 2 5 36 300 3 0 43 245 45 R18 245 40 R19 245 35 R20 B20NHT with Sport chassis and Brembo brake 18 245 40 R19 230 2 3 33 220 2 2 32 270 2 7 39 290 2 9 42 260 2 6 38 300 3 0 43 235 45 R18 250 2 5 36 250 2 5 36 270 2 7 39 290 2 9 42 260 2 6 38 320 3 2 46 ...

Page 298: ...l load Engine Tyres front rear front rear front rear kPa bar psi kPa bar psi kPa bar psi kPa bar psi kPa bar psi kPa bar psi B16DTJ B16DTH 215 60 R16 230 2 3 33 210 2 1 30 270 2 7 39 260 2 6 38 230 2 3 33 280 2 8 41 225 50 R17 235 45 R18 245 45 R18 245 40 R19 225 55 R17 245 35 R20 ...

Page 299: ...i kPa bar psi kPa bar psi kPa bar psi kPa bar psi kPa bar psi B20DTH 215 60 R16 240 2 4 35 220 2 2 32 270 2 7 39 260 2 6 38 240 2 4 35 290 2 9 42 225 50 R17 225 55 R17 220 2 2 32 200 2 0 29 250 2 5 36 240 2 4 35 240 2 4 35 290 2 9 42 235 45 R18 220 2 2 32 200 2 0 29 270 2 7 39 260 2 6 38 240 2 4 35 290 2 9 42 245 45 R18 245 40 R19 245 35 R20 ...

Page 300: ...psi kPa bar psi kPa bar psi kPa bar psi kPa bar psi B20DTH with Sport chassis and Brembo brake 18 245 40 R19 230 2 3 33 220 2 2 32 270 2 7 39 290 2 9 42 260 2 6 38 300 3 0 43 235 45 R18 250 2 5 36 250 2 5 36 270 2 7 39 290 2 9 42 260 2 6 38 320 3 2 46 245 35 R20 All Temporary spare wheel 125 80 R16 125 70 R17 420 4 2 61 420 4 2 61 420 4 2 61 420 4 2 61 ...

Page 301: ...ront rear front rear kPa bar psi kPa bar psi kPa bar psi kPa bar psi kPa bar psi kPa bar psi B14NET B14NET LPG B18XER 215 60 R16 220 2 2 32 240 2 4 34 270 2 7 39 290 2 9 41 220 2 2 32 290 2 9 42 225 55 R17 235 45 R18 245 45 R18 245 40 R19 245 35 R20 225 50 R17 220 2 2 32 240 2 4 34 300 3 0 43 300 3 0 43 220 2 2 32 290 2 9 42 ...

Page 302: ...r psi kPa bar psi kPa bar psi B20NHT 225 50 R17 230 2 3 33 250 2 5 36 270 2 7 39 290 2 9 42 230 2 3 33 300 3 0 43 235 45 R18 245 35 R20 225 55 R17 245 40 R19 245 45 R18 B20NHT with Sport chassis and Brembo brake 18 245 40R19 230 2 3 33 220 2 2 32 270 2 7 39 290 2 9 42 260 2 6 38 300 3 0 43 235 45R18 250 2 5 36 250 2 5 36 270 2 7 39 290 2 9 42 260 2 6 38 320 3 2 46 245 35R20 ...

Page 303: ...kPa bar psi kPa bar psi B16SHL B16DTJ B16DTH 215 60 R16 220 2 2 32 240 2 4 34 270 2 7 39 290 2 9 42 230 2 3 33 300 3 0 43 225 55 R17 235 45 R18 245 45 R18 245 40 R19 245 35 R20 225 50 R17 220 2 2 32 240 2 4 34 300 3 0 43 300 3 0 43 230 2 3 33 300 3 0 43 B20DTH 225 55 R17 230 2 3 33 250 2 5 36 270 2 7 39 290 2 9 42 230 2 3 33 300 3 0 43 235 45 R18 245 45 R18 245 40 R19 245 35 R20 ...

Page 304: ...si kPa bar psi 225 50 R17 230 2 3 33 250 2 5 36 300 3 0 43 300 3 0 43 230 2 3 33 300 3 0 43 B20DTH with Sport chassis and Brembo brake 18 245 40R19 230 2 3 33 220 2 2 32 270 2 7 39 290 2 9 42 260 2 6 38 300 3 0 43 235 45R18 250 2 5 36 250 2 5 36 270 2 7 39 290 2 9 42 260 2 6 38 320 3 2 46 245 35R20 All Temporary spare wheel 125 80 R16 125 70 R17 420 4 2 61 420 4 2 61 420 4 2 61 420 4 2 61 ...

Page 305: ... psi kPa bar psi kPa bar psi kPa bar psi kPa bar psi B16SHL 225 55 R17 220 2 2 32 240 2 4 34 270 2 7 39 290 2 9 42 230 2 3 33 300 3 0 43 235 45 R18 245 45 R18 245 40 R19 245 35 R20 225 50 R17 220 2 2 32 240 2 4 34 300 3 0 43 300 3 0 43 230 2 3 33 300 3 0 43 B20DTH 225 55 R17 230 2 3 33 250 2 5 36 270 2 7 39 290 2 9 42 230 2 3 33 300 3 0 43 235 45 R18 245 45 R18 245 40 R19 245 35 R20 ...

Page 306: ... Engine Tyres front rear front rear front rear kPa bar psi kPa bar psi kPa bar psi kPa bar psi kPa bar psi kPa bar psi 225 50 R17 230 2 3 33 250 2 5 36 300 3 0 43 300 3 0 43 230 2 3 33 300 3 0 43 All Temporary spare wheel 125 80 R16 125 70 R17 420 4 2 61 420 4 2 61 420 4 2 61 420 4 2 61 ...

Page 307: ... kPa bar psi kPa bar psi kPa bar psi B20NHT 225 50 R17 245 35 R20 250 2 5 36 230 2 3 33 290 2 9 42 270 2 7 39 270 2 7 39 300 3 0 43 225 55 R17 230 2 3 33 210 2 1 30 270 2 7 39 260 2 6 38 250 2 5 36 290 2 9 42 235 45 R18 245 45 R18 245 40 R19 B20NHT with Sport chassis and Brembo brake 18 245 40R19 230 2 3 33 220 2 2 32 270 2 7 39 290 2 9 42 260 2 6 38 300 3 0 43 235 45R18 250 2 5 36 250 2 5 36 270 ...

Page 308: ...DTH 225 55 R17 240 2 4 35 220 2 2 32 250 2 5 36 240 2 4 35 250 2 5 36 290 2 9 42 235 45 R18 240 2 4 35 220 2 2 32 270 2 7 39 260 2 6 38 250 2 5 36 290 2 9 42 225 50 R17 245 45 R18 245 40 R19 245 35 R20 B20DTH with Sport chassis and Brembo brake 18 245 40R19 230 2 3 33 220 2 2 32 270 2 7 39 290 2 9 42 260 2 6 38 300 3 0 43 235 45R18 250 2 5 36 250 2 5 36 270 2 7 39 290 2 9 42 260 2 6 38 320 3 2 46 ...

Page 309: ...ront rear front rear front rear kPa bar psi kPa bar psi kPa bar psi kPa bar psi kPa bar psi kPa bar psi B28NER 235 45 R18 270 2 7 39 250 2 5 36 310 3 1 45 300 3 0 43 280 2 8 41 300 3 0 43 245 40 R19 255 35 R20 All Temporary spare wheel 125 80 R16 125 70 R17 420 4 2 61 420 4 2 61 420 4 2 61 420 4 2 61 ...

Page 310: ...ront rear front rear front rear kPa bar psi kPa bar psi kPa bar psi kPa bar psi kPa bar psi kPa bar psi B20NHT B20DTH 225 55 R17 220 2 2 32 220 2 2 32 270 2 7 39 290 2 9 42 230 2 3 33 300 3 0 43 245 45 R18 245 40 R19 225 50 R17 250 2 5 36 250 2 5 36 270 2 7 39 290 2 9 42 260 2 6 38 320 3 2 46 235 45 R18 245 35 R20 ...

Page 311: ...i kPa bar psi kPa bar psi kPa bar psi kPa bar psi B20NHT B20DTH with Sport chassis and Brembo brake 18 245 40R19 230 2 3 33 220 2 2 32 270 2 7 39 290 2 9 42 260 2 6 38 300 3 0 43 235 45R18 250 2 5 36 250 2 5 36 270 2 7 39 290 2 9 42 260 2 6 38 320 3 2 46 245 35R20 All Temporary spare wheel 125 80 R16 125 70 R17 420 4 2 61 420 4 2 61 420 4 2 61 420 4 2 61 ...

Page 312: ...Tyres front rear front rear front rear kPa bar psi kPa bar psi kPa bar psi kPa bar psi kPa bar psi kPa bar psi B20NHT B20DTH 225 55 R17 220 2 2 32 220 2 2 32 270 2 7 39 290 2 9 42 220 2 2 32 290 2 9 42 235 45 R18 235 50 R18 245 45 R19 All Temporary spare wheel 125 80 R16 125 70 R17 420 4 2 61 420 4 2 61 420 4 2 61 420 4 2 61 ...

Page 313: ...er information Declaration of conformity Radio transmission systems This vehicle has systems that transmit and or receive radio waves subject to Directive 1999 5 EC These systems are in compliance with the essential requirements and other relevant provisions of Directive 1999 5 EC Copies of the original Declarations of Conformity can be obtained on our website Radar systems Country specific Declar...

Page 314: ...312 Customer information ...

Page 315: ...Customer information 313 Jack ...

Page 316: ...oduction techniques the thickness of the paint can vary between 50 and 400 µm Therefore different paint thickness is no indicator for a collision damage repair Software acknowledgement Certain OnStar components include libcurl and unzip software and other third party software Below are the notices and licenses associated with libcurl and unzip and for other third party software please see http www...

Page 317: ...M Schweda Christian Spieler Cosmin Truta Antoine Verheijen Paul von Behren Rich Wales Mike White This software is provided as is without warranty of any kind express or implied In no event shall Info ZIP or its contributors be held liable for any direct indirect incidental special or consequential damages arising out of the use of or inability to use this software Permission is granted to anyone t...

Page 318: ...information documents the condition of parts modules systems or the environment operating conditions of system components e g filling levels status messages of the vehicle and its single components e g number of wheel revolutions rotational speed deceleration lateral acceleration dysfunctions and defects in important system components vehicle reactions in particular driving situations e g inflatio...

Page 319: ...n emergency cases allow the transmission of particular vehicle data from the vehicle Radio Frequency Identification RFID RFID technology is used in some vehicles for functions such as tyre pressure monitoring and ignition system security It is also used in connection with conveniences such as radio remote controls for door locking unlocking and starting and in vehicle transmitters for garage door ...

Page 320: ... system 33 Appearance care 270 Armrest 52 53 Armrest storage 70 Ashtrays 92 Automatic anti dazzle 39 Automatic climate control system 142 Automatic dimming 38 Automatic light control 129 Automatic locking 27 Automatic transmission 167 Automatic transmission fluid 228 Autostop 109 159 Auxiliary heater 151 B Baselevel display 110 Battery discharge protection 139 Battery voltage 120 Belts 54 BlueInje...

Page 321: ...parking brake 105 173 Electric parking brake fault 105 Electronic driving programmes 170 Electronic key system 22 Electronic Stability Control 176 Electronic Stability Control and Traction Control system 107 Electronic Stability Control off 107 End of life vehicle recovery 225 Engine compartment fuse box 246 Engine coolant 229 Engine coolant temperature 107 Engine coolant temperature gauge 101 Eng...

Page 322: ...on 244 Instrument panel illumination control 136 Instrument panel overview 10 Interactive driving system 177 Interior care 272 Interior lighting 136 Interior lights 136 244 Interior mirrors 39 Interruption of power supply 170 Introduction 3 ISOFIX child restraint systems 68 J Jump starting 265 K Key memorised settings 23 Keys 20 Keys locks 20 L Lane change alert 204 Lane departure warning 106 211 ...

Page 323: ...157 Reversing lights 136 Ride control systems 175 Roller blinds 42 Roof 43 Roof load 82 Roof rack 81 S Safety belts 54 Safety net 77 Seat adjustment 6 Seat belt 8 Seat belt reminder 103 Seat belts 54 Seat heating 53 Seat position 47 Selective catalytic reduction 164 Selector lever 168 Service 153 273 Service display 101 Service information 273 Side airbag system 61 Side blind spot alert 202 Sideli...

Page 324: ...plevel display 110 Upshift 106 Using this manual 3 V Valet mode 117 Variable effort steering 106 Vehicle battery 231 Vehicle checks 226 Vehicle data 278 Vehicle data recording and privacy 316 Vehicle detected ahead 109 Vehicle dimensions 289 Vehicle Identification Number 276 Vehicle jack 251 Vehicle messages 119 Vehicle personalisation 121 Vehicle security 33 Vehicle specific data 3 Vehicle storag...

Page 325: ... UK Ltd reserves the right to make changes to the technical specifications features and design of the vehicles relative to the information contained in this publication as well as changes to the publication itself Edition January 2016 General Motors UK Ltd Printed on chlorine free bleached paper KTA 2675 16 VX EN KTA 2675 16 VX en 01 2016 ...

Reviews: