background image

2. Hardware Installatio

n

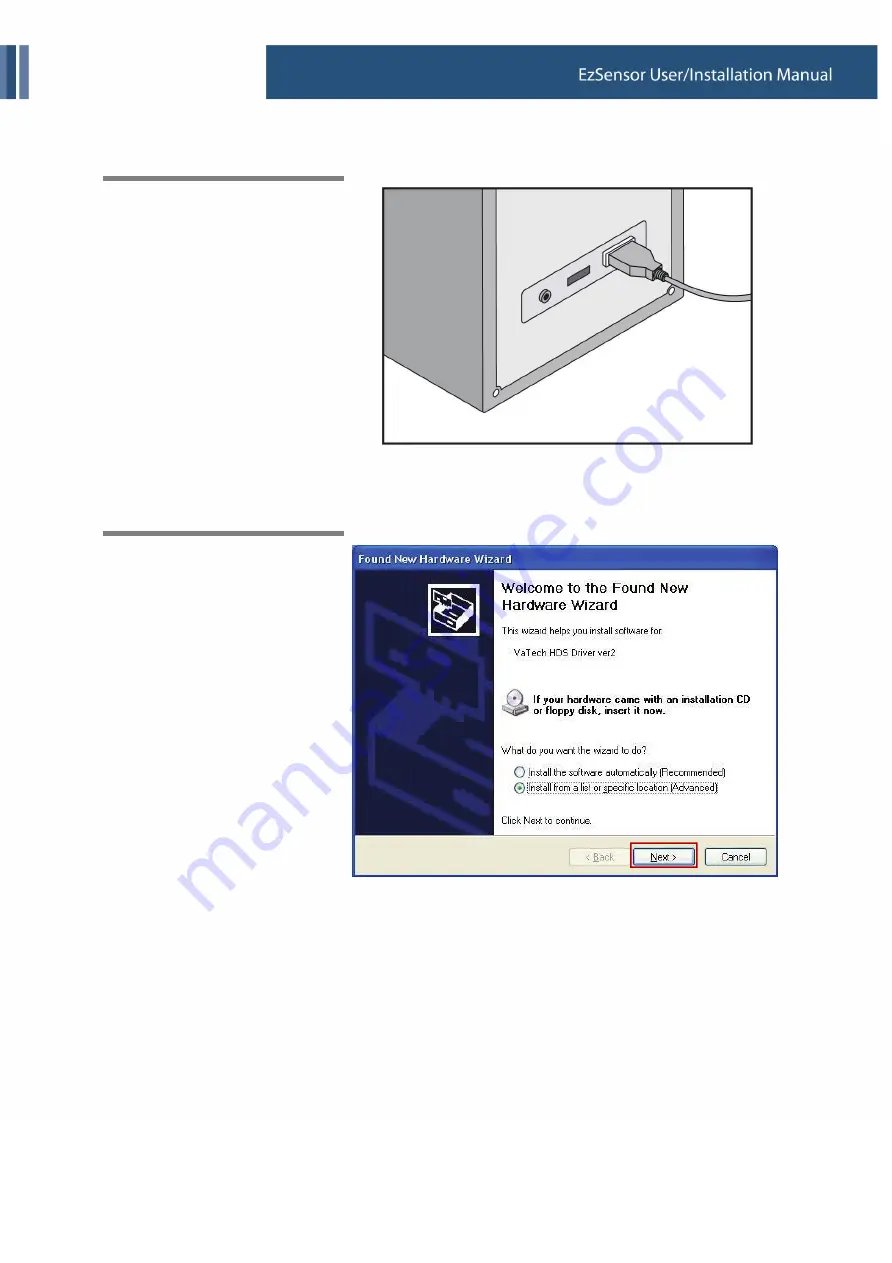
Step 3

Connect the USB cable
connector to the USB 2.0 port on
the PC.

Step 4

After connecting the USB Cable
to the USB 2.0 port on the PC,
the ‘Found New Hardware
Wizard’ will appear.

If the ‘Found New Hardware
Wizard’ does not appear,
reconnect the USB Cable
connector to the PC.

Select ‘Install from a list or
specific location (Advanced)’, and
then click ‘Next’.

15

Summary of Contents for EzSensor

Page 1: ...EzSensor User Manual...

Page 2: ...iar with the safety precautions and usage procedures for this product Note that the product may slightly differ from the contents of this manual depending on individual product specifications The foll...

Page 3: ...is the user s responsibility to ensure compliance with all local safety regulations in effect in the state country of installation Electrical safety The covers of the device may be removed only by qu...

Page 4: ...ropean Community Type B applied Indicates to the user to check the accompanying documents this User Guide for more information about EzSensor Handle with care The E WOO TECHNOLOGY logo and the followi...

Page 5: ...nection Driver Installation 14 2 4 Installation of the EzSensor Holder 19 3 SOFTWARE SETUP AND USAGE 20 3 1 Installation of EasyDent V4 20 3 2 Image Acquisition with EzSensor 25 3 3 Running the EasyDe...

Page 6: ...Sensor is connected by a USB A A cable supplied separately to a compatible Console PC The Console PC runs Windows XP or Windows Vista and also provides power for the device Support for the EzSensor is...

Page 7: ...Dimension W x L x T Pixel Pitch Active Pixel Array Dynamic Range Signal to Noise Ratio USB Cable length between Controller and PC 6 Description Low Noise Hybrid CMOS 1 14 x 1 52 x 0 19 inch 29 2 x 38...

Page 8: ...ensor Module Control Box Components Remark 3 4 5 6 7 8 USB Cable 3M Holder for Control box Holder for Sensor EasyDent V4 Installation CD Driver Installation CD EzSensor Manual USB 2 0 Mandatory Docume...

Page 9: ...ication analogue digital signal conversion USB port interface and optical insulation of all connections 3 USB Cable 3M Used to transmit output signal from the control box to the computer 4 Control Box...

Page 10: ...1 Introduction 6 EasyDent V4 Installation CD 7 DriverInstallationCD 9...

Page 11: ...The cone indicator is an intraoral positioning device specifically designed to support and align the sensor with the X ray source when positioning along the upper or lower jaw Please refer to the app...

Page 12: ...ice Pack 2 or above Microsoft Windows Vista Home Edition or above Hardware Requirements Main CPU Intel Pentium IV 3 0 GHz Main Memory 512 MB of RAM DDR2 Video Memory 64 MB HDD 80 GB larger size of HDD...

Page 13: ...the EzSensor will be installed along with the Windows device driver Step 1 Insert the EzSensor Driver Installation CD in the CD ROM Setup should start automatically If it does not click Start Run and...

Page 14: ...o install Check EzSensor 1 5 or EzSensor 1 0 and then click the Next button Step 4 The Installshield Wizard will start configuring the installation parameters you have chosen Step 5 The InstallShield...

Page 15: ...USB cable to your computer until you have successfully installed the setup program Be sure to connect the EzSensor module to the control box before connecting the USB cable to your computer Step 1 Co...

Page 16: ...e PC Step 4 After connecting the USB Cable to the USB 2 0 port on the PC the Found New Hardware Wizard will appear If the Found New Hardware Wizard does not appear reconnect the USB Cable connector to...

Page 17: ...ion Step 5 Select include this location in the search Click Browse and then select EzSensor100 or EzSensor150 Folder And then click Next button Step 6 If the Hardware Installation window appears click...

Page 18: ...ick the Finish button Step 8 Confirmation of Driver installation at the Device Manager Method of Confirmation Settings Control Panel System Hardware Device manager Select the Vatech HDS Driver located...

Page 19: ...2 Hardware Installation 18...

Page 20: ...nstall the EzSensor locate an area that offers easy access and visibility during patient examination Position the holder on a stable flat surface Using the holes at the back of the holder as guides fa...

Page 21: ...llation of EasyDent V4 Step 1 Insert the EasyDent installation CD in the CD ROM drive Setup should start automatically If it does not click Start Run and type D EasyDentV4 setup exe Press Enter Step 2...

Page 22: ...3 Software Setup and Usage Step 3 Preparing the installation Step 4 The EasyDent V4 InstallShield Wizard will appear Click Next button 21...

Page 23: ...sic version of Easydent V4 CD Publishing Installs the basic version of EasyDent V4 along with CD Publishing capabilities optional Step 6 Select the features that you want to install Click Next button...

Page 24: ...sage Step 7 Now you are ready to install If you would like review any of your installation settings click Back To proceed with the installation click Install Click Cancel to exit the wizard Step 8 Ins...

Page 25: ...3 Software Setup and Usage Step 9 MSDE Microsoft SQL server Desktop Engine is installed automatically Step 10 Choose No I will restart my computer later and then click Finish 24...

Page 26: ...h The sensor must be positioned with the flat side facing the X ray source The use of a cone indicator is recommended to guarantee that the sensor is parallel to the tooth and at the proper angle for...

Page 27: ...3 Software Setup and Usage 3 3 Running the EasyDent V4 3 3 1 Patient Registration Step 1 Turn on the PC Run EasyDent V4 Click Patient icon to register a new patient 26...

Page 28: ...oftware Setup and Usage 3 3 2 Normal Mode Step 1 Start EasyDent by clicking the EasyDent V4 Viewer on the desktop Search and enter the appropriate patient information and then click the Sensor 27 butt...

Page 29: ...se the image type HC Default High Contrast MC Middle Contrast LC Low Contrast HC_N High Contrast New Image processing MC_N Middle Contrast New Image processing LC_N Low Contrast New Image processing N...

Page 30: ...3 Software Setup and Usage Step 3 Select the tooth position and then click the Capture 29 button...

Page 31: ...y after the Please expose X ray message appears The message Optimizing Image Please wait appears momentarily while the image is being optimized The image will appear after optimization is complete Ste...

Page 32: ...ware Setup and Usage 3 3 3 Multi Shot Step 1 Click the MULTI SHOT button The system will get ready to acquire an X ray image Step 2 Expose the X ray after the Press the X ray shot button message appea...

Page 33: ...Usage Step 3 The message Optimizing Image Please wait will appear momentarily while the image is being optimized The image will appear after optimization is complete Step 4 Expose the X ray again for...

Page 34: ...p 5 If you want to acquire more images continue to expose the x ray when the Press the X ray shot button message appears If you want to finish click the Finish button Step 6 Click and drag the image t...

Page 35: ...3 Software Setup and Usage Step 7 Click DB SAVE Step 8 to save the images Click the MULTI SHOT button again to exit the Multi shot Mode 34...

Page 36: ...tor or by a qualified service technician Check that all cables connected to the EzSensor are undamaged Check for external damage to the EzSensor that could compromise its ability to operate safely 4 3...

Page 37: ...ervices mutually agreed upon Any item returned to the factory through an authorized dealer VATECH E WOO will be repaired or replaced at our option at no charge provided that our inspection indicates i...

Page 38: ...LED 1 LED 2 Table 3 Description of LED Indicators Operational State LED State LED 1 LED 2 Functional Status Confirmation Initial State Standby Trigger X ray On Data Transmission with USB cable Image...

Page 39: ...e Exposure Time Upper Lower Jaw Anterior Upper Jaw Canine Upper Jaw Posterior Lower Jaw Anterior Lower Jaw Canine Lower Jaw Posterior 2800 2800 3200 2400 2400 2800 1800 1800 2100 1400 1400 1800 160 0...

Page 40: ...In addition if the X ray source and the distance to the sensor were changed during the initial installation the distance from cone to detector must be changed to the 80mm setting To reduce an initial...

Page 41: ...n below The distance between the cone and the detector should be 80mm 8cm Please align the X ray source over the sensor 1 Distance 80mm 8cm from cone to detector 2 Added filter 4mm Al filter or No fil...

Page 42: ...endix Follow the steps below Step 1 Click the Calibration tab Step 2 Click the Get Bright button for the exposure time Refer to Table 4 Detailed Exposure Guidance Table Step 3 Check the command window...

Page 43: ...ing properly Solution Re install the driver 4 Code 3 Message Capture program is already running Solution Please close other program 5 Code 4 Message Detector s response time out Solution Check and re...

Page 44: ...on Restore the EzSensor s calibration data from the installation CD or re calibrate the sensor Contact Customer Service 12 Code 11 Message Can t find bright frames for calibration Solution User cancel...

Page 45: ...cquisition software 18 Code 17 Message Can t load EzSensor150 dll Solution Please re install acquisition software 19 Code 18 Message Requre EzSensor150 DLL was damaged Solution Please re install acqui...

Page 46: ...luminates a RED light during image acquisition A PID 2001 NO interface 0 Check Connection error message is displayed 45 Corrective Action Check that the USB cable is plugged in correctly at the Contro...

Page 47: ...Appendix 4 1 How to use the cone indicator Cone indicator for molars Cone Indicator for anterior 46...

Page 48: ...sensor into the disposal bag provided Pass the sensor through the cone ring into the sensor holder Fix the sensor firmly to the sensor holder Put the sensor cable in the cable holder located at the si...

Page 49: ...Appendix Fasten the sensor cable on the cone ring with the cable hook Put the cushion cap on the top of the bottom block 48...

Page 50: ......

Reviews: