background image

PAGE 16     

Slicing Settings

RESOLUTION

INFILL

TEMP

PROFILE

TR

FILAMENT

WALL

SPEED

SUPPORT

ANGLE

Ext

On

All

Medium: 200 micron

VariQuest™ Trifecta™

10%

1.73

1

70mm/s

220

Hotend

C

Off

Off

50

BRIM

A

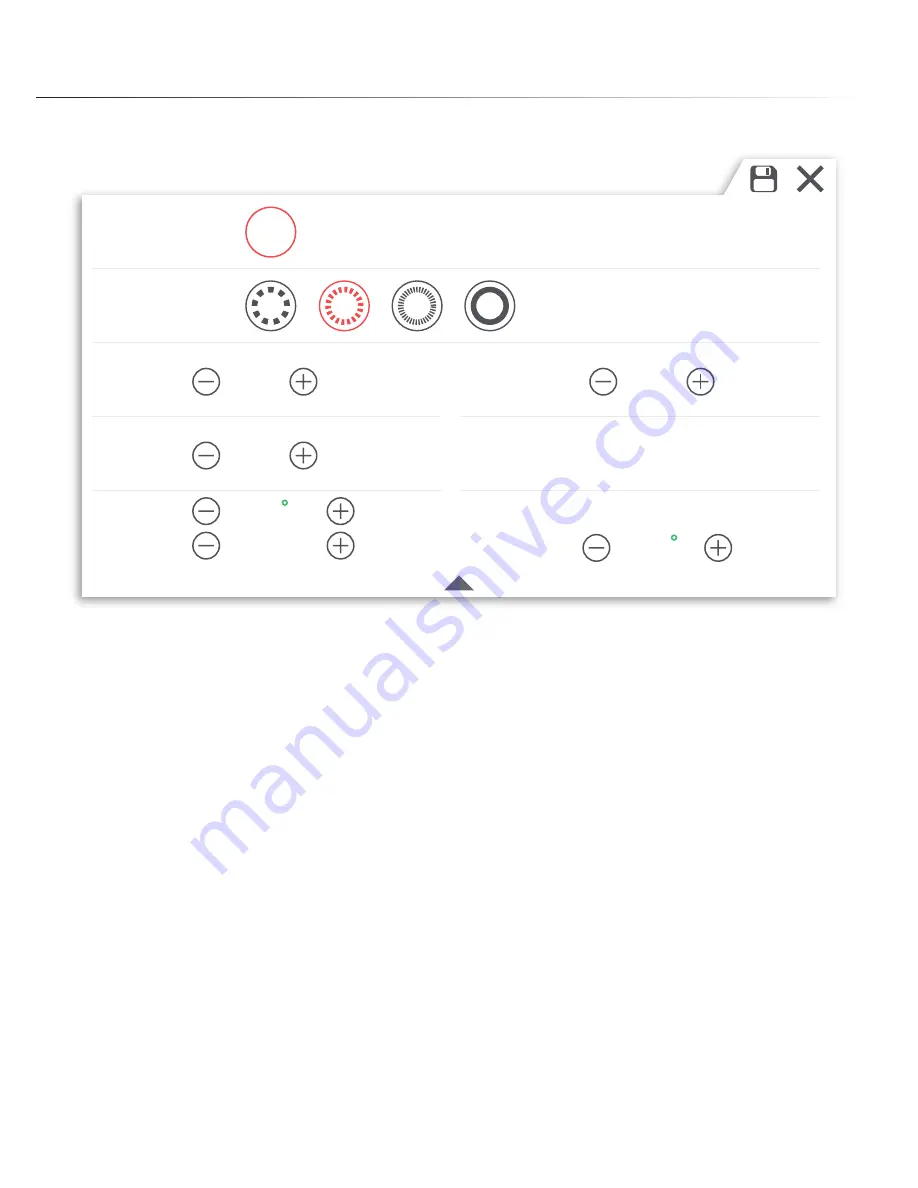
 - Change resolution settings. Choose from 

300

200

100

,


and


50

 micron. Default set to Medium - 200.

B

 - Change Infill percentage. Adjust object density, default set to 

10%

C

 - Filament Diameter. Input the diameter of your filament. Use of a digital caliper is recommended. 

D

 - Change Wall amount. Adjust the wall amount or thickness on your model. Default is set at 

2

.

E

 - 

Toggles Brim support. Activating Brim will add a ring to the base edge of your print.

F

 - 

Temperature settings for the Hotend. Recommended hotend temp - 

220-225

C° 

G

 - Change the speed of the printer. Recommended amount: 

60-70

 mm/s

H

 - Toggle switches for activating 

Support

 and 

Support Angle

 setting.

Summary of Contents for Trifecta 800

Page 1: ...Trifecta 800 3D Printer User s Guide...

Page 2: ...ON AND STARTING A PRINT 11 TRIFECTA SOFTWARE INSTALLATION 13 BED LEVELING GUIDE 12 IMPORTING AND PRINTING A MODEL 14 SLICING SETTINGS 15 EXPORTING A FILE 17 MODEL ROTATION 18 MODEL SCALING 20 MEASURIN...

Page 3: ...00 in a well ventilated environment VENTILATION The Trifecta 800 contains multiple moving parts that can cause injuries Do not reach inside the Trifecta 800 during operation MOVING PARTS The Trifecta...

Page 4: ...VARITRONICS EVER BE LIABLE FOR BREACH OF WARRANTY WHETHER EXPRESSED OR IMPLIED INCLUDING ANY IMPLIED WARRANTY OF THE MERCHANTABILITY OR FITNESS IN AN AMOUNT GREATER THAN THE PURCHASE PRICE OF THE PRO...

Page 5: ...g File Type STL OBJ Os Compatibility Windows Mac Software Trifecta Software Software Connectivity USB firmware SD Card printing Consumption 15W idle 70W operational Electronics RAMPS 1 4 AT mega 2560...

Page 6: ...PAGE 6 Print Cooling Fan Print Bed Hotend Filament Guide Tube SD Card Reader Control Dial Control Menu Spool Holder Power Switch Power Socket USB Port Printer Overview BACK FRONT...

Page 7: ...ifecta 800 Printer Filament Spool Remove foam bracket and remove the printer and filament 3 Place the printer on a firm flat surface Requires accessible power outlet 5 Remove the printer and filament...

Page 8: ...n electrical socket 2 1 3 Turn on the printer by flipping the power switch to the On position I 4 Ensure the power outlet is located near the equipment and readily accessible Use extra caution when cu...

Page 9: ...l from the packaging and place it on the spool holder 2 Take the end of the filament from the spool and insert it into the guide tube 3 5 PAGE 9 Filament Installation 4 Thread the filament through the...

Page 10: ...ded in the accessory kit slide each clip on to pinch the bed platform and glass print surface together Repeat until all four clips are secured onto the bed as shown 2 1 Place the glass print surface o...

Page 11: ...the main menu turn the dial to scroll to Print Push down on the dial to select 1 Scroll down to the file you want to print and push down again to start the print 2 MAIN TEST_PRINT G VASE G BRACELET G...

Page 12: ...e is roughly the thickness of a piece of paper If there is a large gap you will need to turn the screw clockwise to bring the bed closer to the nozzle If there is no gap and the nozzle is scraping the...

Page 13: ...w Rotate model Scale model A B C D E F G H A B C D E F G H Supported OS Windows 7 Mac OS X 10 6 8 or higher The VariQuest Trifecta Software comes pre installed on the VariQuest Design Center You can a...

Page 14: ...Pre sliced STL OBJ Importing a model within Trifecta Software There are two ways to import a file into the Trifecta Software A Import a file directly from Trifecta Software B Launch Trifecta module f...

Page 15: ...Once you imported a 3D model select the Settings button from the side bar to open up the slicing setting PAGE 15 Slicing Settings...

Page 16: ...st object density default set to 10 C Filament Diameter Input the diameter of your filament Use of a digital caliper is recommended D Change Wall amount Adjust the wall amount or thickness on your mod...

Page 17: ...This will begin the export process which generally takes a couple of minutes depending on the size of the model Once slicing is completed use the dialogue box to save the GCODE file onto a SD card or...

Page 18: ...facing the right way with the rotate tool you can adjust the rotational angle on each individual axis In the first image you can see that the vase is lying on its side Since we want to print it with...

Page 19: ...X Y Z In this example we rotated the Y axis ring to bring the model upright To rotate click on the axis you wish to wish to rotate on hold down your left mouse button and drag until you are satisfied...

Page 20: ...exceeds the printer s print volume the model will be shaded in gray We can utilize the Scale Tool to adjust model sizes bigger or smaller To scale uniformly click on the scaling node grey and drag yo...

Page 21: ...vent the model from being distorted Scale the model using precise measurement input in mm Select either the Width Depth or Height measurement control and change the numbers by typing your new measure...

Page 22: ...the longest but allow for the best finish Filament Input the diameter of your filament Use of a digital caliper is recommended If you are using Trifecta PLA filament and do not have a caliper on hand...

Page 23: ...oof Since the angle threshold is set to 30 degrees supports were also generated for the angled piece on the right side of the image not required Support ALL Angle 85 Degree In this example support set...

Page 24: ...p to For Trifecta 1 75 PLA filament set the hotend temperature to 215 220 degrees Celsius Brim Turning on the Brim printing feature in the settings menu will add a one layer brim to the edges of your...

Page 25: ...ke your caliper to a section of the filament and lightly pinch the filament and take a reading In this case the filament diameter is 1 73 mm 3 Finally move to a new section on the filament and take a...

Page 26: ...low the steps below to update your printer firmware 1 Take the USB wire included with your printer and connect the USB B end to the back of the printer Your printer does not need to be turned on to pe...

Page 27: ...Printer Firmware 5 Allow the firmware to upload to the printer Do not disconnect the cable at this time 6 All done Click Ok to close the window and you can now disconnect the USB cable from the print...

Page 28: ...eeding There are skip lines missing gaps along the layer of the print The drive gear teeth may be dirty from use over time Remove drive gear and clean with a brush Re position the drive gear on the ex...

Page 29: ...surface For large prints remove the bed clips securing the glass build surface and place it down on the flat surface Use a thin metal palette knife and find a corner edge of the print to wedge the kni...

Page 30: ...ally navigate the Trifecta slicing software directory C Program Files VariQuest Trifecta Software drivers Run dpinst32 or dpinst64 depending on if the computer is running a 32bit or 64bit OS Imported...

Page 31: ...ment and coil back onto the spool Thread the loose end through any of the holes to prevent the filament from tangling INSTALLING THE SPOOL Rest the spool on the spool holder on the back of the printer...

Page 32: ...GIN Only use machining oil on the X Y axis smooth rods and linear bearings Grease based lubricant can seize and damage linear bearings Apply a single drop on each of the smooth rods and manually move...

Page 33: ...xpose as much of the threaded rod as possible 2 Clean off the rod by wiping off excess grim and dirt with a cloth 3 Apply PTFE based grease onto the threaded rod with a lint free rag or your finger Ev...

Page 34: ...f the extruder cap and rotate the motor shaft to line up the set screw with the hex key Rotate counter clockwise to loosen the set screw and pull out the drive gear from the motor shaft With a razor o...

Page 35: ...may over work the extruder motor and heater cartridge causing the printed surface to have missing gaps and other imperfections A Resolution Lower resolution 300 micron requires a higher filament flow...

Page 36: ...N BEFORE PERFORMING THE SWAP Unscrew the two screws from the top of the carriage that secures the hotend mount 1 Loosen the three screws from the left side of the carriage that secures the hotend blow...

Page 37: ...to give enough clearance to the hotend Pull down on the hotend and retract the unit out of the seating 3 With the hotend still attached to the thermistor and heater cartridge wire swing the hotend aro...

Page 38: ...8 Hotend Replacement Using the 1 75mm hex key loosen the heater cartridge set screw located on the back of the hotend heater block 5 With the setscrew loosened remove the heater cartridge from the hot...

Page 39: ...m the heater block by unscrewing the bronze setscrew by hand 7 Take the new hotend unit and screw the thermistor back into the heater block by hand Avoid screwing in the thermistor setscrew with tools...

Page 40: ...heater cartridge back into the right side of the heater block Orientate the heater cartridge wires so they point toward the back of the extruder 9 Use the 1 75mm hex key to tighten the setscrew that s...

Page 41: ...in between the heater cartridge and thermistor wire 11 Once the components are in place the thermistor wires should go around the back of the hotend heater block and both wires from the cartridge and...

Page 42: ...PAGE 42 Hotend Replacement Insert the hotend mount back into the carriage 13 Insert both hotend mount screws in You will need to push from the bottom of the hotend mount to align the mounting holes 14...

Page 43: ...Hotend Replacement Tighten both mounting screws 15 Screw all three blower fan mounting screws back into the panel Ensure the wiring is routed as shown in the picture and obstruction free during print...

Page 44: ...e position of the carriage on three axis EXTRUDER NOZZLE Top of the hotend with a 0 34mm orifice to extruder molten filament onto the print bed DRIVE GEAR A teethed gear attached to the extruder motor...

Page 45: ...dels into a 3D print ready file for your printer Print ready files will be denoted with the extension G GCODE SD CARD READER Located on the front panel of the printer Load your sliced model files onto...

Page 46: ...r technical assistance please contact your authorized VariQuest dealer or the VariQuest Technical Support team Email techsupport variquest com Phone 1 800 328 0585 2015 Varitronics LLC All Rights Rese...

Reviews: