background image

42

43

Specifications

Main Amplifier 

Power Output: 45 watts X 4 channels into 4-ohms @ < 10% THD+N 

Signal to Noise Ratio: 70dB below reference. (Reference: 1 watt, 4-ohms) 

Frequency Response: 20 Hz to 20 kHz, -3dB. Aux input used as source reference 

Reference Supply Voltage: 14.4VDC 

DVD/CD Player 

Compatible formats: DVD-R, DVD-RW, DVD+R, DVD+RW, 

CD-R, CD-RW, CD-DA, HDCD, SVCD, VCD. 

MPEG, JPEG, XVID, MP3, WMA, MP3/WMA files burned onto a DVD+R/W or DVD-R/W and 

CD-R/RW 

Signal to Noise Ratio: 70dB 

Dynamic Range: >95dB 

Frequency Response: 20 Hz to 20 kHz, -3dB 

Channel Separation: > 60dB @ 1 kHz 

D/A Converter(s): High performance 24-bit, 192 kHz, multi-bit Sigma Delta modulation. DAC 

supports sample rates from 8~192 kHz. 

Electronic Skip Protection (ESP): 

DVD: 2-3 sec, CD-DA: 10 sec, MP3: 100 sec, WMA: 200 sec 

(ESP time is approximate) 

Mechanical anti vibration ability: 10~200 Hz, X/Y/Z direction: 1.0G 

Video Section 

Format: NTSC, PAL (auto-detection) 

Output: 1Vp-p (75-ohm), buffered 

Input: 1Vp-p (75-ohm) 

FM Tuner Section 

Tuning Range: 87.5 MHz – 108 MHz 

Mono Sensitivity (-30dB): 10dBu 

Quieting Sensitivity (-50dB): 15dBu 

Alternate Channel Selectivity: 70dB 

Signal to Noise Ratio @ 1 kHz: 58dB 

Image Rejection: 60dB 

Stereo Separation @ 1 kHz: 30dB 

Frequency Response: 30Hz – 15 kHz, -3dB 

AM Tuner Section 

Tuning Range: 530 kHz – 1710 kHz 

Sensitivity (-20dB): 20dBu 

Signal to Noise Ratio @1 Hz: 50dB 

Image Rejection: 60dB 

Frequency Response: 50 Hz – 2 kHz, -3dB 

Monitor Section 

Screen Size: 6.2" (Measured diagonally). 

Screen Type: TFT Liquid Crystal Display (LCD) active matrix 

Response Time: 30mSec rise time, 50mSec fall time 

Resolution, DVD/Composite Video in: 480i sub pixels, 

800 (W) X 480 (H) 

Viewing angle:   

 60 degrees left or right 

 30 degrees up 

 60 degrees down 

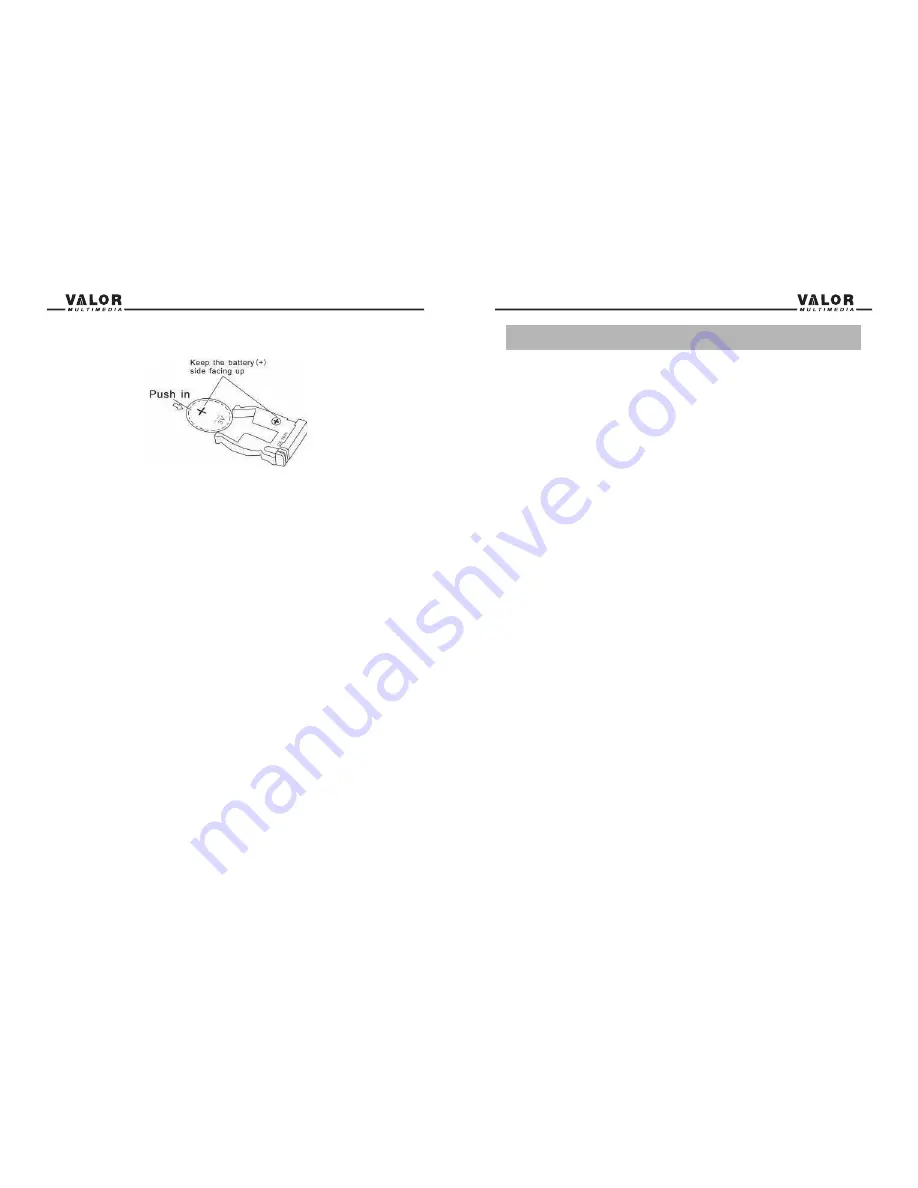
Install the battery 


Insert the battery holder


NOTE:

Only use one (CR2025 3V) lithium battery. 

If battery is incorrectly replaced it may explode. Replace only with the same or equivalent type of 

battery. Do not recharge, disassemble, heat or dispose of the battery in fire. 

Keep batteries away from children to avoid the risk of accident. 

Suggestions

1. Only use a clean silicone cloth and neutral detergent to clean the front panel or monitor’s 

screen. Using a rough cloth and non neutral detergent (such as alcohol) may result in scratching 

or discoloration. 

2. Keep away from water and other liquids. 

3. If the temperature inside the unit gets too high, the unit’s loader will automatically stop playing 

the disc. Please wait for the unit to cool down before using the player again. 

4. Never insert anything other than a 5 inch (12 cm) compact disc into the player as the 

mechanism can be damaged by foreign objects. 

5. Do not attempt to use a 3” (8 cm) Single-CD disc in this unit, either with or without an adaptor, 

as it will damage the player and disc. Such damages are not covered under Warranty.   

6. When the vehicle warms up during cold weather or under damp conditions, condensation may 

appear on the LCD panel. If this occurs, the screen will not operate properly until the moisture 

has evaporated. 

7. We recommend that you clean your discs before inserting them into the unit; this will prevent 

damages to the laser and prolong its life 

Summary of Contents for DD-806W Plus

Page 1: ...t not expressly approved by the party responsible for compliance could void the user s authority to operate the equipment 3 This equipment complies with FCC RF radiation exposure limits set forth for an uncontrolled environment This equipment should be installed and operated with a minimum distance of 20 centimeters between the radiator and your body DD 806WPlus ...

Page 2: ...ls and Supplies 5 Warning 5 Disconnecting the Battery 6 Controls and Indicators 7 Buttons Operation 7 Key Areas for the Touch Screen 8 Remote Control 9 Remote Control Functions 9 10 TFT Monitor Operation 11 Rear Camera Mode 11 Screen Adjustment 11 Screen Adjustment Procedures 11 Parking Brake 11 Operating Instructions 12 Power On Off 12 Source Selection 12 Volume Adjustment 12 Equalizer Setting 12...

Page 3: ...uid crystal fluid may be hazardous to your health or fatal If the liquid crystal fluid from the LCD contacts your body or clothing wash it off with soap immediately Display Brightness When the temperature of the unit falls as in winter the liquid crystals inside the screen will become darker than usual and normal brightness will return once the unit warms up DISC Care Be careful not to spill juice...

Page 4: ... disassemble or adjust the unit without the assistance of a professional For details please consult your local car stereo Automotive electronic specialist shop 5 To prevent injury from shock or fire never expose this unit to moisture or water 6 Never use irregular discs the only recommended disc size is a 12cm round disc 7 To prevent damage to the mechanism inside this unit avoid dropping the unit...

Page 5: ...he source SD Slot Front Aux in Remote Sensor Touch screen TFT Reset Disc Slot Disconnecting the Battery To prevent a short circuit during an installation of a unit please turn off the ignition and remove the negative battery cable prior to starting the installation NOTE If the unit is to be installed in a car equipped with an on board drive or navigation computer do not disconnect the battery cabl...

Page 6: ... on Tuner mode Stop playback Select 11 Enter the audio settings ESC 12 Exit the current menu Menu 13 Enter the main menu of system Picture 14 Adjust the Screen settings Repeat A B 15 Set start point A and end point B to repeat continually OK 16 Start or pause playback confirm the settings Direction 17 Up down left right to select items for certain setting Remote Control Key Areas for the Touch Scr...

Page 7: ... display video 2 The Parking brake does not apply when using the reverse backup camera feature 3 When the parking brake is off the front monitor will display a Caution with blue background preventing the driver from watching video while driving This is for your safety and to reduce the risk of a traffic accident Please see the INSTALLATION SECTION for installation guidance on the parking brake wir...

Page 8: ...tion Instructions Power On Off Press the POWER VOL button to turn the unit on You can also turn on the unit by pressing the button on the remote Press and hold the POWER VOL button on the front panel or press the POWER button on the remote to power off the unit Source Selection Press the SRC Button on the front panel to change sources TUNER DISC CARD FLASH DRIVE BT TEL F AUX R AUX SETUP and STANDB...

Page 9: ...ct the features on the screen The following instructions will show the different ways to access menus and settings Screen Setting Press the SETUP icon on the main menu Press the SCREEN icon while on the Setup menu Selecting a Setting for Adjustment Press one of the setting icons to make any adjustment Standby 1 On the Main menu press the Standby icon 2 In the standby mode the screen will turn off ...

Page 10: ...just the color tone of the picture Date Setting Press the Date icon on the SETUP menu and then select one of the following options Month Day Year to make the date adjustment Time Setting Press the Time icon on the SETUP menu and then select the hour or minute to make the time adjustment Clock Mode Setting Press the Clock Mode icon on the SETUP menu and then select 12 Hr or 24 Hr modes ...

Page 11: ...n command 4 Press one of the buttons on your steering wheel control that you would like to use for this function in order to finalize the learning command 5 Once the button has learned the icon will turn blue DVD Setting Press the DVD icon while on the SETUP menu Selecting a Setting for Adjustment Select one of the three setting options to make any adjustment Parental Control In order to change th...

Page 12: ...while on the SETUP menu Selecting a Setting for Adjustment Load Factory Use this feature to reset the unit back to factory setting TS Calibration Touch Screen Calibration If your touch control seems to be a little off You can go into this setting to calibrate the touch control Basic Settings Press the BASIC icon while on the SETUP menu Selecting a Setting for Adjustment Select one of the three set...

Page 13: ... screen or press the BAND button on the remote control to change between FM and AM Auto Tuning Press the button on remote control or press the button on the screen to seek up the next available station Press the button again to stop searching Press the button on the remote control or press the button on the screen to seek down the next available station Press the button again to stop searching Man...

Page 14: ...rce appears on the top of the screen On the front panel press Menu and select the Disc icon Using the Touch Screen Controls Press to Play Pause Press to stop Press to fast reverse Press to fast forward Press to display Sub title Press to switch among LEFT RIGHT and STEREO tuning frequency one step at a time Using Preset Stations 12 preset buttons are used to save your favorite stations for each ba...

Page 15: ... the DVD playback press the play pause button on the screen or the OK button on the remote control to resume play Pause Playback Press the play pause button on the screen to pause or to resume play Accessing the DVD Menu 1 You can touch the area E middle of screen and then press the button to access the main DVD menu 2 Use the arrow buttons on the remote control to select a title from the menu 3 P...

Page 16: ...anada East Pacific Ocean Islands Region 2 Japan Western Europe Northern Europe Egypt South Africa Middle East Region 3 Taiwan Hong Kong South Korea Thailand Indonesia South East Asia Region 4 Australia New Zealand Middle and South America South Pacific Ocean Islands Oceania Region 5 Russia Mongolia India Middle Asia Eastern Europe North Korea North Africa North West Asia Region 6 Mainland China AL...

Page 17: ...er clockwise Stop Play Pause Flip the current image clockwise CD MP3 WMA JPEG Operation Instructions for Insert Eject Play Pause Stop Playback Track Selection Fast Forward Fast Reverse Scan and Random Play are the same for DVD CD and MP3 operation Please see the DVD Player Operation section for information about these topics The file naming formats listed below are compatible with this unit ISO 96...

Page 18: ...ly Note For other definitions please go to CD MP3 WMA JPEG Operation as references FLASH DRIVE Operation Accessing the Flash Source 1 To switch to FLASH source press the Menu button on the front panel and press the Flash Drive icon or press the SRC button on the remote control until the FLASH appears at the top of the screen NOTE Make sure the USB cable is connected with a flash drive device 2 Sel...

Page 19: ...he BASIC icon option and select Bluetooth make sure the On option is highlighted to activate the Bluetooth feature 2 Pair your mobile phone to this unit refer to the Pairing operation It is necessary to pair your phone first with the unit in order to use the Bluetooth feature Bluetooth Indicator There is a Bluetooth indicator at the top of the screen When the Bluetooth function is Off the indicato...

Page 20: ...h device has received the signal from the radio then you will see the Bluetooth device name VALOR displaying on the screen Select Bluetooth device name VALOR to begin the Bluetooth connection between your phone and the unit This unit can memorized up to 5 mobile phones but only one mobile phone can be used at a time The Default phone will be retained only if all other paired phones are deleted Def...

Page 21: ...ker is shorted Check the speaker connections Unit resets itself when engine is off Incorrect connection between yellow memory wire and positive battery wire Check the wiring and make the correction TFT MONITOR No Video playback Incorrect connection to parking brake wire Check the wiring and make the correction PRK SW is activated and parking brake is not engaged Stop vehicle in a safe place and ap...

Page 22: ... code Disc is inserted upside down Insert the disc with the label side up Image blurred distorted or dark Disc is illegally copied Use the original disc PBC cannot be used during VCD playback PCB is not available on the disc No repeat or searching while playing VCD PCB is on Turn PCB off MP3 Interruption occurred during playback Disc is dirty or scratched Clean the disc or replace the disc File is...

Page 23: ...quid Crystal Display LCD active matrix Response Time 30mSec rise time 50mSec fall time Resolution DVD Composite Video in 480i sub pixels 800 W X 480 H Viewing angle 60 degrees left or right 30 degrees up 60 degrees down Install the battery Insert the battery holder NOTE Only use one CR2025 3V lithium battery If battery is incorrectly replaced it may explode Replace only with the same or equivalent...

Page 24: ...anual 1 Warning card 1 Warranty card 1 Mounting bar screws 1 Wiring Diagram 1 Accessory List DD 806W Plus Multimedia Wiring Diagram VIOLET VIOLET BLACK General Auxiliary Input impedance 10k Power Supply 10 5 to 16V DC negative ground Fuse 10 amp mini ATM type DIN chassis dimensions 7 X 7 X 4 178mm x 178mm x100mm Specifications subject to change without notice ...

Reviews: