background image

- 28 -

6- Service procedures - Magnetic clutch

Magnetic clutch

Removal

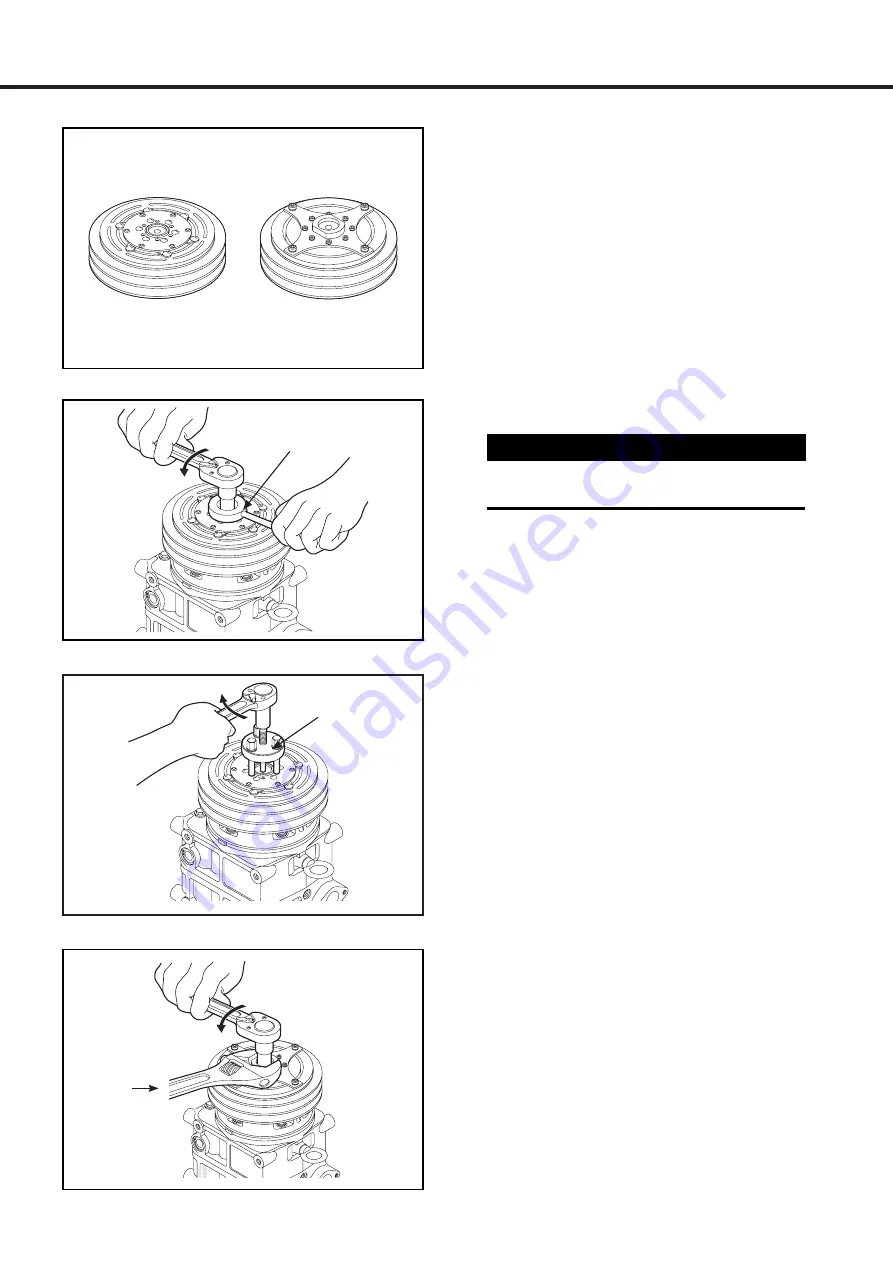
1.  Check your armature type (see at left):
•  3-hole type (1)
•  2-way stopper type (2)

2.  Remove the armature.

•  If it is a 3-hole type armature (1)

a.  Remove  the  center  bolt  using  an  armature 

holder to prevent armature assembly rotation.

b.  Remove  the  armature  assembly  using  an 

armature  puller  assembly.  Remove  the  shims 
from  the  compressor  driveshaft  or  armature 
assembly.

•  If it is a 2-way stopper type armature (2)

a.  Remove  the  center  bolt  using  a  spanner  to 

prevent armature assembly rotation.

Armature puller 
assembly

Armature 
holder

3-hole type (1)

2-way stopper  type (2)

CAUTION!

The  armature  removal  process  differs 
according to the armature type

Spanner

Summary of Contents for TM55

Page 1: ...Copyright 2019 Valeo Japan CO LTD All Rights Reserved SERVICE MANUAL Valeo TM55 TM65 Compressors...

Page 2: ...rmance Oil fill up plug for better inner oil return Lip type shaft seal providing ultimate reliability performance 7 double headed pistons architecture ensuring smooth and quiet operations Compact rob...

Page 3: ...es for disassembly reassembly and inspection of the compressor The following warning signs are used in this service manual These are extremely important to ensure safe operation and to prevent body in...

Page 4: ...il level at inclination conditions 18 Front Lifting 18 Lateral Inclination 18 Oil contamination 19 Oil check 19 Replacement of components 20 Leak test 21 Refrigerant Charging 21 Storing a repaired com...

Page 5: ...CONNECTIONS Internal Hose Diameter Suction 35 mm 1 3 8 in Discharge 28 mm 1 1 8 in Suction 35 mm 1 3 8 in Discharge 35 mm 1 3 8 in WEIGHT 18 1kg 39 9 lbs w o Clutch DIMENSIONS Length Width Height 341...

Page 6: ...he name plate located on top of the compressor body COMP TYPE PART NO SERIAL NO OIL LEAK TEST REFRIG MADE IN JAPAN TM XX ZXXXXXXX X XXXXXXXXXX XXXXXX cm3 HIGH SIDE 2 9MPaG LOW SIDE 1 5MPaG HFC 134a Ti...

Page 7: ...climates in the most stressful conditions Being able to rely on our robust magnetic clutch provides the best way to reduce fuel consumption without using additional unloading devices that decrease sig...

Page 8: ...3 2 Open the service port connector when using a gauge manifold Turn the spindle in the clockwise direction by 1 2 turn to 1 turn The shut off valve and the service port connector are now opened 2 3...

Page 9: ...30 20 80 25 28 32 10 34 56 P kW 7 35 8 43 9 17 9 95 11 02 11 35 Valeo TM 65 performance data R134a Conditions Cooling Capacity Q and Power Consumption P Cond temp oC Pd MPaG Evap temp oC 10 5 0 5 10...

Page 10: ...8 1 Product description Dimensions TM55 TM65 compressors 12 M12x1 75 Dp26 6 M6x1 0 Dp13 PCD 90...

Page 11: ...n 11 Bolt 12 Oil drainer plug 13 Cylinder shaft assembly 14 Eye bolt 15 O Ring 16 Oil filler plug 17 Strainer 18 Gasket 19 Connector 20 Bolt 21 Gasket 22 Plate 23 Plate 24 Bolt 25 Sight glass 26 O rin...

Page 12: ...haft is supported by two radial bearings and two thrust bearings The swash plate is rotated by the drive shaft and moves the pistons back and forth Radial bearing Thrust bearing Suction Compression Su...

Page 13: ...e swash plate and the shoes is lubricated by the splashing action of the oil flowing through the thrust bearings The compressor remains constantly lubricated thanks to the oil circulating together wit...

Page 14: ...rohibited Compressor mounting points The compressor s mounting points should be tightened to the specified torque Specified torque 45 50 N m 4 6 5 1 kgf m 33 2 36 9 lbf ft Compressor bracket 1 Install...

Page 15: ...pulley drive of the vehicle the magnetic clutch to drive pulley ratio should avoid the range 1 0 92 1 08 to limit vibration and resonance Compressor speed must not exceed the specified speed CAUTION P...

Page 16: ...or for a few minutes from time to time 2 Do not drive through water Water may damage the magnetic clutch thus preventing normal operation 3 Always charge the A C system with the specified quantity of...

Page 17: ...gases WARNING Direct contact with refrigerant can cause frostbite or blindness Always wear safety glasses and protective gloves Do not work with refrigerant close to your face Maintenance precautions...

Page 18: ...mpressor start up will cause valve damage and reduce durability Compressor removal When the compressor is operational 1 Perform the oil return operation see p 16 2 Recover the refrigerant from the sys...

Page 19: ...tc 2 Do not mix oils 3 The moisture content must not exceed 1 000 ppm PAG oil only 4 The oil easily absorbs moisture when the container is open Therefore always seal the container immediately after us...

Page 20: ...Lifting In most of bus rear application the front end of the compressor is lifted to fit the inclination of the engine 1 Oil level at sight glass oil level is distorted 2 Oil amount quantity appears l...

Page 21: ...change to red Presence of foreign matter metal filings etc Oil check The compressor oil must be checked as follows when being charged into a used system 1 Perform the oil return operation p 16 2 Remov...

Page 22: ...ed Charging amount Amount to remove from new compressor 91 5 61 or more Same as recovered 61 amount recovered Under 61 61 30 5 unit cu in 6 Install the oil filler plug and tighten it to the specified...

Page 23: ...gf m 18 24 lbf ft 2 Fill the compressor with refrigerant through the suction side raising the refrigerant pressure to at least 0 39 MPaG 5 kgf cm2 56 3 psig 3 Check the compressor for leaks using a le...

Page 24: ...able p 22 23 for the appropriate measure Most of the malfunction symptoms can be classified in the following categories 1 Insufficient cooling capacity 2 Abnormal noise 3 Smoke In case of insufficient...

Page 25: ...cool blow coming out Replace the compressor Fix the refrigerant leakage then fill with refrigerant until having the right amount Charge the battery or replace the magnetic clutch Replace the magnetic...

Page 26: ...ipping The magnetic clutch has a backlash and slips Abnormal noise from the magnetic clutch Abnormal noise from the magnetic clutch 3 Smoke Trouble Symptom Possible cause Measure A B C D Magnetic clut...

Page 27: ...ecover refrigerant then refill with the right amount of refrigerant Receiver dryer is clogged Temperature difference between inlet and outlet pipes happens Dryer is covered with frost Replace parts Ex...

Page 28: ...w control the thermal sensing tube is not closely in contact with the evaporator pipe Adjustment or replacement Air mixed in refrigeration cycle Just after compressor stops discharge pressure will com...

Page 29: ...Center bolt M10 x 1 25 25 30 2 5 3 1 18 22 2 Field coil screw M6 x 1 0 4 2 7 2 0 4 0 7 3 1 5 3 3 Bolt M10 x 1 5 25 32 2 5 3 3 18 24 4 Oil filler plug M10 x 1 5 15 18 1 5 1 8 11 13 5 Connector bolt M10...

Page 30: ...prevent armature assembly rotation b Remove the armature assembly using an armature puller assembly Remove the shims from the compressor driveshaft or armature assembly If it is a 2 way stopper type a...

Page 31: ...ley puller to the pulley Hook the puller claws to the edge of the pulley as shown 6 Tighten the center pulley puller bolt to remove the pulley 7 Remove the six field coil compressor screws Then remove...

Page 32: ...t before reinstallation 3 Check the field coil for a loose connector or cracked insulation Installation 1 Install the field coil on the compressor with the harness on top and tighten the mounting scre...

Page 33: ...rotation Specified torque 25 30 N m 2 5 3 1 kgf m 18 22 lbf ft 6 Check that the clutch clearance is as specified If necessary adjust the clearance using shim s Adjusting shims are available in the fo...

Page 34: ...ly and a spanner 4 Once the pulley is fixed loose the collar and remove the pulley installer assembly 5 Install the snap ring beveled edge up using external snap ring pliers Snap ring External snap ri...

Page 35: ...1 kgf m 18 22 lbf ft 9 Check that the clutch clearance is as specified If necessary adjust the clearance using shim s Adjusting shims are available in the following thicknesses Shim Part No Thickness...

Page 36: ...then drain the oil 4 Remove the seven bolts securing the head using an hexagon 14 mm wrench 5 Alternately tap the two projections on the front head using a remover and a mallet to remove the front cy...

Page 37: ...the snap ring using the internal snap ring pliers 5 Position the guide on the shaft 6 Coat the new O ring with clean compressor oil and install it in the front cylinder head 7 Install the front cylind...

Page 38: ...torque 15 18 N m 1 5 1 8 kgf m 11 13 lbf ft 13 Install the strainer in the suction port 14 Fit the blanking plates connectors to the suction and discharge connections and tighten them to the specifie...

Page 39: ...d and cylinder block 48 7 Guide 36 41 To install shaft seal 48 8 Shaft seal remover installer 35 36 To remove and insert the shaft seal 49 9 Armature puller 30 To remove armature 49 10 Armature puller...

Page 40: ...e burrs and fluff Part Name 3rd Angle Proj Surface Treatment Heat Treatment Hardness Material Br HQF HTL HRC40 to 45 3 1 2 SS41 SS41 S45C 1 2 3 Armature Holder Material Bolt Collar Part Name Material...

Page 41: ...the edges to be slight chamfering Should remove burrs and fluff Br Armature Installer Assy 1 M10x1 25 M14x2 0 6 1 C 1 C 27 70 24 0 35 14 M x2 0 40 40 Collar Part Name 3rd Angle Proj HQ HQf HRC40 to 45...

Page 42: ...Surface Treatment Heat Treatment Hardness Material S45C HQ HTL HRC40 to 45 Section view A A Center Pulley Puller Unless otherwise specified the edges to be slight chamfering Should remove burrs and fl...

Page 43: ...Assy 1 2 3 1 2 3 Pulley Installer Assy 15 100 15 24 6 12 5 4 12 0 25 13 9 Bolt Part Name 3rd Angle Proj HQ HQf HRC40 to 45 S45C Heat Treatment Hardness Surface Treatment Material Unless otherwise spec...

Page 44: ...s to be slight chamfering Should remove burrs and fluff Br Pulley Installer Assy 2 A A Section view A A 18 28 5 0 2 0 5 C 0 5 C 2 C 5 C 27 7 24 0 35 20 15 28 0 3 Collar Part Name 3rd Angle Proj HQ HQf...

Page 45: ...fluff Part Name 3rd Angle Proj Surface Treatment Heat Treatment Hardness Material SK85 JIS Remover for cyl head Unless otherwise specified the edges to be slight chamfering Should remove burrs and fl...

Page 46: ...9 0 5 7 2 R 5 1 R Armature Puller Part Name 3rd Angle Proj HQ HQf HRC40 to 45 S45C Heat Treatment Hardness Surface Treatment Material Unless otherwise specified the edges to be slight chamfering Shoul...

Page 47: ...ole Bolt 1 2 3 Armature Puller Assy Unless otherwise specified the edges to be slight chamfering Should remove burrs and fluff Part Name 3rd Angle Proj Surface Treatment Heat Treatment Hardness Materi...

Page 48: ...X2 0 2 10 30 12 13 9 7 10 5 R2 152 R1 5 35 42 R HQ HQf HRC40 to 45 Armature puller assy 2 Pole Unless otherwise specified the edges to be slight chamfering Should remove burrs and fluff Part Name 3rd...

Page 49: ...body service kits sets and parts See Product description Exploded view p 10 Item Part name Reference Quantity Remarks 24 Connector body Z0011223 n 1 Dis Suc 23 Gasket Z0011226 n 1 For conn 26 Gasket...

Page 50: ...r HFC 134a use SERVICE MANUAL Version EU5565 16002 01EN Published by VALEO JAPAN CO LTD Printed in Japan Copyright 2016 VALEO JAPAN CO LTD For any inquiry regarding the present service manual contact...

Page 51: ...m Copyright 2016 Valeo Japan CO LTD All Rights Reserved Valeo TM55 TM65 Compressors for Bus Air Conditioning Valeo TM55 TM65 Benefits High reliability Integration flexibility Great cooling capacity En...

Reviews: