background image

14

FR

Informations pratiques

C

14

EN

Using the appliance

B

The valve knobs on the cooktop have 3 positions: Off (0), Max (large flame symbol), and Min 

(small flame symbol). After having ignited the burner and set it to the ‘Max’ position, as explained 

above, you have the option to adjust the flame height between the ‘Max’ and ‘Min’ positions. 

Avoid setting the knob to between the ‘Max’ and ‘Off’ positions.

Chapeau

Couronne

Bougie 

d’allumage

Brûleur 

inférieur

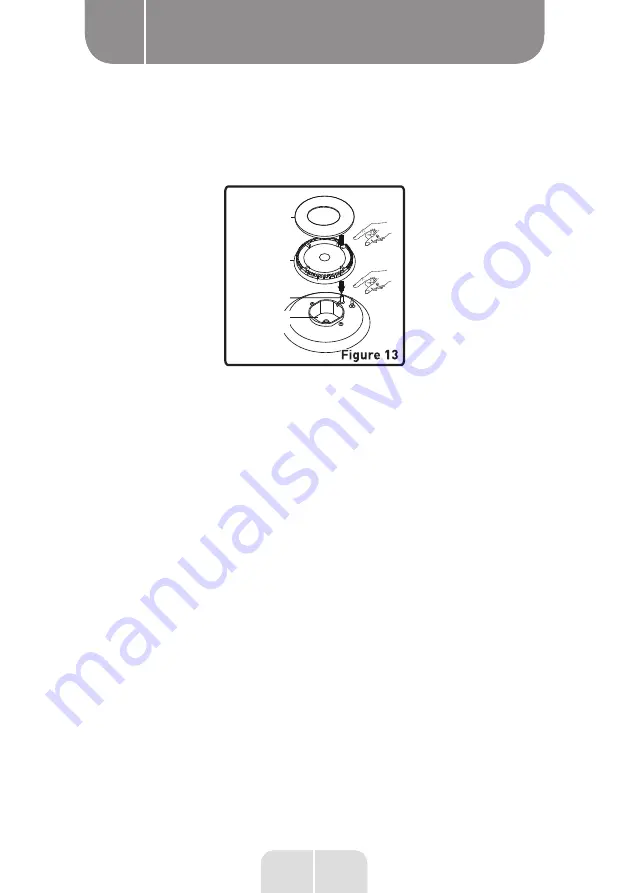
After ignition, visually check the flames. If you can see a yellow tip or suspended or unstable 

flames, turn off the gas supply and check that the burner caps and crowns are correctly positioned 

(Fig. 13). Caution, these elements are extremely hot; wait for them to cool to avoid burns. Make 

sure that no liquid runs into the burners. If the flames accidentally flare outside of the burner, 

close the valves, air the kitchen with fresh air, and wait at least 90 seconds before igniting the 

burner again.

To stop cooking, turn the burner knob clockwise until the mark on the knob is opposite the ‘0’ 

point (the mark on the knob must be up).

Your cooker is fitted with burners with different diameters. In order to make sure the burners 

are functioning efficiently, take note of the size of the pots/pans placed on the burners, and use 

perfectly level pans. Don't use pans with a concave or convex base, in order to avoid energy loss. 

Make sure the size of the pots/pans corresponds to the flame. If you’re using pots/pans which 

are smaller than those specified below, this may cause energy loss. To use gas as economically 

as possible, set the flame to the minimum position once boiling point has been reached. We 

advise that you always cover your cooking pot/pan.

Rapid burner: 22-26 cm

Semi-rapid burner: 14-22 cm 

Auxiliary burner: 12-18 cm

Burner cap

Ring

Spark plug

Lower burner

Summary of Contents for MC 60 31MC S 701T

Page 1: ...ar of the product upon presentation of the sales receipt FR CONDITION DE GARANTIE Ce produit est garanti pour une p riode de 2 ans partir de la date d achat contre toute d faillance r sultant d un vic...

Page 2: ...Informations pratiques C 964428 MC6031MCS701T 06 2023 V6 USER GUIDE 02 GUIDE D UTILISATION 32 Dual fuel cooker Cuisini re mixte 2 2...

Page 3: ...d t e s t e d a n d re c o m m e n d e d b y E L E CT R O DEPOT VALBERG brand products guarantee simple use reliable performance and impeccable quality You can be sure of complete satisfaction wheneve...

Page 4: ...l information BUsing the appliance Installation Gas connection Electrical connections and safety Gas change Using the cooker Using the hotplates Using the oven Oven functions Oven accessories Cleaning...

Page 5: ...2 Hob 3 Control panel 4 Oven door handle 5 Under oven or drawer front 6 Oven door 7 Drip tray 8 Oven rack 9 Grill 10 Oven light 11 Semi fast cooking 12 Rapid burner 13 Auxiliary burner 14 Pot pan sup...

Page 6: ...the technician installing the cooker Installation environment for your cooker Your cooker should be installed and used in a place with effective ventilation at all times The oxygen in the air means t...

Page 7: ...on the condition that this place is well ventilated and is not a bedroom or a hazardous space Flue gas extraction It is advised to install either an extractor hood connected to a duct that leads dire...

Page 8: ...ck of the cooker and the wall and between the sides of the cooker and adjacent units Ensure that the cooker is not placed near a refrigerator and that there are no flammable materials in the vicinity...

Page 9: ...er to take these measurements and apply adjustments Butane G30 propane G31 gas connection The technician must first check the gas setting of your cooker If it has a natural gas supply they will need t...

Page 10: ...o respect when connecting the gas supply hose No part of the hose should come into contact with a surface reaching temperatures above 90 C There must be a distance of at least 20 mm between the hose a...

Page 11: ...contact the after sales service The power cable should only be replaced by the after sales service The power socket must be located close to the cooker Do not use an extension cord Ensure that the po...

Page 12: ...llowing steps must be taken Procedure for changing injectors Hob burners Shut off the main gas supply and unplug the electrical socket Remove the burner cap and the upper burner figure 9 Unscrew the i...

Page 13: ...the bypass screw by approximately 90 The adjustment is correct when the flame reaches a height of at least 4 mm Make sure that the flame does not go out when adjusting it from the maximum position to...

Page 14: ...l shut off the gas supply from the concerned valve to the burner avoiding any non combusted gas accumulation You must wait at least 90 seconds before turning the gas burner on again after an automatic...

Page 15: ...are outside of the burner close the valves air the kitchen with fresh air and wait at least 90 seconds before igniting the burner again To stop cooking turn the burner knob clockwise until the mark on...

Page 16: ...the pan is dry before positioning it over the burners Parts exposed to the flame can reach extremely hot temperatures during use This is why you must keep children and animals out of reach of the bur...

Page 17: ...f these positions the hotplate starts to operate Under each button you will see a small diagram that indicates the corresponding hotplate An indicator light on the control panel shows whether one of t...

Page 18: ...sks overheating the control knobs Figure 16 CORRECT INCORRECT INCORRECT Fond de casserole incurv INCORRECT Petit diam tre de casserole Le fond de la casserole est mal plac Never use the hob without po...

Page 19: ...the temperature to switch on the oven 50 100 150 200 250 Max Oven thermostat knob This knob is used to select the temperature after selecting an oven function When you select a temperature the oven l...

Page 20: ...on The static cooking function emits heat which ensures that the food is cooked evenly on the lower and upper levels This function is ideal for baking doughs cakes baked pasta dishes lasagne and pizz...

Page 21: ...icator lights come on and the fan and the upper and lower heating elements switch on This function is used to grill food fast and to cover a larger area for example to grill meat use the upper shelves...

Page 22: ...r area The upper heating element and the grill are stimulated with the fan to ensure even cooking Use the upper levels of the oven Brush the metal oven rack lightly with oil to prevent the food from s...

Page 23: ...If you want to use the large oven rack insert a tray in one of the lower positions to catch the oil Also pour water into this tray for easy cleaning and to avoid fumes As mentioned in the previous se...

Page 24: ...23 FR Informations pratiques C 23 EN Using the appliance B WARNING Ensure that the rack is placed correctly on a rail in the oven and push it all the way in...

Page 25: ...easier to clean when the oven is still a little warm After each use wipe the oven with a soft cloth previously soaked in soapy water Then wipe it once more with a damp cloth and dry it It is sometime...

Page 26: ...a soft cloth Ensure not to leave them wet After cleaning ensure that all pieces have been put back in place correctly Avoid cleaning any part of the cooktop with a metal sponge This may scratch the su...

Page 27: ...oker is cold Open the oven door remove the glass cover of the lamp and then the bulb Install the new 300 C resistant bulb oven specific 230 V 25 Watts maximum type G9 in place of the old one Place the...

Page 28: ...eatballs Watery foods 175 200 3 40 50 Chicken Chop Steak Cake baked with two trays 160 180 2 5 30 40 Dough baked with two trays 170 190 2 5 35 45 Use the spit RECIPES Operation LOWER UPPER Thermostat...

Page 29: ...2 3 4 25 35 Grilled meatballs Watery foods 175 200 3 40 50 Chicken 200 2 3 45 60 Chop Steak Cake baked with two trays Dough baked with two trays RECIPES FUNCTIONS GRILL Thermostat position C Oven rac...

Page 30: ...atural gas with a hose with a mechanical tip To connect your cooker with a hose with a mechanical tip do not remove the fitting or seal already installed on the gas supply Ensure that the hose you are...

Page 31: ...tip OR if you wish to change the supply mode and connect your cooker to natural gas with a connecting hose with a mechanical tip use the fitting supplied with the spare parts Ensure the hose you use...

Page 32: ...31 FR Informations pratiques C 31 EN Note...

Page 33: ...ue chaque utilisation vous apportera satisfaction Bienvenue chez ELECTRO DEPOT Consultez notre site Internet www electrodepot fr www electrodepot be Parce que votre satisfaction est notre priorit nous...

Page 34: ...w electrodepot fr sav notices http www electrodepot be fr sav notices Installation Raccordement au gaz Branchements lectriques et s curit Changement de gaz Utilisation de la cuisini re Utilisation des...

Page 35: ...Bandeau de commande 4 Poign e de la porte du four 5 Fa ade sous four ou tiroir 6 Porte du four 7 L chefrite 8 Grille 9 Gril 10 Lampe du four 11 Br leur semi rapide 12 Br leur rapide 13 Br leur auxilia...

Page 36: ...t ventilation forc e kWh cycle Nombre de cavit s 1 Source de chaleur LECTRIQUE Volume L 65 Ce four est conforme la norme EN 60350 1 Conseils en mati re d conomie d nergie Four Cuisinez les repas simul...

Page 37: ...nd nergieenWh kgdelazonedecuisson lectrique 193 Puissance assign e en W de la zone de cuisson lectrique 1000 Nombre de br leurs gaz 3 Br leur Auxiliaire Efficacit nerg tique N A Puissance quivalenteen...

Page 38: ...ominale kW 1 75 1 75 D bit nominal 166 7 l h 127 2 g h Br leur auxiliaire Rep re d injecteur 1 100 mm 72 50 Puissance nominale kW 1 1 D bit nominal 95 2 l h 72 7 g h PAYS DE DESTINATION PRESSION mbar...

Page 39: ...e lues par le technicien charg d installer la cuisini re Environnement d installation de votre cuisini re Votre cuisini re doit tre install e et utilis e dans un endroit disposant d une ventilation ef...

Page 40: ...l air n cessaire peut galement provenir d un autre endroit condition que cet endroit soit correctement ventil et qu il ne s agisse ni d une chambre coucher ni d un endroit dangereux vacuation des gaz...

Page 41: ...le mur et entre les cot s de la cuisini re et les meubles adjacents Veillez ne pas placer la cuisini re pr s d un r frig rateur et ce qu il n y ait pas de mati res inflammables proximit comme des ride...

Page 42: ...ous vous recommandons de contacter le service apr s vente afin d effectuer ces mesures et r glages Branchement au gaz butane G30 propane G31 Le technicien doit tout d abord v rifier le r glage gaz de...

Page 43: ...ne doit entrer en contact avec une surface dont la chaleur est sup rieure 90 C La distance minimale entre le tuyau et les parties chaudes doit tre de 20 mm La longueur du tuyau ne doit pas exc der 1...

Page 44: ...tactez le service apr s vente Le remplacement du c ble d alimentation doit tre effectu uniquement par le service apr s vente La prise d alimentation doit tre situ e proximit de la cuisini re N utilise...

Page 45: ...Les tapes ci apr s doivent tre imp rativement effectu es Proc dure changement des injecteurs Br leurs du plan de cuisson Coupez l alimentation de gaz principale et d branchez la prise lectrique Retire...

Page 46: ...esserrez la vis de d rivation de 90 environ Lorsque la flamme atteint une hauteur d au moins 4 mm le r glage est correct V rifiez que la flamme ne s teint pas en passant de la position maximale la pos...

Page 47: ...concern vers le br leur et vite toute accumulation de gaz non br l Attendez obligatoirement 90 secondes minimum avant de rallumer un br leur gaz teint suite une coupure automatique Allumage lectrique...

Page 48: ...r fermez les robinets a rez la cuisine avec de l air frais et attendez minimum 90 secondes avant de rallumer le br leur Pour arr ter la cuisson tournez la manette du br leur dans le sens horaire jusqu...

Page 49: ...lacer sur les br leurs La temp rature des parties expos es la flamme peut tre tr s lev e lors de l utilisation C est pourquoi il est imp ratif de tenir les enfants et les animaux hors de port e des br...

Page 50: ...nte se met fonctionner Sous chaque bouton vous verrez un petit diagramme qui indique la plaque chauffante correspondante Un voyant lumineux situ sur le panneau de contr le indique si l une des plaques...

Page 51: ...es de commande Figure 16 CORRECT INCORRECT INCORRECT Fond de casserole incurv INCORRECT Petit diam tre de casserole Le fond de la casserole est mal plac Ne jamais utiliser la table de cuisson sans r c...

Page 52: ...re pour mettre en marche le four 50 100 150 200 250 Max Manette du thermostat du four Cette manette sert choisir la temp rature apr s avoir s lectionn une fonction du four Lorsque vous s lectionnez un...

Page 53: ...chaleur ce qui assure une cuisson uniforme des aliments aux niveaux inf rieur et sup rieur Cette fonction est id ale pour la cuisson de p tes de g teaux de plats de p tes au four de lasagnes et de pi...

Page 54: ...f rieur et sup rieur fonctionnent Cette fonction est utilis e pour griller des aliments rapidement et pour couvrir une plus grande surface pour faire griller de la viande par exemple utilisez les tag...

Page 55: ...ce L l ment chauffant sup rieur et le gril sont stimul s avec le ventilateur pour assurer une cuisson uniforme Utilisez les tag res sup rieures du four Badigeonnez l g rement la grille m tallique avec...

Page 56: ...s voulez utiliser la grande grille ins rez un plateau sur une des positions inf rieures afin de recueillir l huile Versez galement de l eau dans ce plateau pour un nettoyage facile et viter les fum es...

Page 57: ...FR Informations pratiques C 56 FR Utilisation de l appareil B AVERTISSEMENT Veillez placer correctement la grille dans l une des glissi res du four et l enfoncer compl tement...

Page 58: ...aud Apr s chaque utilisation essuyez le four avec un chiffon doux au pr alable tremp dans de l eau savonneuse Essuyez le ensuite une fois de plus avec un chiffon humide puis s chez le Il est parfois n...

Page 59: ...hiffon doux Veillez ne pas les laisser mouill s Apr s le nettoyage assurez vous d avoir remis correctement les pi ces en place Evitez de nettoyer une partie de la table de cuisson avec une ponge m tal...

Page 60: ...irez le couvercle en verre de la lampe et ensuite l ampoule Placez la nouvelle ampoule r sistante 300 C sp cifique four 230 V 25 Watts maximum type G9 la place de l ancienne Remettez le couvercle en v...

Page 61: ...50 Poulet C telette Bifteck G teau cuit avec deux plaques 160 180 2 5 30 40 P te cuite avec deux plaques 170 190 2 5 35 45 Utiliser le tournebroche RECETTES FONCTIONS INF RIEUR SUP RIEUR Position du...

Page 62: ...es Aliments aqueux 175 200 3 40 50 Poulet 200 2 3 45 60 C telette Bifteck G teau cuit avec deux plaques P te cuite avec deux plaques RECETTES FONCTIONS GRIL Position du thermostat C Position de la gri...

Page 63: ...un tuyau TFEM Pour raccorder votre cuisini re avec un tuyau TFEM ne d montez pas le raccord ni le joint d j install s sur l arriv e de gaz Assurez vous que le tuyau que vous utilisez est conforme la n...

Page 64: ...imentation et brancher votre cuisini re au gaz naturel avec un tuyau de raccordement TFEM Utilisez le raccord fourni avec les pi ces de rechange Assurez vous que le tuyau que vous utilisez est conform...

Reviews: