background image

Installation instructions

Heat pump dryer
One-family household

1068340-R02

22/05/2019

1068340-R02

3

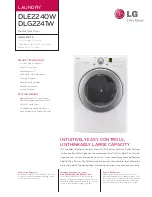
2. Positioning the installation plate

General tips

Use the installation plate supplied to install the appliance. It fixes the appliance in position, and is for use with both
free-standing appliances and appliances positioned in a niche.

In case of underfloor heating, do not drill holes in the floor! Adhere installation plate into place!

1

E

D

45

Fold out spacers 

D

 in order to keep dis-

tance to the back wall.

1

2

2

ø6

Variant 1:

 Without underfloor heating:

Fasten installation plate to the floor with
3 screws.

Dampen mounting slots 

E

 with water to

make the appliance easier to push in.

Variant 2: 

With underfloor heating:

Holes must not be drilled in the floor if
the room has 

underfloor heating

. The

installation plate must be adhered to the
floor.

Dampen mounting slots 

E

 with water to

make the appliance easier to push in.

When installing the washer-dryer tower, do not drill any holes in the washing machine! Adhere installation plate into
place!

If a 

tumble dryer

 has to be installed 

on

top of a washing machine

, no holes

must be drilled in the washing machine.
The installation plate must be adhered to
the floor.

Summary of Contents for AT6TWHWR

Page 1: ...drum and in the appliance packaging Designation Article no Number See installation step Installation plate incl double sided adhesive tape W40653 1 2 Positioning the installation plate Tower panel W5...

Page 2: ...ng walls of their installation location 1160 1200 180 180 1200 1160 595 70 15 600 500 50 57 5 3 6 1 5 126 444 280 850 2 4 550 458 71 Left hand opening Right hand opening 1 Cooling air inlet 2 Cooling...

Page 3: ...ll 3 1 2 2 6 Variant 1 Without underfloor heating Fasten installation plate to the floor with 3 screws Dampen mounting slots E with water to make the appliance easier to push in Variant 2 With underfl...

Page 4: ...K 2 3 Turn over the installation plate Push to the front edge of the washing machine cover plate see arrow and adhere into place Take the tower panel out of its fixture on the back of the tumble dryer...

Page 5: ...605 860 1710 45 Centre the installation plate in the niche Distance to the back wall 45 mm Cut out for lateral connections left or right 100 100 mm Niche height for tumble dryer 860mm Niche height fo...

Page 6: ...pliance 3 Inserting the ventilation grille 1 400 cm 1710 50 400 cm 860 The heat given off from the rear of the appliance must be conducted out of the niche Insert 2 ventilation grilles P33002 or a ven...

Page 7: ...arth conductors ensure safe and fault free operation After installation live parts and cables with basic insulation must not be accessible Check old installa tions The appliance is designed for use up...

Page 8: ...le dryer and the level of the water in the drain trap Position the drain hose from the tumble dryer above the overflow line U Do not exceed the maximum pumping height Max pumping height 1200 mm Max pu...

Page 9: ...he function test can be started imme diately after installation It cannot be aborted by interrupting the power supply Once the function test has been run or aborted it can no longer be selected and th...

Reviews: