30
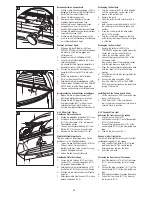
Besonnungslampe auswechseln
1.
Drehen Sie die Besonnungslampe (45/1) in
beliebiger Richtung, bis die Kontaktstifte in
der Nut der Fassung sichtbar sind.
2.
Ziehen Sie die Lampe heraus.
3.
Reinigen Sie den Reflektor mit einem
sauberen, alkoholgetränkten Tuch.
4.
Halten Sie die neue Besonnungslampe
waagerecht und zwar so, dass die
Kontaktstifte senkrecht übereinander liegen.
5.
Drücken Sie die Besonnungslampe in dieser
Lage in die Fassung (45/3).
6.
Drehen Sie die Besonnungslampe um 90
Grad, so dass die Einkerbung im Metallring
am Lampenende oben liegt.
Wechsel des Power Spots
1.
Entfernen Sie den Reflektor (45/7) des
POWER SPOTS durch leichten Druck gegen
die Fassung und Drehung gegen den
Uhrzeigersinn.
2.
Entrieglen Sie die 2 Haltefedern (45/4).
3.
Lösen Sie die Steckverbindung (45/3) des
Verbindungskabels.
Sie können jetzt die Fassung komplett mit
Hochdruckstrahler (45/2) entnehmen
4.
Drücken Sie den neuen Hochdruckstrahler
komplett mit Fassung (45/2) in die Halte-
federn.
5.
Achten Sie darauf dass die Tellerfeder
(45/6) auf dem Sockel liegt.
6.
Verbinden Sie die Steckverbindung (45/5).
7.
Setzen Sie den Reflektor (45/7) des POWER
SPOTS durch leichten Druck gegen die
Fassung und Drehung im Uhrzeigersinn ein.
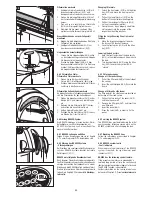
Acrylglasscheibe Seitenbräuner hochklappen
1.
Kippen Sie die Acrylglasscheibe(46/1)
Richtung Seitenbräuner, bis sie anliegt.
2.
Drehen Sie die 4 Riegel (46/3) der
Acrylglasscheibe (46/1) mit dem Innen-
sechskantschlüssel (46/2) zurück, so
dass die Acrylglasscheibe fest verankert ist.
6.3.2 Effekt Licht Fluter
Fronthaube Fluter abnehmen
1.
Drehen Sie die beiden Schrauben (47/2) aus.
2.
Schieben Sie die Fronthaube aus den
(47/1) Aussparungen (47/6) der grossen
Abdeckhaube heraus.
3.
Lösen Sie die Steckverbindung (47/7) der
Platine (47/8) für das uwe Leucht-Logo.
4.
Nehmen Sie die Fronthaube (47/1) ab.
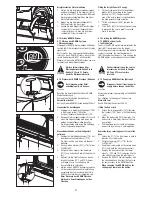
Effektlicht-Strahler wechseln
Über den vorderen Längsträgern des Fluters
befinden sich je 5 Effektlichtstrahler.
1.
Fassen Sie den Effektlichtstrahler (47/5) am
Ende an, ziehen Sie den Strahler
gleichmässig nach vorne aus der Fassung
und den Haltefedern heraus.
2.
Setzen Sie den neuen Strahler ein.
Fronthaube Fluter befestigen
1.
Führen Sie die Laschen (47/3) der Front-
haube (47/1) in die Aussparungen (47/5)
der grossen Abdeckhaube ein.
2.
Verbinden Sie die Steckverbindung (47/7)
der Platine (47/9) für das uwe Leuchtlogo.
4.
Drücken Sie die Fronthaube zur Griffleiste
herunter.
3.
Befestigen Sie die Fronthaube (47/1) mit den
beiden Schrauben (47/2).
Exchanging the Sunlamp
1.
Turn the sunlamp (45/1) in either direction
until the contact pins can be seen in the
groove of the lamp holder.
2.
Remove the lamp.
3.
Clean the reflector with a cloth soaked in
alcohol.
4.
Hold the new sunlamp horizontally so that
the contact pins are vertically above one
another.
5.
Press the sunlamp into the lamp holder
(45/3) in this position.
6.
Turn the sunlamp 90 degrees so that the
notch in the metal ring at the end of the lamp
is at the top.
Exchanging the Power Spot
1.
Remove the reflector (45/7) of the
POWERSPOT by pressing slightly against the
socket and turning it anti-clock-wise.
2.
Unlock the 2 holding springs (45/4).
3.
Loosen the plug connection (45/3) of the
connecting cable.
Now you can take off the complete socket
with the high pressure bulbs (45/2).
4.
Press the new complete high pressure bulb
with the socket (45/2) into the holding
springs.
5.
Pay attention that the disc spring (45/6) lies
on the base.
6.
Connect the plug connection (45/5).
7.
Insert the reflector (45/7) of the POWER
SPOT by pressing slightly on the socket and
turning it clock-wise.
Installing the Side Tanner Acrylic Panel
1.
Lift the acrylic panel (46/1) towards the side
tanner until it touches.
2.
The 4 bolts (46/3) of the acrylic panel
(46/1) snap in place and the acrylic panel is
secured firmly in position.
6.3.2 Canopy Effect Light
Removing the front cover of the canopy
1.
Loosen the two bolts (47/2).
2.
Pull the front cover (47/1) out of the sparings
(47/6) of the big cover.
3.
Loosen the plug connection (47/7) of the
control board (47/8) for the illuminated uwe
logo.
4.
Take off the front cover (47/1).
Change of effect light bulbs
There are 5 effect light bulbs each over the front
longitudinal supports of the canopy.
1.
Hold the effect light bulb (47/5) at its end,
pull the bulb out off the socket and the
holding springs towards the front.
2.
Insert the new bulb.
Fastening the front cover of the canopy
1.
Insert the brackets (47/3) of the front cover
(47/1) into the sparings (47/5) of the big
cover.
2.
Connect the plug connection (47/7) of the
control board (47/9) for the illuminated uwe
logo.
4.
Pull the front cover down towards the handle.
3.
Fasten the front cover (47/1) by means of
the two bolts (47/2).
45
46
1
3
2
5
6
7
4
1
2
3
47
3
1
2
4
5
6
7
8
9

