


13
3
2
1
1
2
3
1
2
3
4
5
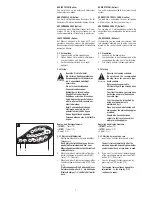
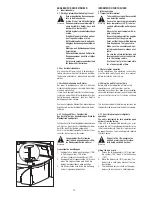
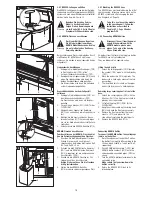
Grosse Abdeckhaube vor dem Fußgestell
entfernen
1.
Entriegeln Sie die Abdeckhaube (11/2) mit
dem Innensechskantschlüssel (11/1).
Die Frontschürze wird durch ein Fangseil
gehalten.
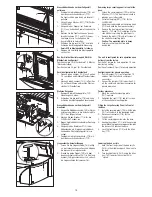
2.
Lösen Sie den Stecker (X21) (11/4) für das
FLOORLIGHT.
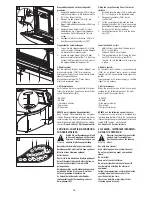
3.
Hängen Sie das Fangseil am Karabiner
(11/3) aus und halten Sie die Frontschürze
fest.
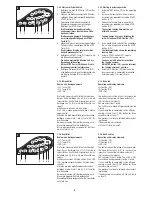
4.
Nehmen Sie die Frontschürze aus den un-
teren Aufnahmen (12/1 und 12/2) heraus
und legen Sie sie zur Seite ohne die
Kunststoffteile zu zerkratzen.
5.
Entfernen Sie die rechte (11/5) und linke
Schraube der Montageplatte Steuerung.
Vorsicht: Die Montageplatte ist schwer.
6.
Klappen Sie vorsichtig die Montageplatte
nach unten.
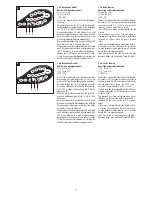
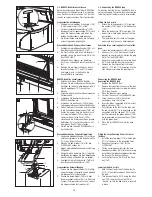
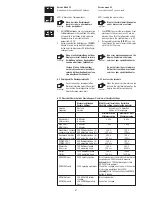
Das Gerät ist bei Auslieferung ab Werk für
Münzbetrieb konfiguriert.
Position Jumper für Münzbetrieb 1,2 Münzer
(Werkseinstellung).
Position Jumper 2,3 prvt. für Privatbetrieb
Gerät konfigurieren für Privatbetrieb
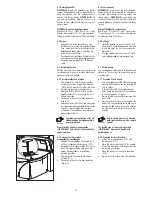
1.
Ziehen Sie den Jumper (13/3) aus Position
1,2 vom linken und mittleren Pfostenstecker
ab.
2.
Stecken Sie den Jumper (13/3) in Position
2,3 auf den mittleren und rechten Pfosten-
stecker für Privatbetrieb.
Weiteres Vorgehen
1.
Bewegen Sie die Montageplatte (13/1)
Steuerung nach oben.
2.
Schrauben Sie die rechte (11/5) und linke
Schraube der Montageplatte Steuerung ein.
Grosse Abdeckhaube vor dem Fußgestell
montieren
1.
Hängen Sie die Abdeckhaube (12/3) mit ihren
unteren Langlöchern in die Aufnahmestifte
(12/1) des Fußgestells ein.
2.
Stecken Sie den Stecker (11/4) für das
FLOORLIGHT wieder ein.
3.
Kippen Sie die Abdeckhaube etwas Richtung
Fußgestell.
4.
Hängen Sie den Karabiner (11/3) in der
Abdeckhaube ein. Kippen Sie die Abdeck-
haube oben Richtung Fußgestell, bis sie
anliegt.
5.
Verriegeln Sie die Frontschürze (11/2) mit
dem Innensechskantschlüssel (11/1).
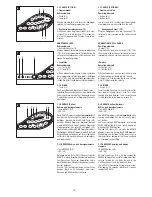
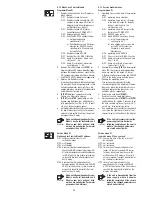
Liegenscheibe herunterklappen
1.
Fassen Sie die Liegenscheibe (14/5) mittig
an der vorderen Längsseite an und klappen
Sie diese auf die Liege herunter.
2.
Drehen Sie beide Riegel (14/2) mit dem
Innensechskantschlüssel (14/1) in Richtung
Symbol (14/4) geschlossen zurück , so dass
die Liegenscheibe fest verankert ist.
Removing large covering panel in front of the
base.
1.
Unlock the covering panel (11/2) with the
Allen key (11/1). The front apron is held in
place by an
arrester cable.
2.
Unfasten the plug (X21) (11/4) for the
FLOORLIGHT.
3.
Hang the arrester cable on the spring hook
(11/3) and hold the front apron securely.
4.
Remove the front apron from the lower
mounts (12/1 and 12/2) and place it to the
side without scratching the plastic parts.
5.
Remove the right (11/5) and left screws of
the controller mounting plate.
Caution: The mounting plate is heavy.
6.
Carefully swing the mounting plate
downward.
The unit is configured for coin operation upon
delivery from the factory.
Position of jumper for coin operation
1,2 coin-
box(factory setting)
Position of jumper 2,3 pvrt. for private operation
Configuring unit for private operation
1.
Pull the jumper (13/3) out of position 1,2
coinbox, from
the left and center post
connectors.
2.
Connect the jumper (13/3) in position 2,3
on the center and right post connectors for
private operation.
Further procedure
1.
Move the controller mounting plate
(13/1) upward.
2.
Retighten the right (11/5) and left screws
of the controller mounting plate.
Fitting the Large Covering Panel in Front of
the Base
1.
Install the covering panel (12/3) with the pins
(12/1) of the base in the elongated holes.
2.
Reconnect connector (11/4) for the
FLOORLIGHT.
3.
Tilt the covering panel towards the base.
4.
Hook both carbines (11/3) into the covering
panel. Move the large covering panel towards
the base until it touches the base.
5.
Lock the front apron (11/2) with the Allen
key (11/1).
Lowering the bed acrylic
1.
Hold the front long side of the bed acrylic
(14/5) in the middle and push it down onto
the bed.
2.
Turn back both bolts (14/2) using the Allan
key (14/1) towards the symbol (14/4)
“closed”.
11
12
1
2
4
3
5
13
14